

There have been many updates to alerts in Cradle-8. These include:
- An Alerts sidebar which shows a summary of alerts displayed as dials
- An Alerts tab
- Easier to navigate between the Alerts section of Project Setup to the Alerts Setup dialog for a particular item type
- Sending alerts
- Deletion of alerts
Alerts Sidebar
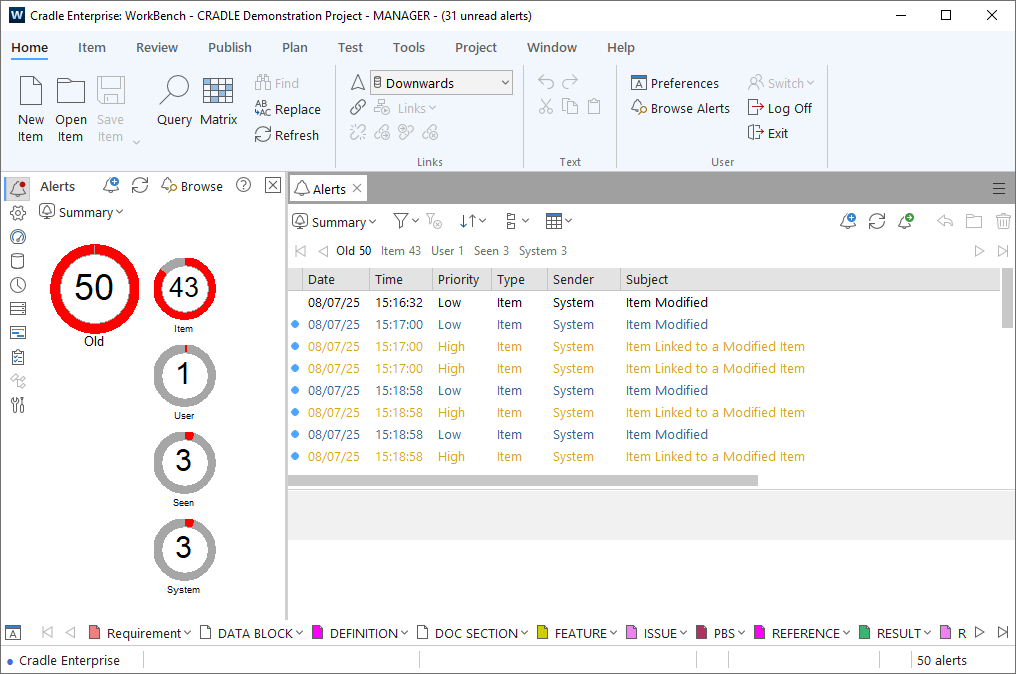
There is a new Alerts sidebar which shows a summary of alerts displayed as dials:
This is accessed by clicking the  button.
The Alerts sidebar shows the totals of the alerts with two levels of sub-totalling:
- The sub-totals of the main sort order are shown as large dials
- The sub-sub-totals of each sub-sort order for each value of the main sort order are shown as small dials
Clicking on a dial opens the Alerts tab filtered to show the alerts that are represented by the dial.
There are 3 different views to display the alerts:
- Summary – Summary of all alerts
- Users – Display of all user alerts
- Items – Display of all item alerts
Please note you can create three user-defined alerts displays in User Preferences. You can also set a default alerts display for both the Alerts sidebar and the Alerts tab in User Preferences.

From the Alerts sidebar you can:
- Create an alert
- Refresh the display of alerts
- Open the Alerts tab
An example of the Alerts sidebar with the Alerts tab open is shown below:
As you can see from the example above there is a red dot on the Alerts sidebar button. This indicates there are unread alerts.
Alerts Tab
From the Alerts sidebar, you can click the  button which opens the Alerts tab. You can also access the Alerts tab by clicking the button on the Home tab.
Alerts Tab Options
At the top of the Alerts tab (above the list of alerts), the following options are available:

 – There are 3 alert displays; Summary, Users and Items. You can also create an additional three user-defined alert displays in User Preferences
 – You can add various filters, e.g. type of alerts, based on item type, date of alert, priority and if the alerts are read/unread. You can choose a filter option from each section in the drop-down. For example you could choose Item, Today, Urgent and Unread. This will display all urgent item alerts from today that have not been read.
 – Clears the selected filter
 – Ability to sort the alerts shown in the display, e.g. by Type, Date, Priority or Status and either Ascending or Descending
 – You can then sub-group the summary value options, e.g. by Type, Date, Priority or Status
 – How to view the alerts as either Summary or Details
 – Produces the New Alert dialog
 – Refreshes the list of alerts
 – Publishes a report showing the alerts. You can also publish an item alert by selecting an item in a query or the Project sidebar, or an item open in a form and clicking Publish Alerts from the Alerts drop-down on the Item tab or right-clicking and choosing Alerts > Publish Alerts. A report showing the alerts for the selected item(s) is published.
 – Produces the New Alert dialog where you can reply to the selected alert
 – Opens the item related to the alert
 – Deletes the selected alert(s)
Above the display of alerts is a summary bar which shows the sub-totals and sub-sub-totals.
Changing Options
If you make any changes to the filter, sort by, sub-group or view options an asterisk (*) will be placed next to the alerts display name. If you make changes to any user-defined display you then have the option to save these changes by clicking on the Alerts display name and choosing Save. You cannot save any changes to the Summary, Users and Items displays.
Marking Alerts as Read/Unread
Highlighting alerts in the list marks them as read. You also have the option to mark an alert as read or unread by selecting Mark As Unread or Mark As Read from the right-click context menu.
Easier to Navigate
It is now much easier to navigate between the Alerts section of Project Setup to the Alerts Setup dialog for a particular item type when setting up your alerts.
From the Items tab in the Alerts section, if you have the Item Type Specific Alerts option ticked you can either select an item type in the list and click Edit… or you can double-click the item type. This displays the Alerts Setup dialog for the selected item type:

There is a Select button which allows you to choose whether you want to select All alerts in the list or None.
You can also click the Reset button to reset all data in both the Item and Categories tabs to the defaults.
Sending Alerts
Item alerts can be sent by selecting the item(s) either in a query, a form or from the Project sidebar and then you can either:
- Click New Item Alert… from the Alerts drop-down on the Item tab
- Right-click and choose Alerts > New Item Alert…
The New Item Alert dialog is displayed:

Note: Alerts can also be sent to a user list.
Deleting Alerts
There are a number of ways to delete alerts:
- Alerts tab – Delete the selected alert(s)
- Project Setup – Delete the current user’s unread and/or read alerts upon logout within a specific time frame


Delete alert options in Project Setup Project tab – Delete alerts for all users or the currently logged in user for a specific time frame


Delete Alerts dialog