Cradle Modules – REQ

Cradle-REQ Module

The Cradle REQ module provides a complete requirements capture and engineering solution with built-in CM. It can manage needs, risks, products, features, tests, validations and any other data. It is easily applied to both agile and phase-based processes.

REQ Requirements Management Module

Requirements management is part of every agile and phase process. Stakeholder needs are captured, analysed and engineered. Changes are tracked in a CM system. All needs will be linked to design, build, test and acceptance information. In agile, this is in every sprint. In phase-based processes, it is less frequent. But the techniques are the same, and the same tool needs apply that only Cradle provides:

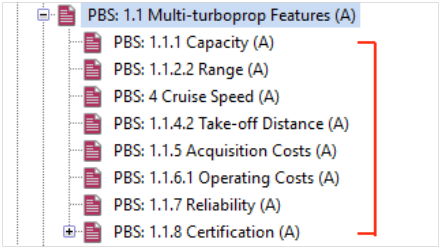
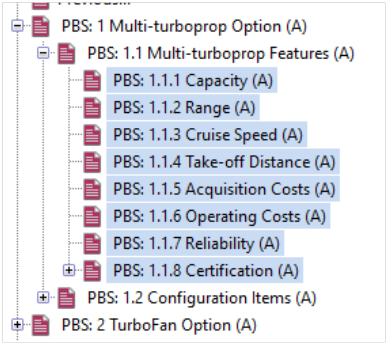
Requirement types can be defined (user, business, system, product, functional or non-functional), user stories and use cases. Link to codes, standards, regulations, knowledge or assumptions. You define other item types to be managed, such as functions, issues, tests, risks, SBS, PBS, WBS or defects. Attributes in these items are controlled, how they will be linked to each other, and their workflows.

Item Attributes

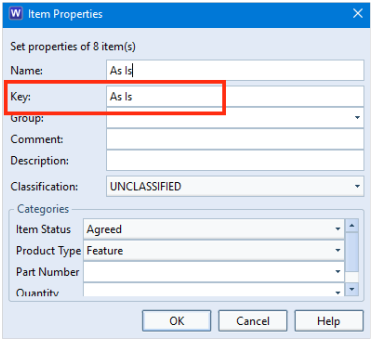
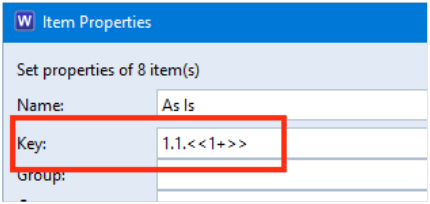
Items have user-definable attributes, each storing or linking to up to 1 TByte of data. Attribute types are user-defined, including dates, numbers, plain and rich text, single or multi-value lists, Office and other documents, and calculations.

The text in requirements, tests, verifications and other items can be quality checked against project-specific rules.

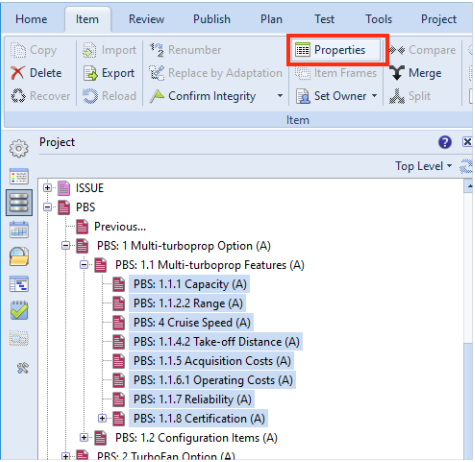
Items can be in hierarchies, groups and many:many relationships. You can create projects using a common library. Product ranges, models, variants and builds are supported. Items can be shared and reused in any of these structures.

Capturing Items

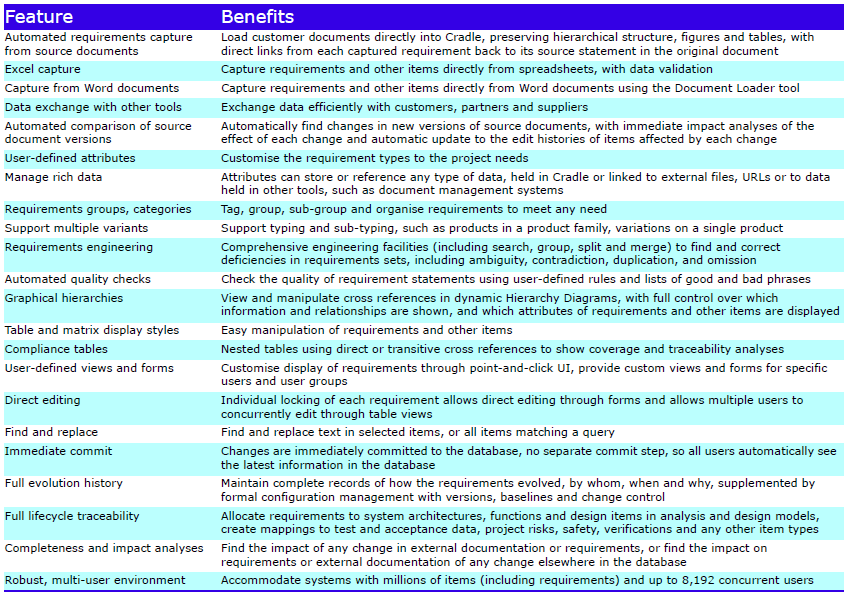
Items can be captured from external documents by Document Loader. It reproduces the document structure in a hierarchy of items. Each item is linked to its origin in the document. Figures are loaded automatically. Tables can be captured into items, images, Word objects or rich text.

Document Loader finds differences in new versions of documents. Loading the new version will update items and their links. Coverage analysis between documents and database items are provided.

Full version management of source documents is provided. Regression to previous versions is supported, with reversal of all changes.

Requirements and other items can be loaded from Word, Excel or other tools using plug-ins, data exchange or direct interfaces.

Analyses

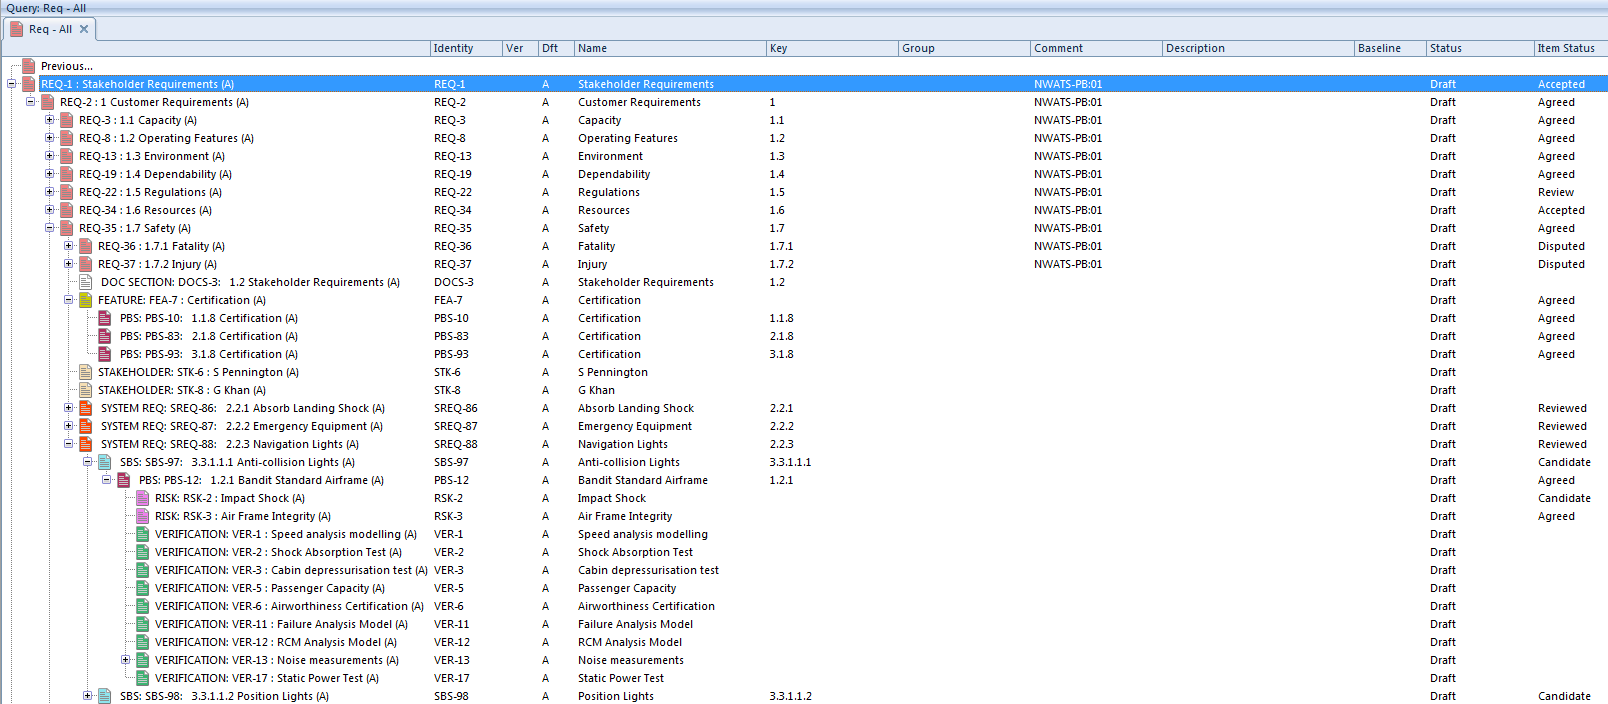
Coverage, traceability and impact analyses are easily run, then viewed as trees, lists, tables, matrices, or in dynamic Hierarchy Diagrams with user-defined attributes. Items can be filtered, sorted, split and merged. All changes to items can be logged. Users can be alerted to changes by Cradle, email or both.

Discussions

Users collaborate by adding discussions to items and adding threads to items and adding threads of comments to these discussions.

Reviews

Once stable, items can be progressed through a series of formal reviews that log comments from all reviewers. You define the workflows. Once in a baseline, items can be subject to formal change control using change request (proposals) and change tasks (actions). You can view the database as it was in any previous baseline.

Multiple generations of requirements can be maintained and compared. Multiple sets of variants can be managed to reflect different products in a common family.

Items can be progressed within their lifecycles. The lifecycle of an item represents the series of stages that it can pass through between being created and reaching a final, rest, condition.

User-defined tree, table and matrix views can be defined from a point-and-click UI to show traceability, coverage and compliance. This includes RTMs, VCRMs and PVMs.

Linking Items

Cradle provides transitive cross referencing, in which it follows chains of multiple links between indirectly linked items, so you can see cross-lifecycle traceability in one step. For example, you can view user requirements to tests, where Cradle transparently follows intermediate links via system requirements, functions, architecture components and so on.

Requirements can be linked to test data, safety and other critical issues, risks or any project data. When used with the Cradle-SYS module, user stories and requirements can be linked to functional, behavioural, UML, analysis, architecture and design models organised into any number of model hierarchies in both analysis and design domains.

Publish Information

All information can be published in user-defined reports and formal documents.

Feature Summary

Feature Summary - REQ
Feature Summary – REQ

Please contact 3SL for further information about adding a Cradle REQ module to your existing system.

Renumbering a Sequence of Incorrect Key Values

Scenario

You have captured a number of items into Cradle. However, the KEY attribute that defines the hierarchy has incorrect values. Do you have to open each item individually to correct this numbering?

For example, the items below should have a sequence of 1.1.1 to 1.1.8:

Numbering of items in a hierarchy
Incorrect hierarchical numbering

Solution

No, you can actually define the key sequence by selecting all of the items to be changed and pressing Properties:

Properties option
Properties option

In the Item Properties dialog, you will see that the Key attribute is listed with the value As Is. This is due to the items having different values:

Item Properties dialog showing Key As Is
Item Properties dialog

In this field you can add the value sequence within chevrons <<#=>>. In this case, you could enter the value 1.1.<<1+>>:

Item Properties dialog showing Key

The result of this operation is shown below in which the Keys are now numbered sequentially as required:

Correct hierarchy numbering

Any changes to the items will be stored in the items’ histories.

Use Hierarchies to Aggregate and Apportion Values

You will often want to organise information in a hierarchy. The hierarchy represents an entire collection of information. You can view the hierarchy at any level that is convenient. In effect, each level summarises the levels below it. Therefore, you may want any numerical information at the bottom of the hierarchy to be totalled at each higher level. So, it is common to use hierarchies to aggregate and apportion values.

Cradle can help you by calculating appropriate values at each level in the hierarchy. In the following System Breakdown Structure (SBS) hierarchy, the total weight of that component and everything within it is shown inside the square brackets:

Use Hierarchies to Aggregate and Apportion Values
SBS Hierarchy With Aggregated Total Weights

Aggregation and Apportionment

Aggregation means to add together. In the example, the components of the transformer are:

  • Transformer, weight 15
  • Transformer mount, weight 5

Therefore, the aggregate weight is 20, which is shown as the weight of the entire transformer.

Apportion means to divide, or split. If a set of pumps is to weigh at most 200kg, and there are 4 pumps, then we can apportion this weight budget equally between the four pumps. So, each pump is to weigh 200kg divided by 4, which is 50kg for each pump.

So we normally aggregate actual values up a hierarchy.

Therefore we normally apportion a budget value down a hierarchy.

Use Hierarchies to Aggregate and Apportion Values

You can aggregate values up a hierarchy by:

  • Create an integer attribute that stores the value for each item
  • Create a calculation that adds the item’s value and the total of the values of all its children
  • Store this calculated value as the total for this item and its children

Another way to say this is:

  • value for an item = user-supplied value
  • total for an item = value for the item + total of the ‘total for an item’ for all children

You can apportion values down a hierarchy in a similar way:

  • Create an integer value that stores the budget value for the item
  • Create a calculation that divides the item’s parent budget value
  • Store the calculated value as the budget for this item

Integer Attributes

You can create integer, or positive integer, attributes in items. An integer attribute can only store an integer value. You can only store integers greater than or equal to zero in a positive integer attribute.

You can create integer attributes as categories and then assign them to your items. For example, you can create an integer attribute Weight by:

Use Hierarchies to Aggregate and Apportion Values
Creating an Integer Attribute
  1. Ensure you are logged-in as a user who has PROJECT privilege so you can change the schema
  2. Select Project Setup from the Project tab
  3. Set Options to Item Definitions and select the Categories tab:
  4. Select New… and enter the name of the new attribute, for example Weight, and set its type to be Integer or Positive Integer:

Assign the new Weight category to an item type by:

Use Hierarchies to Aggregate and Apportion Values
Assign an Integer Attribute to an Item Type
  1. Select the Item Definitions tab
  2. Choose the item type
  3. Select Categories
  4. Select an unused category assignment and select the new Weight category:

Repeat this process to create another positive integer attribute Total Weight and also assign it to the item type. This is the attribute that will receive the result of the aggregation calculation.

The Aggregation Calculation

The last step to use hierarchies to aggregate and apportion values is the aggregation or apportionment calculation.

Still inside the schema and with the same item type selected:

Use Hierarchies to Aggregate and Apportion Values
A New Calculation
  • Select Calculations…
  • Select New and enter the calulation‘s name, such as Weight Calcs
  • To define the expression, we start by choosing the item’s own weight category:
Use Hierarchies to Aggregate and Apportion Values
Add a Category to a Calculation
  • Then click the + button or manually enter + into the calculation to perform an addition
Use Hierarchies to Aggregate and Apportion Values
Add Linked Items Into a Calculation
  • Then choose to total the Total Weight of all child items. We find the child items by finding all items of the same type that are linked to the current item by following all cross references found by the navigation Downwards. When we find these linked items, we get the Total Weight value from them:
  • Select Validate to check the expression that we have created
Use Hierarchies to Aggregate and Apportion Values
Store the Calculation in an Attribute
  • Finally we specify that we want the result of the calculation to be stored in the integer category Total Weight that we calculated. This means that each item’s total weight will be available to its parent item when it get values from its children, see 2 above

Using the Results

We can use hierarchies to aggregate and apportion values and the results can be used either directly from the calculation, or by saving the result of the calculation in an attribute.

You can either display a calculation or the category that stores its result. The values can be shown in views. This is what what we did to produce the SBS display at the start of this blog entry. Here is the view:

Use Hierarchies to Aggregate and Apportion Values
Displaying a Calculation in a View

You can use a calculation, or the category that stores its result:

  • In other calculations, or
  • As part of rule sets, or
  • To calculate part of a metric, or
  • To calculate KPIs (key performance indicators) in dashboards

Numbering Item Hierarchies

Cradle provides a lot of flexibility for numbering item hierarchies. This is helpful if you need many hierarchies of the same type of items.

Hierarchies of Items

Hierarchies are very common in requirements management and systems engineering. Some common examples are:

  • User requirements are typically structured as a hierarchy
  • System requirements are typically a hierarchy
  • A System Breakdown Structure (SBS) will be a hierarchy
  • A Work Breakdown Structure (WBS) will also be a hierarchy

It is also common to have several hierarchies of the same type of information. For example:

  • A hierarchy of subsystem requirements for each of a product’s subsystems
  • An as designed and an as built SBS

It is easy to join many hierarchies into one. You create a new, top-level item and then connect all of the hierarchies to it. This is usually a bad idea.

Why?

Because it helps if the  numbers are different in each hierarchy. If each hierarchy is different to the others, it will be confusing if items in different hierarchies have the same number.

Hierarchical Number is Not the Identity

So what is a hierarchical number?

Every item in the database has an Identity. This is unique for the item type. Once the item has been created, its Identity does not change. Cross references use Identities to connect items to each other.

The hierarchical number of an item is NOT the Identity. Well, Cradle does allow identities to be the hierarchical attribute, but we DO NOT recommend it. We will ignore this from now on!

The hierarchical number describes an item’s position in the hierarchy. A simple hierarchical number is:

4.1.2

This tells us that the item is at the third level in the hierarchy. It is the 2nd item below item 4.1, and is part of the 1st group of items below item 4.

Hierarchical numbers are most common in the numbering of sections and sub-sections in documents.

Hierarchical numbers are not fixed. They can change. You can reorganise a hierarchy, moving an item and its children from one part of the hierarchy to another. Cradle calls this reordering a hierarchy. When you reorder items, their hierarchical numbers will change. Their Identities will not change.

By default, Cradle will store hierarchical numbers in the attribute called Key. You can store it in a category, if you wish.

Hierarchical Numbers

A hierarchical number has two parts:

  • A prefix
  • A hierarchy part, which is zero or more of:
    • A hierarchical separator
    • A number

The hierarchical separator can be:

  • A dot or period (this is the default); .
  • A hyphen: –
  • A slash: /

So these are all hierarchical numbers if the separator is a dot:

  • 1
  • 1.2.3
  • fred
  • fred.3.1

and these are also correct if the separator is a hyphen:

  • sid
  • sid-3
  • sid-3-4

and these are also valid hierarchical numbers if the separator is a slash:

  • bert
  • bert/1
  • bert/1/2

The prefix can be anything that does not contain a hierarchical separator. So if the separator is dot, then the prefix could be:

  • <nothing>
  • fred
  • fred-23/A-2.1
  • sid-2

Numbering Item Hierarchies

It is easy to have many hierarchies of items of the same type.

We recommend that you give each hierarchy a different prefix. For example here are some SBSs for the different subsystems in a product:

Numbering Item Hierarchies
A Collection of SBS Hierarchies

Each hierarchy has a unique prefix, such as:

  • Pwr for the power subsystem
  • Conn for the connectivity subsystem

and so on. This approach will ensure that:

  • Each item in every hierarchy has a unique hierarchical number
  • Each hierarchical number shows which subsystem it belongs to
  • The prefix for each hierarchy can be used in a query to find all items in that hierarchy
  • The hierarchical number shows the position of the item in its hierarchy

The simple recommendations for numbering item hierarchies are:

  • Use descriptive prefix strings in the hierarchical numbers of all items
  • Use a different prefix string for each hierarchy


Controlling Tree Labels

Trees

Trees are a common way to explore the information in a database and controlling tree labels is important as:

• Any query’s results can be shown in Tree style
• Trees are available for each item type from the Project sidebar
• The Phase hierarchy can contain nodes that run queries whose result item are shown as nodes in the phase hierarchy tree

A default tree view can be set for individual items. This view is used to construct the text label whenever a tree node is added for an item of that type. Any frames, linked items, discussions are ignored.

As shown in the screenshot below, “REQ-1” in the DEMO project as the top level item, using the tree view you can see all items which are linked to REQ-1

Screenshot showing the Requirement hierarchy tree from a query in the DEMO project
Requirement hierarchy tree from a query

Cradle has a default for the labels of the nodes in these trees. This default uses an item’s Identity, Name, Key, Version and Draft attributes. This label may not be what you want to see, particularly if:

• Your items are auto-numbered, so the Identity is generated by Cradle and is not important to you,
• If most of this type of item do not have anything in their Name attributes

You can control the contents of labels in tree nodes. To do this:

1. Login to WorkBench as a user who can modify the schema and can create project-wide views
2. Define a new view that lists the attributes that you want to appear in the labels. This view can include any attributes except calculations and frames. Only the first row in the view will be used. Save the view with Project scope, to ensure that everyone can use it.
3. Start Project Setup from the Project tab, set Options to Item Definitions and select the Item Types tab
4. Select the item type whose tree labels are to be set and choose your view from the Tree view: drop-down list
5. Save the schema and close Project Setup

Now when any user sees any items of this type in any tree, the labels for these tree nodes will only contain the information defined by the view.

Setting up tree labels for item types can be a very efficient tool when using Cradle to help your team save time when browsing through the tree nodes for items types, as this will only show the pre determined information the user is looking for.

Article Updated  – 04/02/2019 – Added image and conclusion