Can I keep an item’s change history when exporting?

Can I keep an item’s change history when exporting?

The simple answer is yes!

I certain scenario’s you may need to export items from one Cradle database and import them into another. Depending on your reasons for this, you may want to retain an items change history. However, this is only possible when using the Standard Cradle Export Format and Change History is enabled for your item types.

Enabling Change History

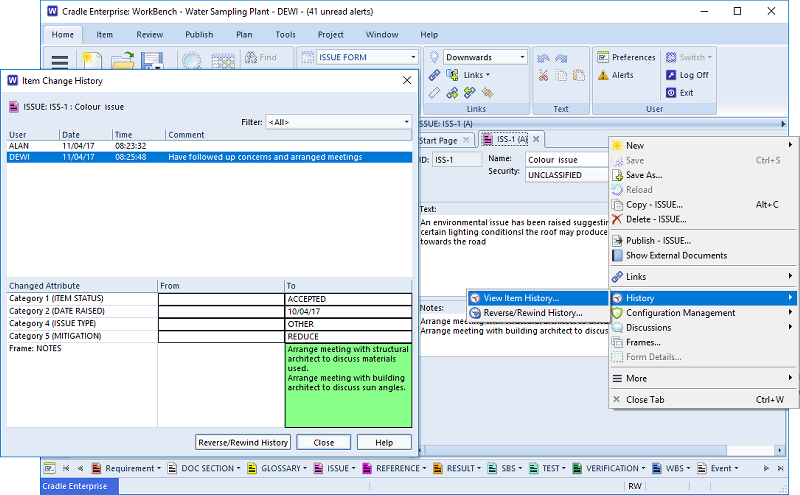
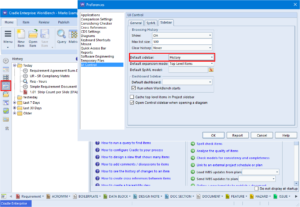
Each item type can have change history enabled in the Project Schema via the Project Setup dialog. You can see how to enable change history in this Cradle help article. Once enabled you should start to receive a change dialog pop-up when making changes to items of that type.

Image showing Change details window
Change details

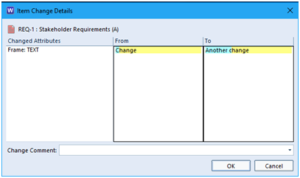
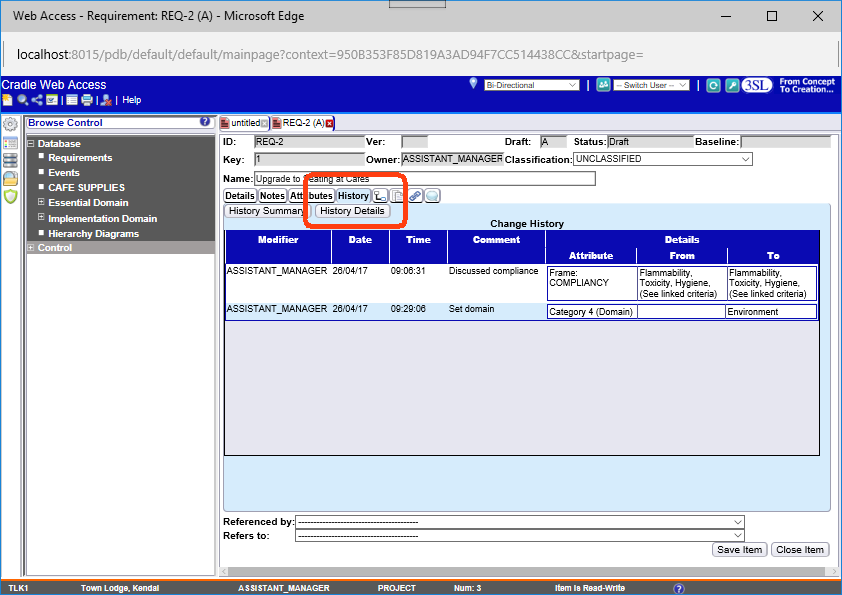
You can choose to enter a change comment, which can include your reasons for making this change. This can prove useful in situations where there are a large number of users in one database enabling full traceability.

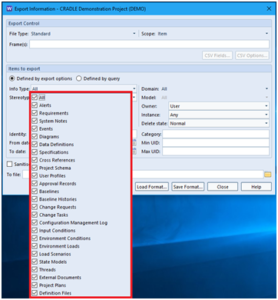
Standard Cradle format

Cradle export format files are unique to Cradle and can store every piece of PDB (Project Database) information which does include an item’s change history. However, the type of information that is stored can be further defined by you in the export interface.

Image showing export dialog
Export dialog


Reverse and Rewind Item Edits

What is Reverse and Rewind?

You can rewind edit histories so you can restore an item back to a state before a particular change or you can reverse a single edit in an item’s change history. This doesnt mean the feature will delete a previous change that has been made but it does mean it will add a further entry returning the the value to a previous state.

Reverse and Rewind edit history dialog
Reverse/Rewind edit histories

Reverse

Reversing an edit is an exact undo operation. It reverses the change to every attribute that was modified by the selected edit. Note that creation/deletions of xrefs cant be reversed.

For further information on reversing an edit please refer to the Reverse

Change History section of our online help.

Rewind

The Rewind operation essentially reverses all edits working backwards from the most recent back to (and including) the selected edit. Its end result is to restore the item to the state that it was in before the selected edit occurred.

For further information on rewinding edit histories please refer to the Rewind Change History section of our online help.

Results

Further Change History will be generated to show what changes were either reversed or rewound. The example below has seven change history entries. For simplicity each only modified one attribute of the item. Selecting the third entry and then either reverse or rewind will produce the two illustrated results.

Showing the different results for reversing or rewinding
Reverse or Rewind

We hope we have covered all the information that is needed to help you on your way to understanding reverse/rewind. Any more help can be found on our help page.

Article Updated 04/02/2019 –  Updated to say data will not be lost just changed to a state they were previously

Item’s Edit History

Who Changed That? When? Why?

When working in large teams or over a long period an item’s edit history is very useful.

Each item type can have history turned on in the Project Schema via the Project Setup dialog. Users can choose what stage to enable history, Never, Always, Changing draft items that have a baselined instance, Named category matches specified value.

Right clicking on the item and selecting the History -> View Item History. The resulting dialog shows who changed the item on what date and what time. It also displays a comment (This can be made mandatory) entered at the time of editing. If an entry is selected in this list, full details are shown in the lower half of the dialog. If there are a large number of changes, the filter at the top of the dialog can aid finding a relevant change.

Dialog showing an item's edit history
Item’s Edit History

Item History in a Web Browser

Web Access allows you to see an item’s history too. This functionality is in our shipped web UIs. It can be added to your own custom UIs, see the ‘history’ template information.

Web Access showing an item's history
Item History in Web Access

History Filter in Views

New Cradle 7.2 Views Feature

If too much information is showing in the history cell of a View, it can now be filtered by the number of entries and/or by a date. This makes it easier to see what’s changed in, say, the last week.

In the “View Details” dialog select the “Item History” cell. Then in the Cell Properties select whether to limit the “Maximum number of changes”, entering a maximum number to show. Then select  “Changes within date range” in order to enter relative or absolute date values for the history filter.

The start options are:

  • Today
  • Start of this week
  • Start of last week
  • Start of this month
  • Start of last month
  • Start of 2 months ago
  • Start of 3 months ago
  • Specify

The end options are:

  • Today
  • End of last week
  • End of last month
  • End of 2 months ago
  • End of 3 months ago
  • Specify

Cradle History

Problem

Back after a coffee break?  You log-in to Cradle and can’t remember which item you were editing?

Solution

Then use the History sidebar, you will see the queries, items, matrices etc. that you have run in the past listed chronologically. You can remove an erroneously opened item from the history by selecting the text, rather than the icon, and right-clicking, you will be given the option to ‘Delete’ the entry.

For further information on retracing your steps.

Re-Tracing Your Steps – the History Sidebar

The History sidebar is a useful productivity aid that is available in WorkBench in all Cradle products. It remembers what you did:

– Today
– Yesterday
– In the past 7 days
– In the past 30 days
– Older than 30 days

so you can quickly and easily repeat these actions by clicking nodes in the history. It remembers:

– Items that you opened in forms, including saved Hierarchy Diagrams (HIDs)
– Queries, reports, graphs, matrices and metrics that you used
– Phase hierarchy nodes that you used, including those that run commands or publish documents

The History sidebar is so useful that you may want it to be the default sidebar when you start WorkBench. If so, select Edit -> Preferences and choose UI Control and select the Sidebar tab. Here you can also:

– Enable or disable histories, or only record a history for the current WorkBench session
– Specify the maximum number of entries in the history list
– Control whether old entries in the history will be automatically purged

Please experiment with the History sidebar and tell us what you think about it as comments in this discussion!

History Sidebar