Summer’s on the way for those in the Northern Hemisphere. The Vernal (Spring) Equinox is marking the first day astronomical spring. Explained further on TimeandDate.com
Why not consider a spring clean, remove all those dusty files full of project requirements version 1 to version 9. Why? Will you really be able to find what you are looking for without a way of searching? Consider whether you can sensibly access the details of those designs sitting rolled up in mailing tubes. Do you have the means to edit them electronically any more. Does anyone know where the file is kept?
NOTE: If you live in the Southern Hemisphere you don’t have to wait until spring you could have an Autumn clean !
Sunrise
Cradle can help save your day!
With all the data for your project in one convenient tool, everything from the requirements through the project plan, the design and the test results conveniently linked together. Isn’t that much nicer than a set of files on shelves?
From under £300 (Current Requirements Management Desktop price March 2024) you could bring order where there was chaos. See the comparison chart for details of which tool suits best and the shop for current price details.
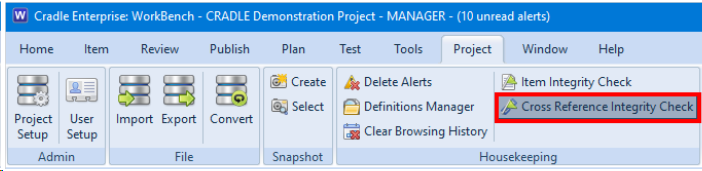
This blog follows on from our previous blog about project integrity checks. Here we discuss a second project integrity tool which concerns the validity of cross references. This can be found in the Project ribbon:
Cross Reference Integrity Check option
As with the Item Integrity Checker, the user MUST have ACCESS_BYPASS privilege to instigate any changes to the data. It is highly recommended that there are no other active users in the database.
In fact, we would recommend locking a project using Project Manager prior to using these utilities if you cannot be certain that other users would not try to log on during the process of running the utilities.
Also, it is highly recommended to back up your database and/or create a snapshot prior to instigating any changes using these utilities.
For details about snapshots, refer to the following help page.
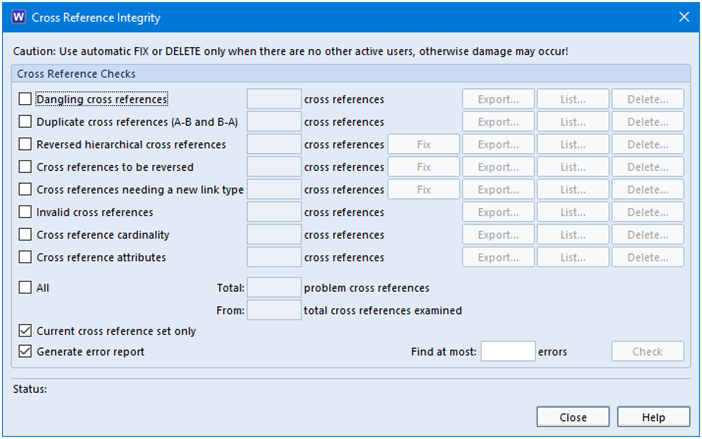
Cross Reference Integrity Checker
The Cross Reference Integrity Checker consists of several checks that compare the links found in the database with the rules specified in Project Setup. Some of the issues found can be repaired with a single click.
There are some checks that would not be required in normal Cradle usage but could appear as a result of an import. An example of this could be due to the fact that Cradle has the ability to import cross references independently of any item types and specify the from item and the to item. These items referred to in the cross references by their identity attribute, might not exist in the database so this is an example of a dangling cross reference.
Cross Reference Integrity Checks
Other checks are:
Duplicate cross references
Reversed hierarchical cross references – where the from item has an identity that suggests it to be the child of the to item. For example, a cross reference that is from item 1.2.3 to item 1.2. The usual action is to fix the cross references which will reverse them.
Cross references to be reversed – where the link rules specified in Project Setup state that the link between the checked items should be in the opposite direction in order to be valid.
Cross references needing a new link type – where it detects cross references that are invalid according to the current link rules but which become valid if their link type is changed
Invalid cross references
Cross reference cardinality – detects cross references whose cardinality does not match the current link rules
Cross reference attributes – checks the cross reference attributes, e.g., if there was information in a cross reference attribute (e.g. Reason) and was removed in a way other than through the UI, this check will flag the cross reference.
Cross Reference Integrity dialog
These checks will provide both a report and a summary in the dialog.
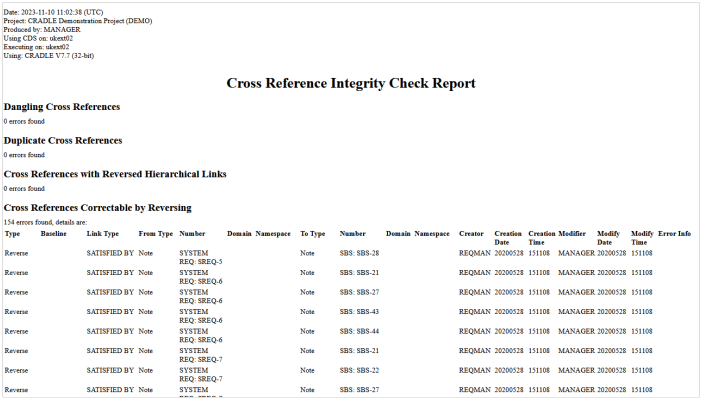
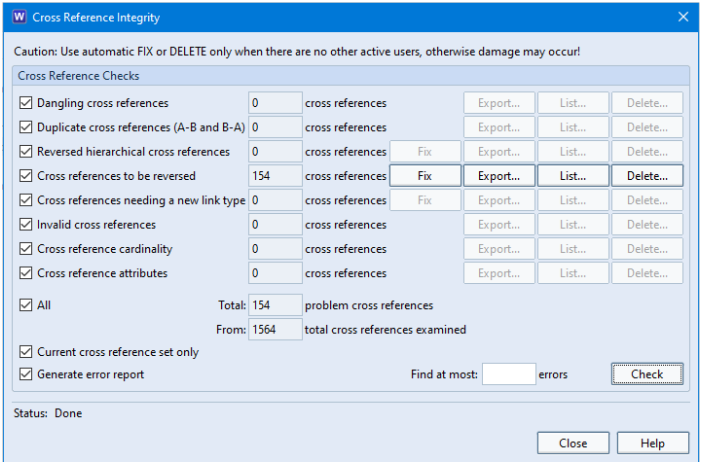
Example Cross Reference Integrity ReportExample Cross Reference Integrity dialog
In this example, 154 of the cross references that exist in the database would be valid if they were reversed. So clicking the Fix button would repair those links with a single click.
Summary
We have addressed some of the checks that can be run on items to confirm the validity of cross references.
Please remember that the user MUSThave ACCESS_BYPASS privilege to instigate any changes to the data. It is highly recommended that there are no other active users in the database.
There are situations, as with any database, where integrity issues may occur with the data not matching what is defined in the schema. This could be due to a number of reasons such as:
Items of data that have not yet been populated
Mandatory categories or frames that have not been populated
With Cradle also providing the facility for data to be imported and captured in a number of different ways, it is inevitable that the integrity of this data may be questionable. Document Loader, capture add-ins and import are some of these mechanisms and, despite some protective settings in these tools, it is still possible to bring in data that does not match the current schema.
In addition to this, it is possible to import a project schema itself or modify the project setup which would impact the data that already exists in the database:
Changing item attributes, categories and frames
Changing link rules
For these reasons, Cradle provides two utilities in WorkBench that check the data in comparison to Project Setup:
Item Integrity Check
Cross Reference Integrity Check
For both of these utilities, the user MUST have ACCESS_BYPASS privilege to instigate any changes to the data. It is highly recommended that there are no other active users in the database when the checkers are ran. One way to ensure this is to lock the project using Project Manager.
We also recommend that you take a backup of your database and/or create a snapshot prior to making any changes with these utilities.
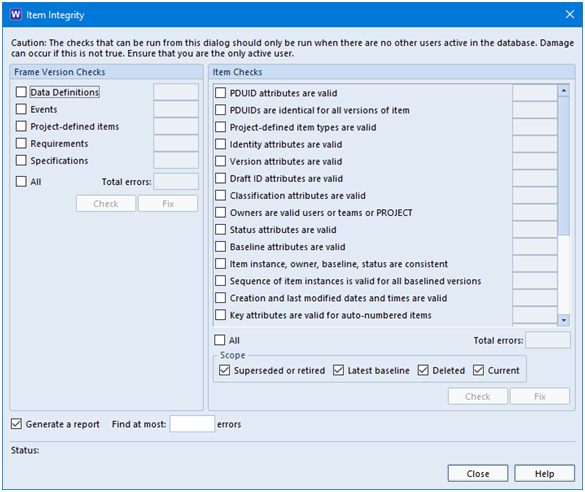
The Item Integrity Checker is split into two parts:
Frame version checks
Item checks
Item Integrity Checker
Frame Version Checks
Cradle item types contain a type of attribute called a frame. Each frame can store or manage up to 1 TByte of any kind of data. An item can contain any number of frame attributes.
In practice, most frames store a small amount of text.
These item types also have a mechanism called edit history that records any changes that are made to an item. Each edit contains:
The date and time the edit occurred
The Cradle username of the person who performed the edit
The reason the edit was performed, this description is optional
A list of all the attributes (predefined, category values and frames) that were changed in the edit and their old and new values
For frames, it records the frame version numbers before and after the edit. All the frames versions are held within the item’s frame.
These frame version checks detect:
Missing version of any frames
Missing records in any version of any frame
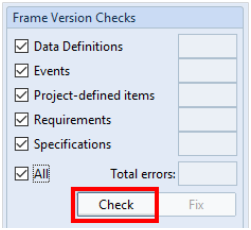
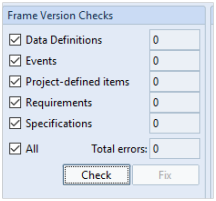
To run this utility, select the item type(s) you want to check or All to check all item types. Then press the left-most Check button.
Frame Version Checks
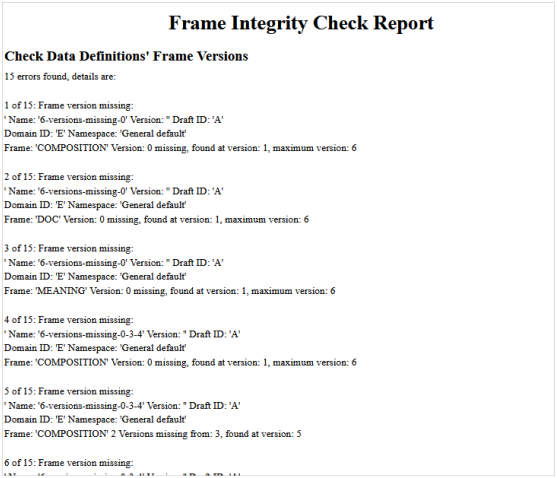
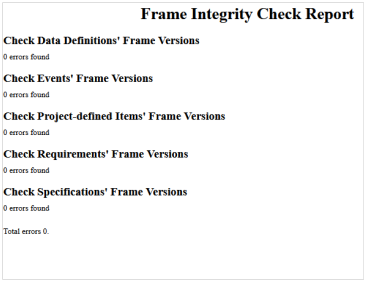
This will check all of the items in each item type selected to ensure each frame has a version of 0 and that all history for that frame, occurs in an accumulative sequence of 0, 1, 2, 3 etc and produce both a report and a summary in the dialog.
Frame Integrity Check report
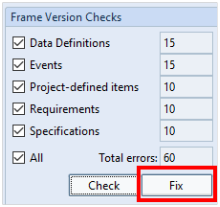
Notice in the dialog, that the Fix button becomes activated.
Fix button in frame version checks
Pressing this button will repair the history records and can be checked by repeating the process:
Recheck frame versionsFrame Integrity Check Report – No issues
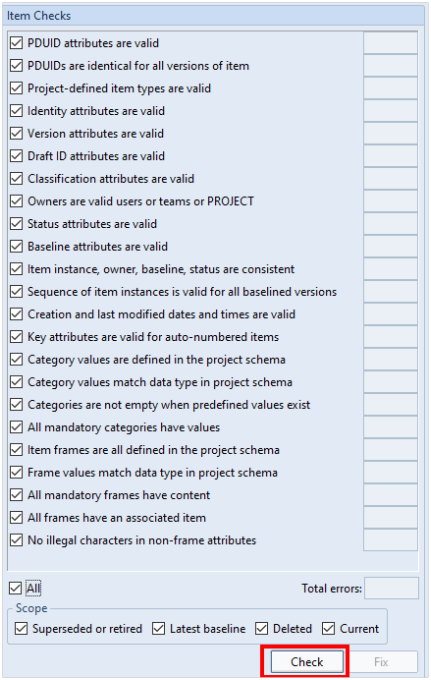
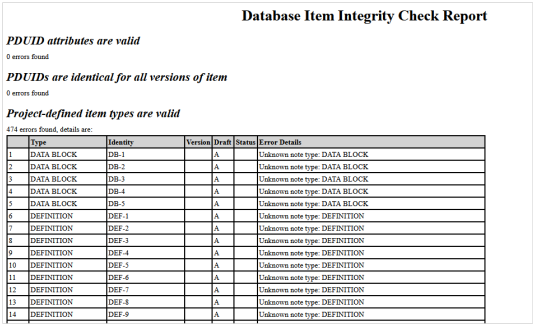
Item Checks
On the right-hand side of the Item Integrity Check dialog, you will see a list of item checks that can be selected, or press All to select and run all checks.
These item checks compare the data that is held in the database with the currently defined settings in Project Setup to ensure they are consistent. If they are not, the utility will list any possible issues.
Item Checks
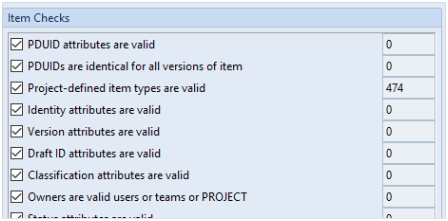
Once you have pressed the Check button, a report is produced and a summary appears in the dialog:
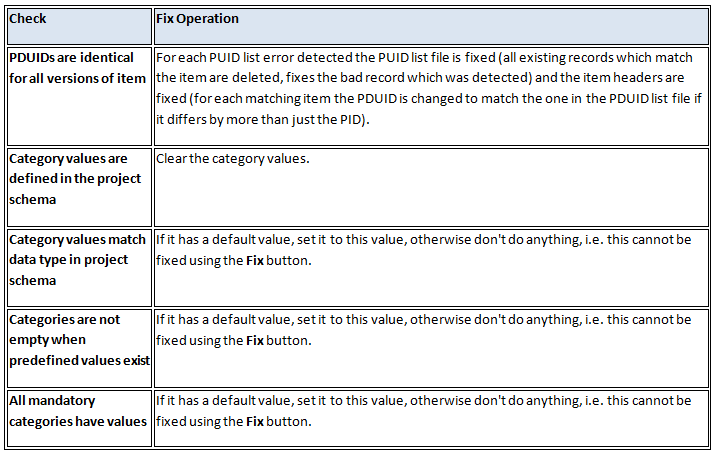
As with the frame integrity check, there is a Fix button but this can only apply to a number of checks. The ones that cannot be automatically fixed will appear on the report and will require some user intervention to correct the issue.
Below is a list of the issues that can be automatically fixed:
Issues that can be fixed
Summary
In this post we have addressed some of the checks that can be run on items in the database to confirm their data integrity using the Item Integrity Checker.
Please remember that the user MUST have ACCESS_BYPASS privilege to instigate any changes to the data and it is highly recommended that there are no other active users in the database.
Next we will discuss the Cross Reference Integrity Checker.
A Table tag allows you to generate uniform tables where the resulting items are reported in rows. This can be a list of individual items or links to other items using a defined hierarchy. Below shows an example definition of both.
Insert a Table tag:
Insert Table Tag button
Add Field tags into the table cells:Field TagsTables in Document Publisher
This will output the examples below:
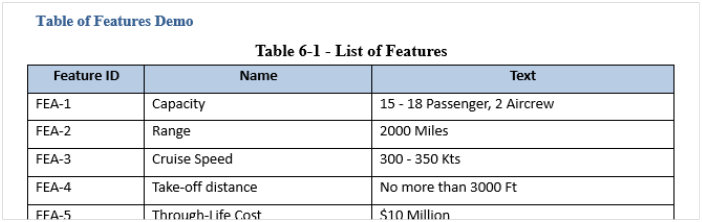
Table showing FEATUREs
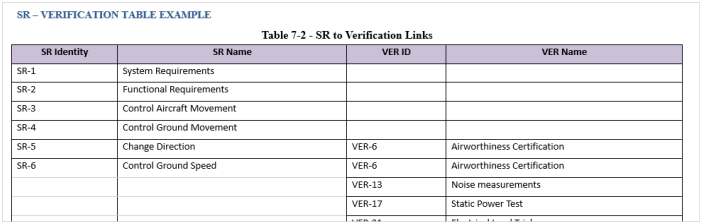
Table showing System Requirements
WorkBench Table Tag
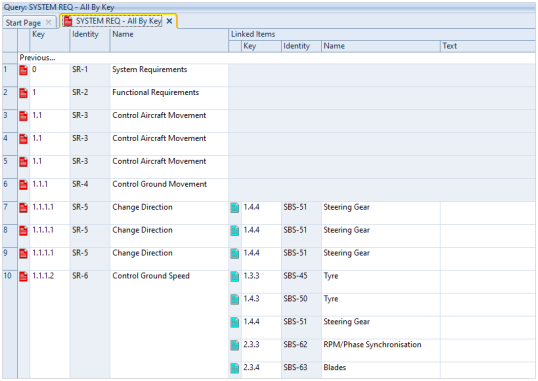
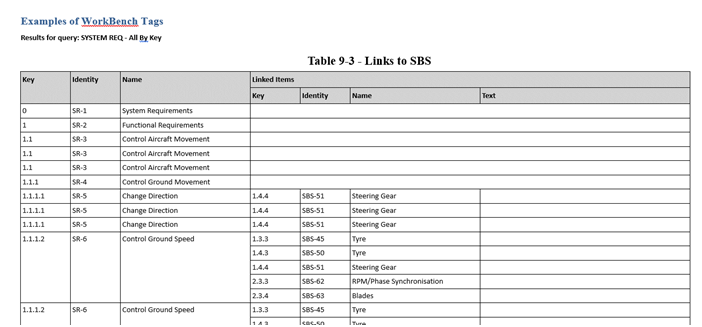
Many tables will probably have been used as a result of queries in WorkBench. For example, one shown here is a list of System Requirements linked to SBS items:
SRs linked to SBS items
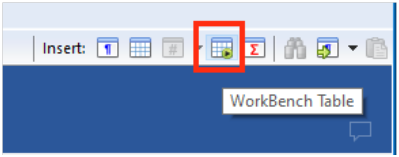
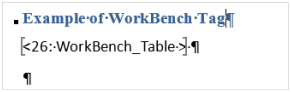
These tables can be used as a WorkBench Table tag in a Document Publisher output:
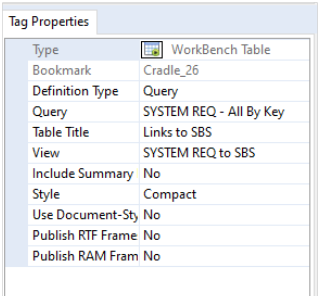
WorkBench Table Tag buttonExample WorkBench Table TagWorkBench Table Tag Properties
This is a quick and easy method of producing tables without any need for defining Field tags as the table attributes are already defined in WorkBench. An example output is shown below:
WorkBench Table Output
Inserting into Table Cells
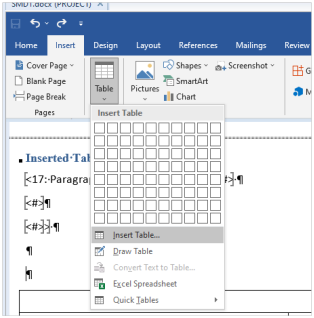
Document Publisher also provides the ability to insert data into table cells by the use of a special Computed Insert_Table_From_Bkmk Field tag. The steps to achieve this are:
Insert a Word table and format as appropriate:Word Insert Table option
Inserted Word table
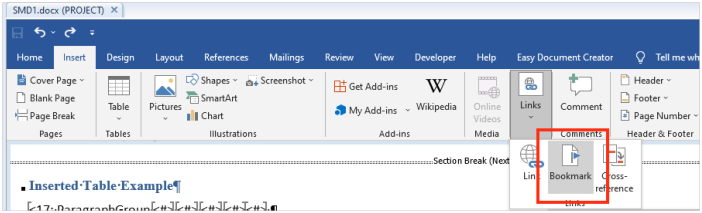
Highlight the table and insert a Word bookmark:
Insert Word Bookmark option
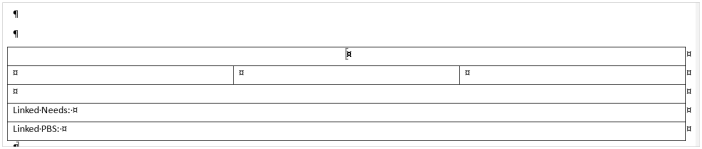
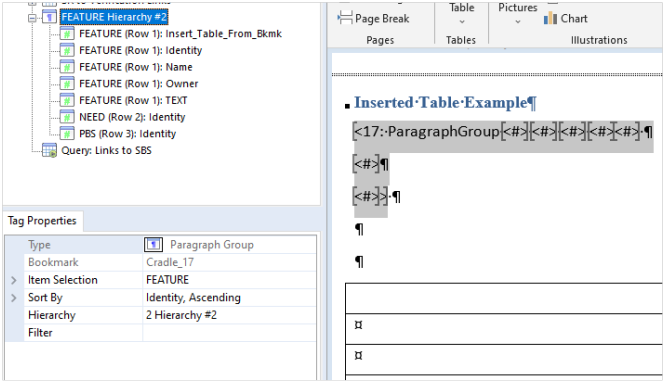
Before the table, insert a Paragraph Group tag and define the item type that you would like to shown in the table. For example – FEATURE items:
Example Paragraph Group tag
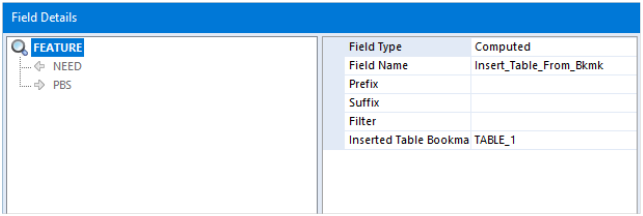
The first Field tag is very important as this specifies that the fields are going to be inserted into the table using the bookmark TABLE_1 that was defined. In this example, we also create a hierarchy to show linked NEED items and PBS items:
FEATURE hierarchy
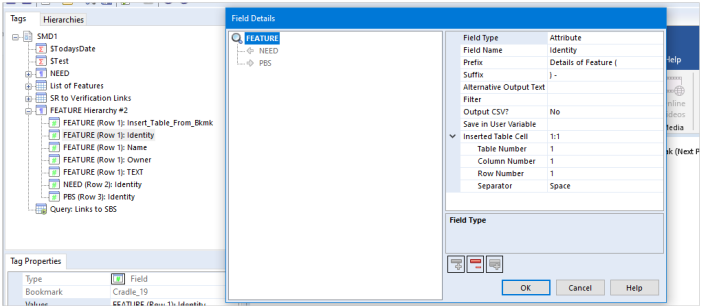
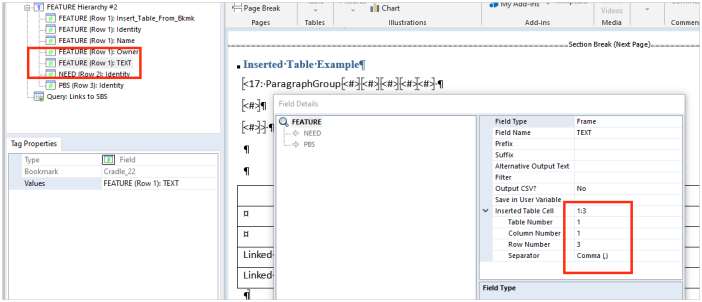
In subsequent Field tags, you can insert into a specified row and column of the table. In this first tag, it is inserting the FEATURE identity attribute into cell column 1, row 1:
Inserting FEATURE identity
You can see here that another one of the Field tags is inserting the FEATURE TEXT frame into column 1, row 3 of the table:
Insert FEATURE TEXT frame
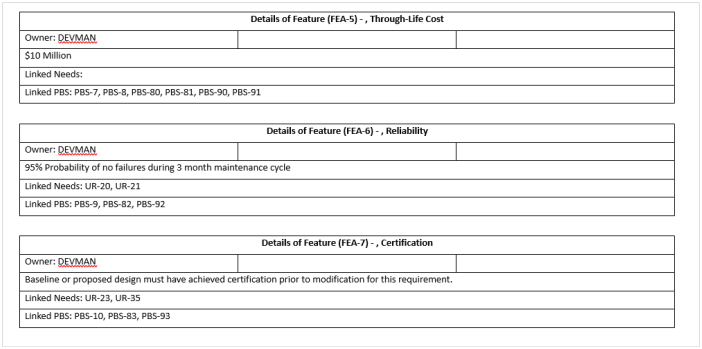
Once you have specified all of the cells to be populated in the table, this can then be published like the example shown below:
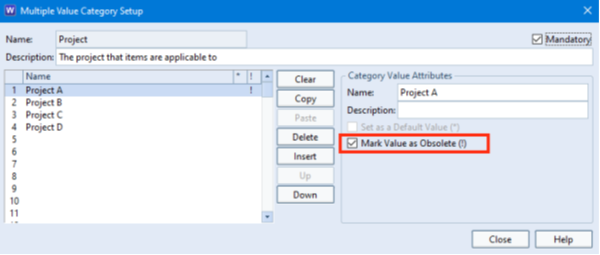
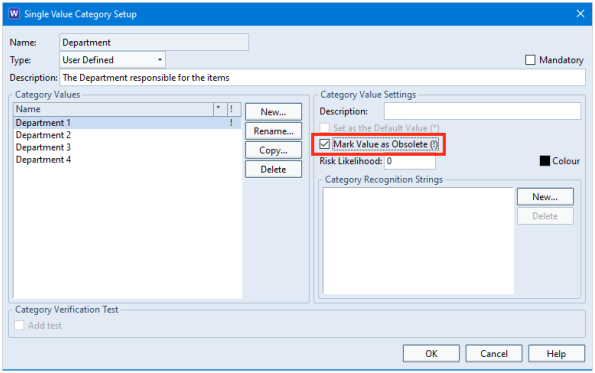
When setting up a single value pick list or multiple category, you can define any number of possible values. These can be chosen by a user as the value of the category in an item.
However, over time, category values may no longer be relevant.
Removing the values from the project schema would be the wrong course of action as values could still exist in items (possibly in old baselines) that would raise errors in item integrity checks and could cause problems when data is imported. For example, data that used to be valid can no longer be imported unless extra import options are selected to ignore the validation of data.
Set Category Values as Obsolete
Instead of deleting those values from the project schema, you can set category values as obsolete so that the value can no longer be entered by users but the historical values remain valid.
In this example, Project A might have been completed so is no longer valid to set for future items. Also, Department 1 might not be responsible for any future items but they were responsible for historical ones.
Marking a multiple value category value as obsoleteMarking a single value category value as obsolete
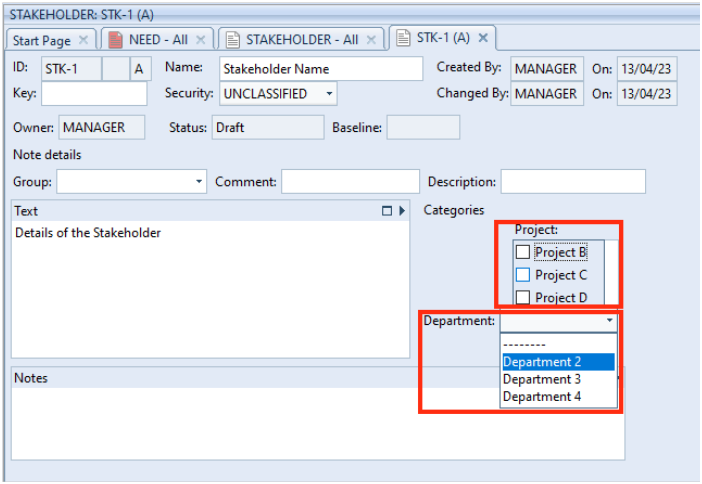
Once set, any items that had been set to the obsolete value remain valid. However, users can only enter the values that are currently valid; not the ones that are marked as obsolete.
Items only allow valid values to be set
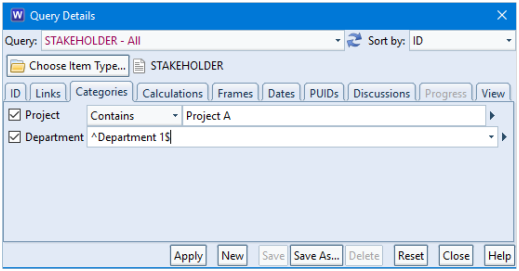
When querying the database, you can still set the query criteria to search for items that are marked as obsolete.
Querying the database on category values marked as obsolete
Any validation checks on items in the database will return without error because the value remains defined in the schema.
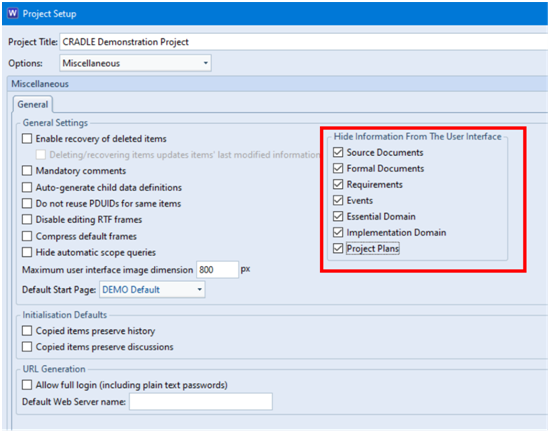
Requirements – standard requirement type that you might wish to replace with a system note type instead
Events – used in the analysis stage of a project to model the environment of a system and to describe how the system interacts with this environment
Essential Domain – analysis models
Implementation Domain – design models
Project plans – integration with Microsoft ProjectBefore hiding unused item types
Some of the item types might not be necessary in your schema so you can remove unused item types/information in the Miscellaneous section of Project Setup:
Setting item types to be hidden
Once applied and WorkBench restarted, you will no longer see the item types/information you have chosen to hide. This includes:
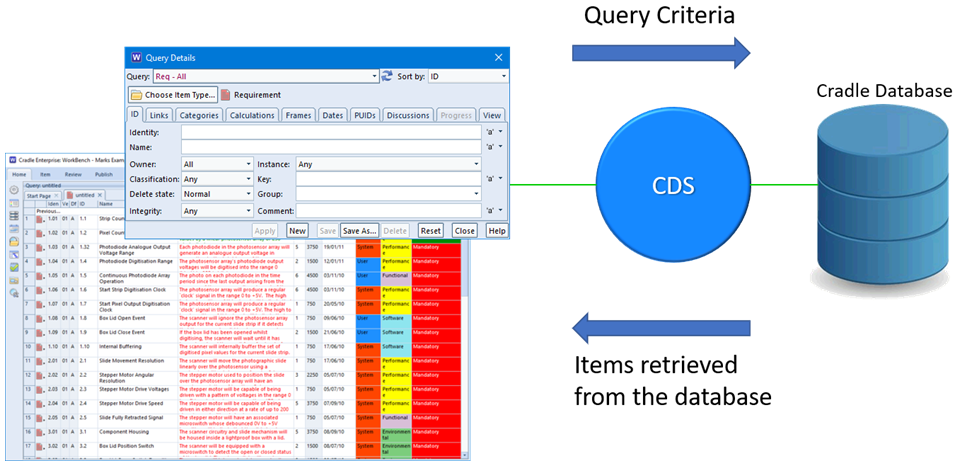
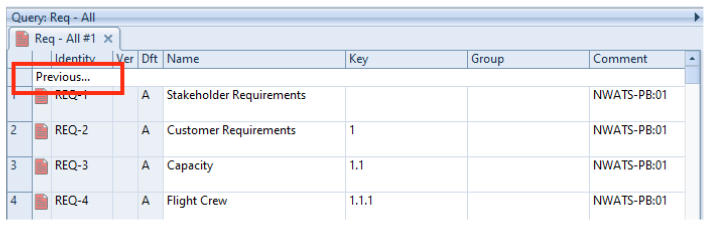
When a query is run in WorkBench, the tool will return a list of the items matching the criteria specified.
As a Cradle database can contain any number of items of information a query could find 0 to 1 million items.
Items in Cradle Database
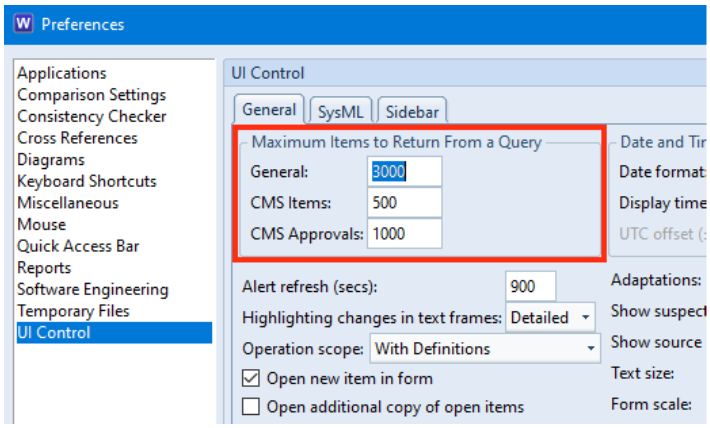
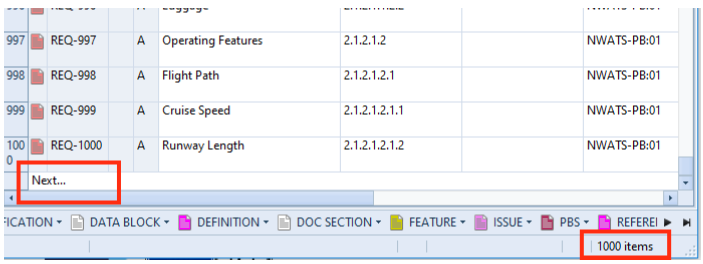
The time taken to find so many items could be excessive. Therefore, queries find and return items from the database in blocks. The default size of a block is 1000 items but can be extended to 8000 items in UI Control user preferences:
Retrieve Item Options in User Prefs
This means that when you run a query it will return at most N items.
Navigating between Blocks of Data
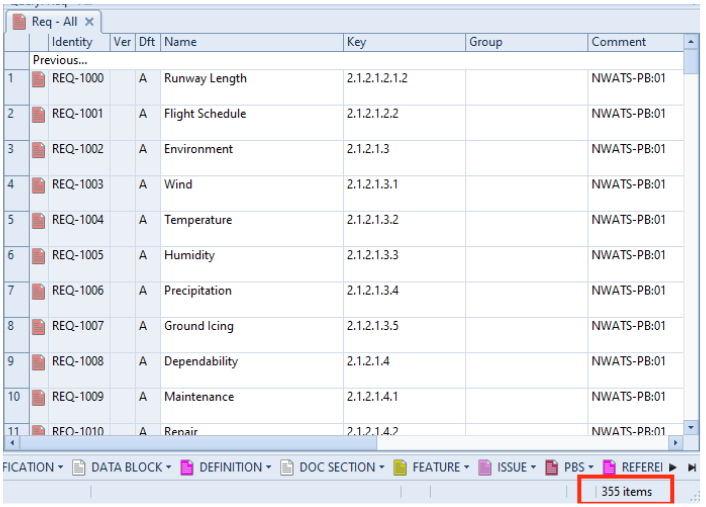
When the block is shown in the WorkBench UI, it is preceded by Previous… and followed by Next….
If you select these, then the query is re-run to find the next block or the previous block of items.
Query showing Previous optionQuery showing Next option
In this example, clicking the Next… option will retrieve the next set of items in the query:
Query showing items
Selecting Previous… again will return you to the previous block of items.
Reporting Items
If you are creating a report or publishing a document using a query, it is likely that you would NOT wish to be restricted by blocks of items.
Reports allow you to specify:
Selected items – items highlighted in the query
All items in this set – the block of N items
All matching items in database – the totality of items matching the query criteria
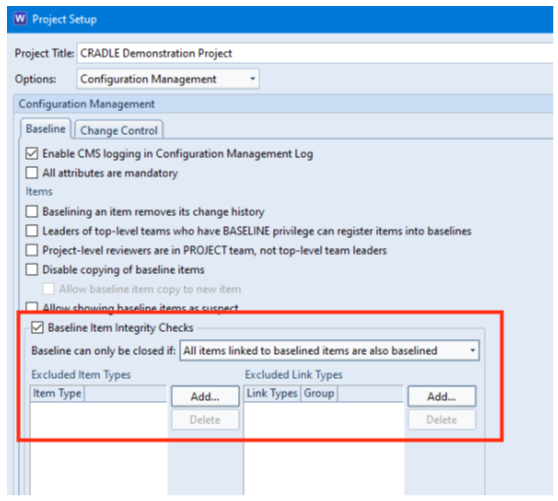
In certain situations, it may be necessary to stop a baseline from being closed if a condition has not been met. For example, if items have been registered in the baseline but items that are linked have not been.
Having this option set will ensure that all relevant data will appear in your completed baseline.
Open and Closed Baselines
Setting the Baseline Item Integrity Check
To set this option, navigate to the Configuration Management options in Project Setup and tick the Baseline Item Integrity Check option:
Baseline Option in Project Setup
You also have the ability to set a rule for the direction of the link/dependence:
All items linked to baselined items are also baselined (default option)
Baselined items’ source items are also baselined
Baselined items’ destination items are also baselined
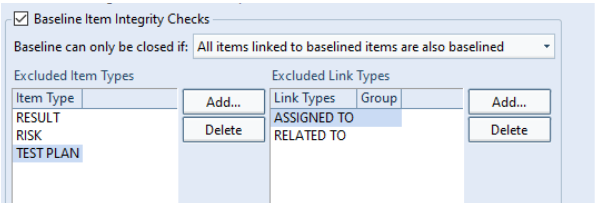
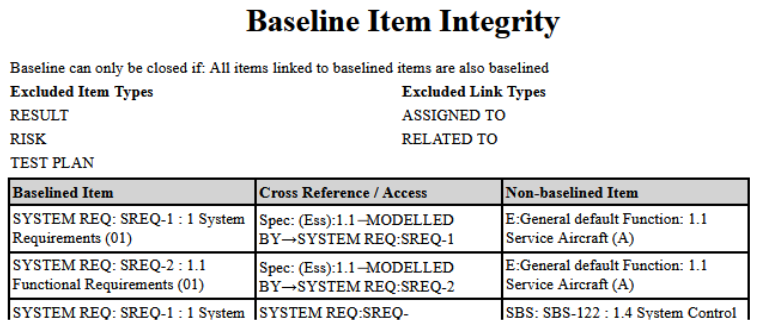
Exclusions
You can also exclude item types or link types from being bound by this setting:
Excluded item and link types
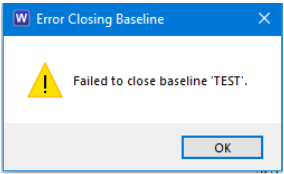
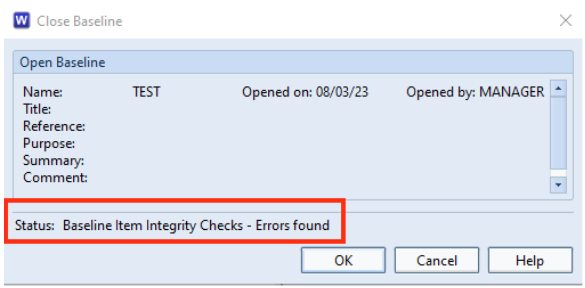
Failing the Check
If any of the checks fail, an error message will be shown with a report showing the items that caused the close baseline operation to fail:
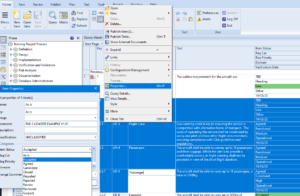
WorkBench has the ability to select multiple items and modify some attributes and categories using the Properties dialog.
Properties for Multiple Selected Items
However, what if you wanted to add data into selected item’s FRAMES?
In this example, we will show how this can be achieved using CSV export / import.
Adding data to multiple selected item FRAMES
Create a CSV File
Export your item type to CSV. You only need to map the default attributes Identity, Type, Draft and Version that are already pre-set. The other attributes/frames/categories do not need to be exported.Export Items Dialog
Setting Required Attributes
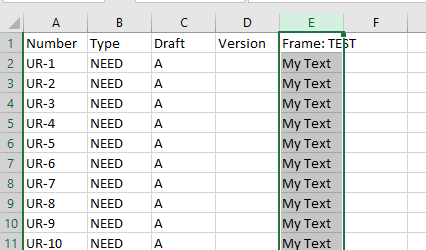
Open the CSV file in Excel and add a column representing the new frame. In this example, we are adding a new frame named TEST and adding the text “My Text” in this frame for all (or selected) items. You could, of course, add different text content for each of these cells.Add Frame Column to Excel
Add a Frame in your WorkBench Project
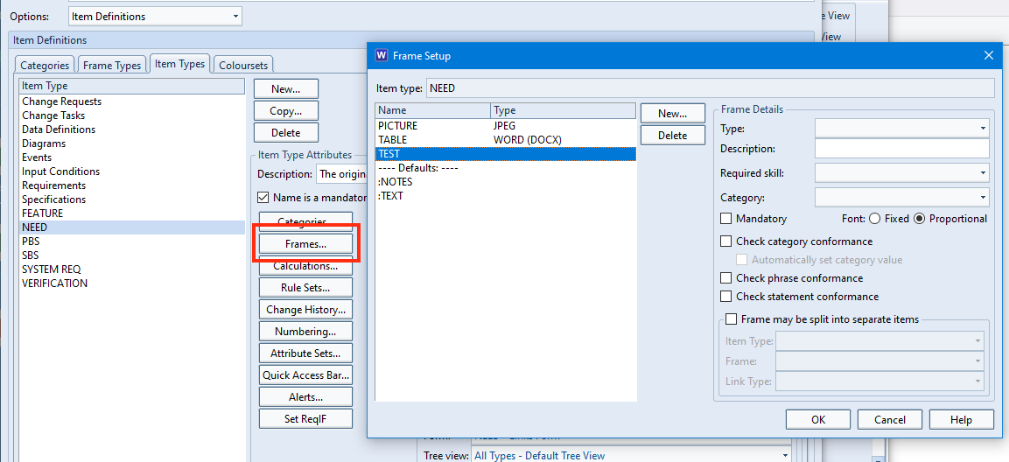
If you don’t already have the frame, you can add a new frame to the item type in Project Setup now. This is the frame where we will add content en bloc.
Frame Setup
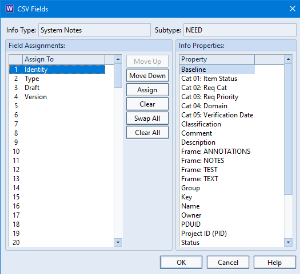
Importing The CSV File
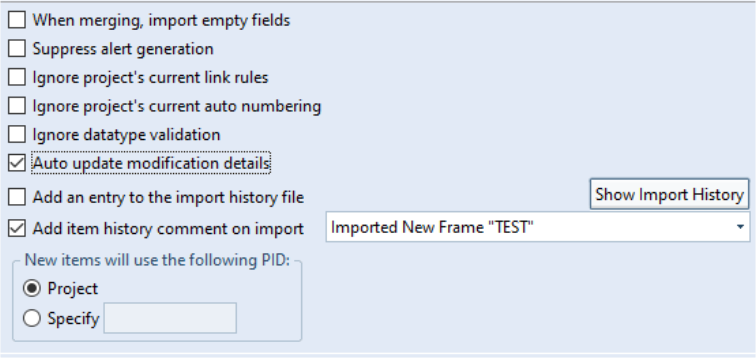
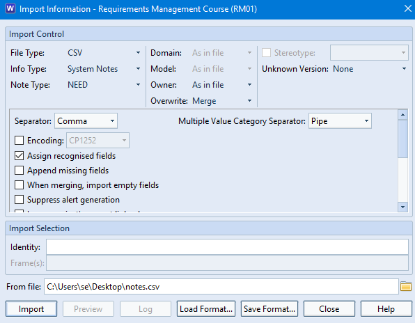
Select Import with the file type CSV and the required item type ensuring that the Overwrite option is set to Merge and press Import. Note also that there are options here to update the modification date / last modifier and also whether to add an entry to the items’ edit history.
Import OptionsImport Dialog
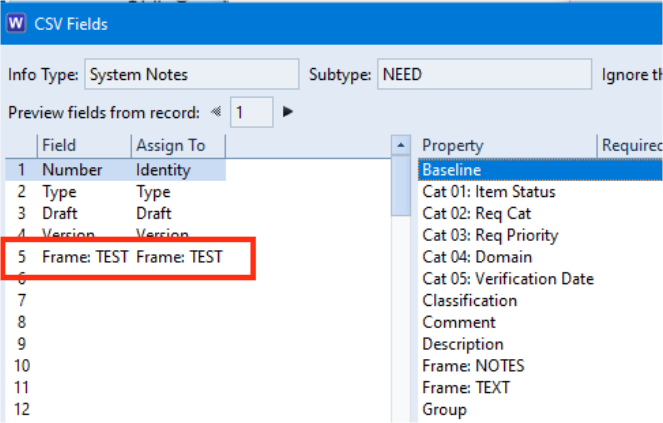
Map the fields ensuring that the added frame is mapped
CSV Fields
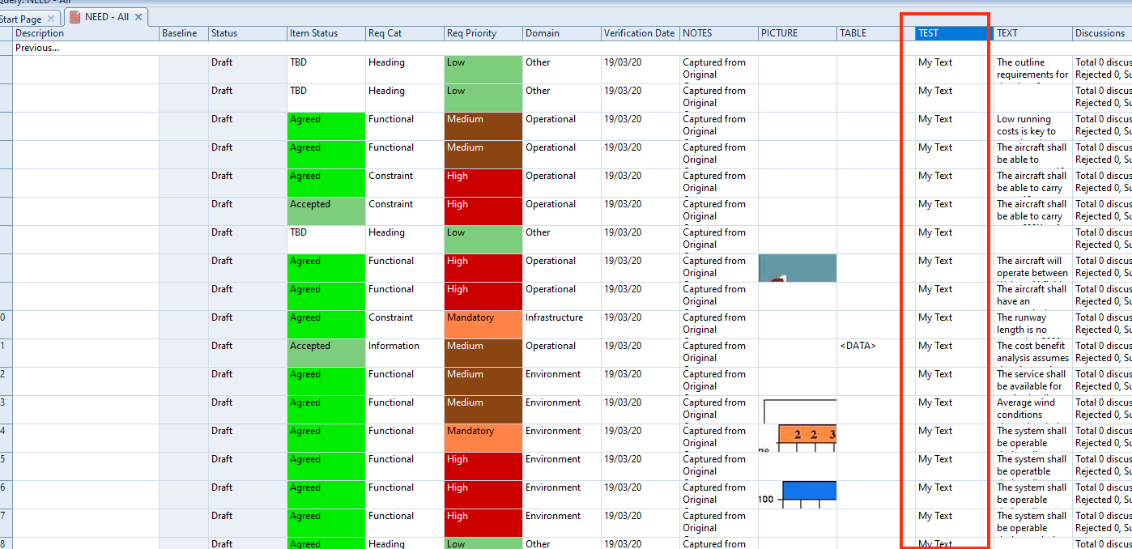
You will see that the new frame has been added with content for all items and the previous content remains intact
However, should you require additional assistance, reporting a bug or suggesting an enhancement, additions to our documentation etc, you can contact 3SL directly via Support Services:
3SL Support Services
Contacting 3SL
When seeking support, we suggest assigning a Cradle liaison/Project Administrator as the users’ first point of call as they should already have undergone some form of Cradle training. If this person cannot provide an answer, then our support team will be available to assist.
3SL Support Services
Technical Support Department is available 9am – 5pm GMT Monday to Friday but often also available outside of these hours via email support@threesl.com . Our landline is +44 (0)1229 838867.
Support Call Logging
When communicating with 3SL via email, we will initially assign you a call number and a support engineer to address any problems that you might have. Please provide as much information about this call as possible so we can quickly resolve the call without any misunderstanding. The details that we like to receive are:
Name and full contact details
Area of Cradle with the problem
Your perceived priority for the problem
Operating system information
Cradle version
Means of reproducing the problem
Screenshots, error logs and data (sanitised or raw) are especially welcome to allow us to quickly and easily reproduce any problems.
Any bug reports or enhancements will be tracked in our database and you will be informed when an update is available.
Web Meetings
Should there be any confusion or further information required about a call, you or 3SL may suggest a demonstration via a Web Meeting.
3SL generally uses GoTo Meeting as our meeting platform but we can also use your corporate default platform such as Microsoft Teams.
Cradle Training
3SL offers training courses in the administration and practical usage of Cradle as:
Online “public” training interspersed throughout the year
On-site or online “private” training
These training courses cover subject areas such as: