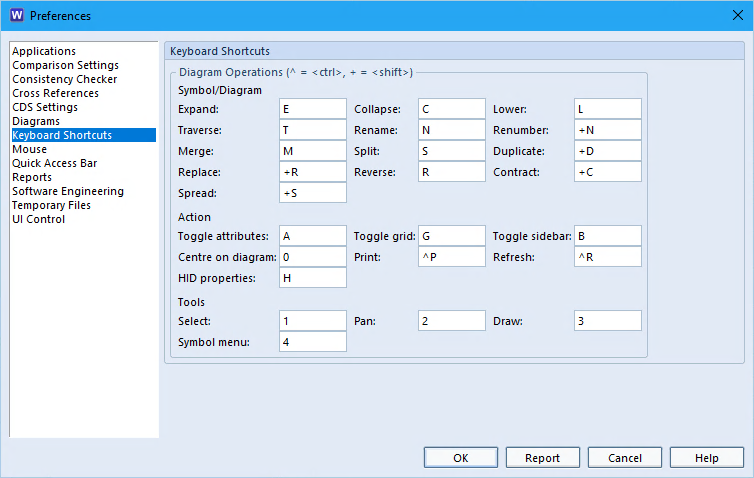
There are the usual operating system shortcuts such as <ctrl> + C and <ctrl> + V to cut and paste text. Users can see and set the additional Cradle keyboard shortcuts in their user preferences.
These preferences are first drawn from the system wide cradle.ini/cradle.rc file. If you alter any of them for your own needs, they are saved in your personal user preferences as a difference between the system setting and you chosen value. Thereby balancing consistency between users, whilst allowing flexibility when needed.
This menu is selected from the tab Home -> Preferences
Cradle Keyboard Shortcuts
Keyboard
The Cradle shortcuts are mainly based around diagram drawing operations. This can speed up productivity considerably. For example; you don’t have to keep moving your mouse cursor to a menu, just to switch between say drawing and selecting.
More information about keyboard shortcuts can be found in the Cradle Help . Similarly the reset of the user preference details can also be set in the same dialog.
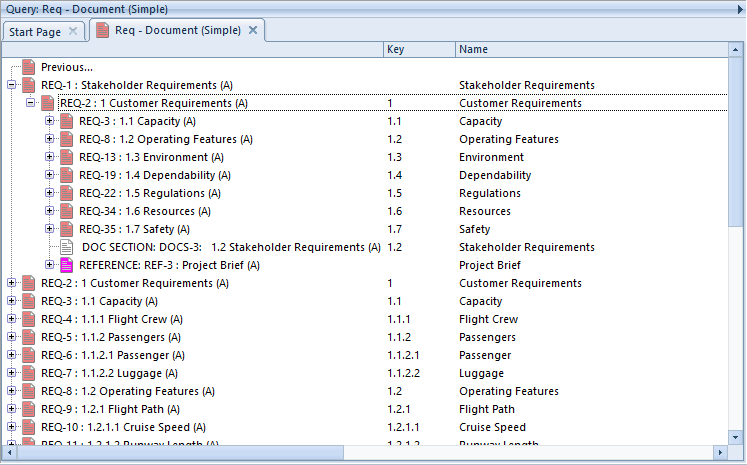
You can find items in a Cradle database by running a query. For example, you can use the pre-defined queries in the Quick Access Bar at the bottom of the UI. Once the query has run, the results are shown in a display style. Tree style is one of the four styles available:
A view is used to specify which parts (attributes) of the items will be shown. A display style controls how these attributes will be displayed, and the facilities that are available to you.
Tree Style
This is the second most frequently-used of the display styles after table style. It displays each item as a node in a tree, with a set of columns for the other attributes:
Items Shown in Tree Style
There are two views used to display trees:
A view that specifies the contents of the node shown in the tree. You specify this view in the schema for the item type.
A view that specifies the attributes shown in columns to the right of the tree
To have items displayed in this style:
Specify it in the query to be run:
Specify Tree Style in a Query
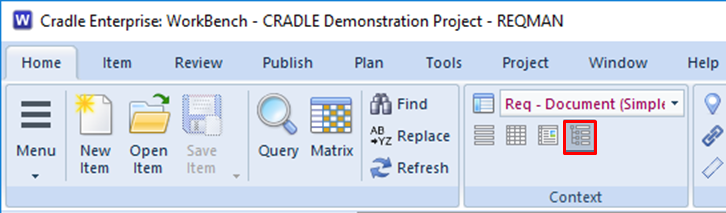
Also, select it from the Context group in the Home tab:
Choose Tree Style in the UI Ribbon
Or, right click and choose Style -> Tree from the context-sensitive menu
Finally, press <CTRL> and 4
Facilities
Use the left mouse button to select individual items
You can select a groups of items by selecting the first and then pressing <SHIFT> and the left mouse button to select the end of the group
Press <CTRL> and the left mouse button to select or de-select individual items
You can shrink and widen the display columns. Move your cursor to the edge of a column heading and the cursor will become a pair of arrows. Press, drag and release the left mouse button to change the column’s width.
You can follow cross references by expanding the tree node for the item. Cradle will find all cross references to and from the item, select which cross references to use, and display the items at the other end of these cross references as new nodes in the tree.
Use drag-and-drop items between trees to create cross references between the items
Drag-and-drop items inside a hierarchy of the same type of items to reorder that hierarchy and automatically rebuild the hierarchical numbering within it
You can expand a tree node by:
Click its + button
Select the text of the tree node and press: +
Select the text of the tree node, right click, and choose Expand from the menu
Double click on the text of the tree node
You can collapse a tree node by:
Click its – button
Double-click on the text of the tree node
Select the text of the tree node and press: –
Select the text of the tree node, right click, and choose Collapse from the menu
Advantages
The advantages of tree style are that it is:
The simplest way to explore items and their relationships
A convenient method to create cross references
The easiest way to reorganise a hierarchy of items
If you want to do anything with cross references between items, or to work in a hierarchy of items, then this is the best display style to use.
Disadvantages
The disadvantages of tree style are that:
It provides a limited ability to display information
You cannot edit information directly
Summary
Tree style is the most convenient method to work with cross references within a set of items and between one set of items and other sets of information.
Therefore, we recommend this style whenever you need to work with cross references between items and inside hierarchies.
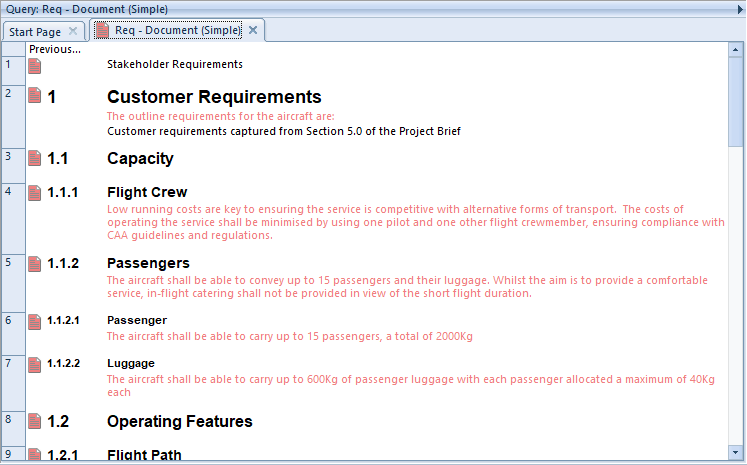
You can find items in a Cradle database by running a query. For example, you can use the pre-defined queries in the Quick Access Bar at the bottom of the UI. Once the query has run, the results are shown in a display style. Document style is one of the four styles available:
A view is used to specify which parts (attributes) of the items will be shown. A display style controls how these attributes will be displayed, and the facilities that are available to you.
Document Style
This is the second most flexible of all the display styles. It displays each item as a set of one or more rows and one or more columns (as controlled by the view), with invisible borders around each of the cells. You can edit items directly in this display style.
Items Shown in Document Style
This display style is similar to table style, except that:
The height of each item’s row is set by the information to be shown. So some rows are shallow and other rows are deep. If an attribute contains no data, its height will be close to zero.
Different sized fonts are used to display the first row in the view. The size of the font is based on the levelof the item being shown. This level is based on the number of dots (periods) in the first attribute shown in the row. This is typically the Key, or whatever attribute you may have specified to hold the item’s hierarchical number.
The borders around the rows and columns are invisible
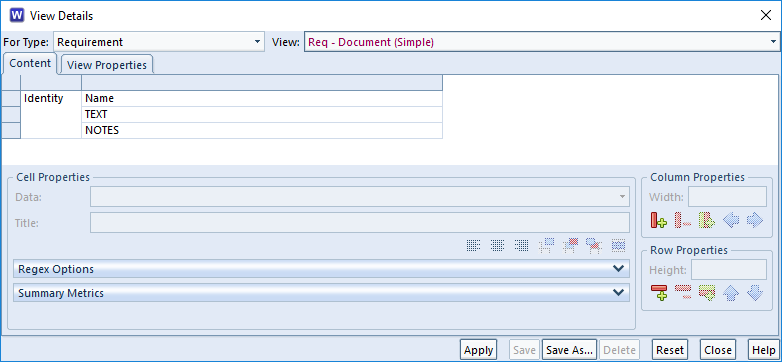
For document style, you should use views that show attributes in successive rows, rather than successive columns. For example:
Arrangement of Attributes in a View for Document Style
The result is that items are displayed in a style that looks like a document, with large font for section headings and smaller fonts used for subsection headings.
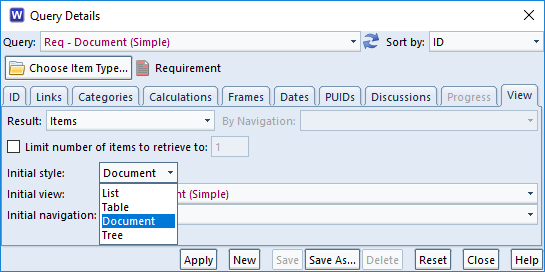
To have items displayed in this style:
Specify it in the query to be run:
Specify Document Style in a Query
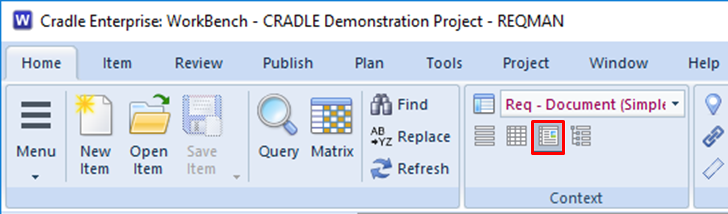
Also, select it from the Context group in the Home tab:
Choose Document Style in the UI Ribbon
Or, right click and choose Style -> Document from the context-sensitive menu
Finally, press CTRL and 3
Facilities
Document style provides a wide range of faciltiies.
Selecting Items
Use the left mouse button to select individual items
You can select a groups of items by selecting the first and then pressing SHIFT and the left mouse button to select the end of the group
Press <CTRL> and the left mouse button to select or de-select individual items
Changing the Display
You can shrink and widen the display columns. Move your cursor to the edge of a column heading and the cursor will become a pair of arrows. Press, drag and release the left mouse button to change the column’s width.
You can move any row or column in the view. Move your cursor onto any cell border and the cursor will become a pair of arrows. Press, drag and release the left mouse button to move that border.
By default, all rows are displayed with different heights, you can increase or decrease the height of any row
You can sort the data in any column. Click the column heading and choose a sort order, either ascending or descending, in either a case-sensitive or case-insensitve manner (this only applies to languages that have upper-case and lower-case characters)
Tooltips are displayed for each column. Move your cursor into a column heading and after a second, a description of that attribute will be shown. You can enter these descriptions in the schema.
You can see tooltips for some attribute values. Move your cursor into a cell that displays a category with a pick-list of possible values. A tooltip appears containing a description of that category and category value. You can enter these descriptions in the schema.
Exploring Data
You can expand rows to follow cross references. Double-click the heading for an item’s row and that row will expand to show one new row for each item linked to the original item. Repeat this as many times as you like.
You will see the level of any expanded row as the number of dots in its row heading
You can collapse rows by double-clicking the row heading.
Editing Data
You can edit items directly Click inside any cell. If you have RW access to the item, Cradle locks the item so you can edit it.
Advantages
The advantages of document style are that it is:
Flexible. You can adjust the display and sort information.
Navigable. You can explore the database by expanding rows to follow cross references.
Editable. You can edit information through the display style.
Readable. All items are shown with a display height to display their entire contents.
Disadvantages
The disadvantages of document style are that:
It takes much longer to display than list style or tree style
The rows displaying information are of different heights, so you may not see many items at the same time. You may need to scroll more than in other display styles.
Summary
Document style is the second most flexible of Cradle’s four display styles, after table style. It is not the quickest style to generate, but it does provide a familiar document-like view of information and a lot of capability.
Therefore, we recommend document style whenever you want to display items in a document format. This can be very helpful for users who are more familiar with using documents, rather than data-orientated tools.
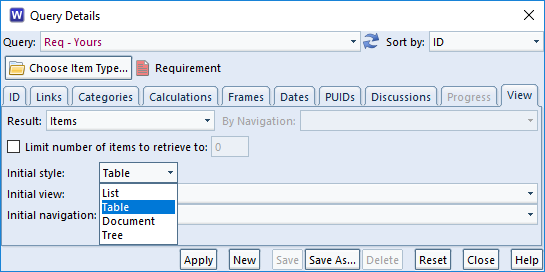
You can find items in a Cradle database by running a query. For example, you can use the pre-defined queries in the Quick Access Bar at the bottom of the UI. Once the query has run, the results are shown in a display style. Table style is one of the four styles available:
A view is used to specify which parts (attributes) of the items will be shown. A display style controls how these attributes will be displayed, and the facilities that are available to you.
Table Style
This is the most flexible of all the display styles. It displays each item as a set of one or more rows and one or more columns (as controlled by the view), with borders around each of the cells. You can edit items directly in this display style.
Items Shown in Table Style
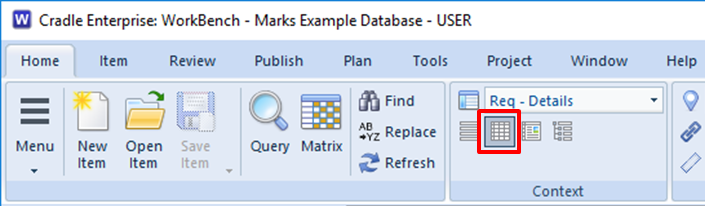
To have items displayed in this style:
Specify it in the query to be run:
Specify Table Style in a Query
Also, select it from the Context group in the Home tab:
Choose Table Style in the UI Ribbon
Or, right click and choose Style -> Table from the context-sensitive menu
Finally, press <CTRL> and 2
Facilities
Table style provides a wide range of facilities.
Selecting Items
Use the left mouse button to select individual items
You can select a groups of items by selecting the first and then pressing SHIFT and the left mouse button to select the end of the group
Press <CTRL> and the left mouse button to select or de-select individual items
Changing the Display
You can shrink and widen the display columns. Move your cursor to the edge of a column heading and the cursor will become a pair of arrows. Press, drag and release the left mouse button to change the column’s width.
You can move any row or column in the view. Move your cursor onto any cell border and the cursor will become a pair of arrows. Press, drag and release the left mouse button to move that border.
By default, all rows are displayed the same height, but you can increase the height of any row
You can sort the data in any column. Click the column heading and choose a sort order, either ascending or descending, in either a case-sensitive or case-insensitve manner (this only applies to languages that have upper-case and lower-case characters)
Tooltips are displayed for each column. Move your cursor into a column heading and after a second, a description of that attribute will be shown. You can enter these descriptions in the schema.
You can see tooltips for some attribute values. Move your cursor into a cell that displays a category with a pick-list of possible values. A tooltip appears containing a description of that category and category value. You can enter these descriptions in the schema.
Exploring Data
You can expand rows to follow cross references. Double-click the heading for an item’s row and that row will expand to show one new row for each item linked to the original item. Repeat this as many times as you like.
You will see the level of any expanded row as the number of dots in its row heading
You can collapse rows by double-clicking the row heading.
Editing Data
You can edit items in a table. Click inside any cell in the table. If you have RW access to the item, Cradle locks the item so you can edit it.
Advantages
The advantages of table style are that it is:
Flexible. You can adjust the display and sort information.
Navigable. You can explore the database by expanding rows to follow cross references.
Editable. You can edit information through the display style.
Compact. All items are shown with the same display height.
Disadvantages
The disadvantages of table style are that:
It takes longer to display than list style or tree style
The rows displaying information are all the same height, so you may have to click in a cell or expand a row border to see all of the information in some attributes
Summary
Table style is the most flexible of Cradle’s four display styles. It is not the quickest to generate, but it provides the most capability.
Therefore, we recommend table style as the best general purpose display style in Cradle. Unless you need something provided by a different display style, use table style.
The Cradle UI displays information inside tabs. These tabs are grouped into panes. You can design your Cradle UI with a set of panes grouped in nested rows and columns in your preferred layout. This layout is called a session. Using sessions is the easiest way to maximise your productivity with Cradle.
You can save your current layout of panes, and the tabs inside them, in a session. You can then restore this session when you login to Cradle. When you do this, Cradle will restore the panes, organise them in your preferred layout, and where possible, automatically recreate all of the tabs inside each pane by re-running queries and so on.
The result is that when you login to Cradle and specify a session, your Cradle UI will look the same as it did when you last logged-out.
This will save you a lot of time and help you to complete your work more quickly and effectively!
Working With Sessions
Using sessions is very easy:
You can save a session at any time
You can specify a session when you login.
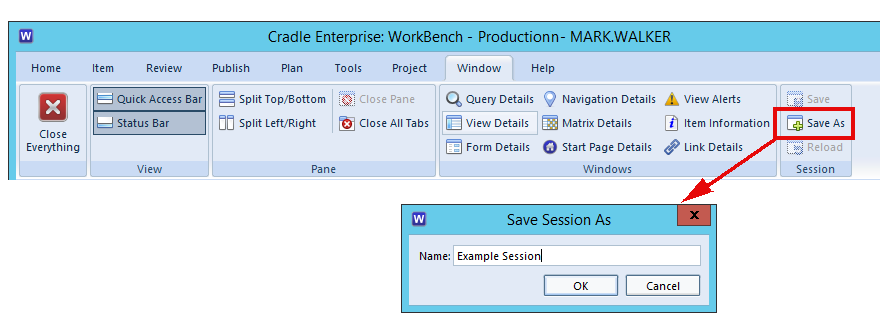
Saving a Session
You can save your current WorkBench layout as a session by clicking Save As in the Session group in the Window tab in the UI’s ribbon:
Save a Session
You will be asked to enter a name for the session. When you are working in WorkBench with a session, you can update the saved session to match your current layout of panes and tabs by clicking Save,
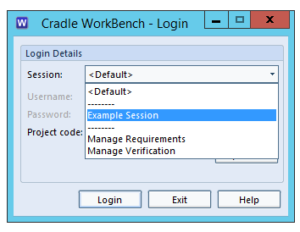
Using Sessions
When you next login to Cradle WorkBench, you can choose your session from the drop-down list in the Login dialog:
Specify a Session at Login
and your layout of panes and tabs in the session will be restored, re-running queries and so on as necessary.
You can also reload the session that you chose at login by selecting Reload. from the Session group in the Window tab in the UI’s ribbon.
The Cradle WorkBench UI is divided into panes. Each pane is a region that can contain one or more tabs. A tab is a container with a selectable name and a rectangular area that contains the results of running a query, report, metric or graph, or a single item that is being edited. Using tabs is a way to maximise your productivity with the Cradle UI by helping you to arrange queries, items and other information, either so you can see everything at the same time, or so the information is presented in a layout that you find convenient.
Layout of a Tab
A tab is a rectangular region in the Cradle UI that has a name, a close control and a rectangular region containing the result of a query, a report, a metric, a matrix, a pivot table, or a dashboard:
Tabs in a Pane in the Cradle UI
Tabs exist inside panes.
Each pane can contain up to 16 tabs. You can have many panes open in the UI at the same time.
When you create a new tab, it will open in the currently-selected pane. So, if you run a query, that query will open in a new tab in the current pane. If you open an item, it will open in a tab in the current pane.
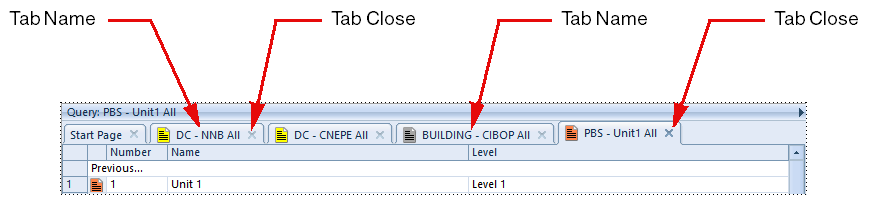
Tab Names
Each tab has a name, shown above it, that is name of the query, report, metric, graph or pivot table shown in the tab, or some details of the item shown in a form.
Using Tabs
Next to a tab‘s name is a button, you can click this button to close the tab.
You can also press CTRL-W to close a tab, or choose Close Tab from the context-sensitive menu that will appear if you right-click inside a tab.
You can move a tab between panes by:
Put your cursor in the name of the tab to be moved
Press the left mouse button
Drag into the new pane
Release the mouse button
Horizontal or vertical scrollbars will appear if a tab’s contents are larger than the screen area available. You can increase the area used to display a tab by either:
Use the sash control to increase the size of the pane that contains the tab
Maximise the pane containing the tab using its pane control menu, or simply double-clicking the pane’s legend
The Cradle WorkBench UI is divided into panes. Each pane is a region that can contain one or more tabs. A tab is a container with a selectable name and a rectangular area that contains the results of running a query, report, metric or graph, or a single item that is being edited. Using panes is a way to maximise your productivity with the Cradle UI by helping you to arrange queries, items and other information, either so you can see everything at the same time, or so the information is presented in a layout that you find convenient.
Layout of a Pane
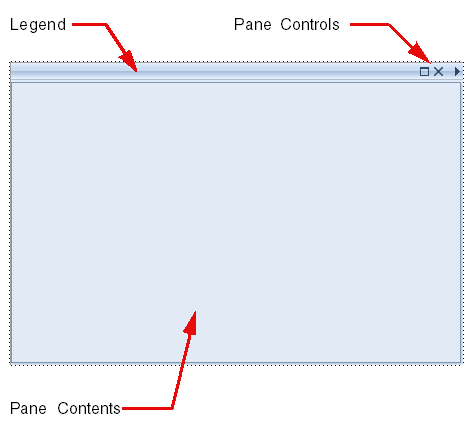
A pane is a rectangular region in the Cradle UI that has a legend and a set of controls:
A Pane in the Cradle UI
The pane’s contents are one or more tabs. Each tab contains the results of a query, report, matrix, metric, graph or pivot table, or an item in a form.
Each pane can contain up to 16 tabs. You can have many panes open in the UI at the same time.
When you create a new tab, it will open in the currently-selected pane. So, if you run a query, that query will open in a new tab in the current pane. If you open an item, it will open in a tab in the current pane.
Pane Legend
The pane’s legend appears when you select a tab inside it. The legend will be the name of the tab that you have selected.
You can double-click the legend to maximise the pane. This will maximise the pane to fill the WorkBench UI, overlaying all other panes. When a pane is maximised, double-click the legend again to minimise the pane. This will restore the pane to its original size.
Pane Controls
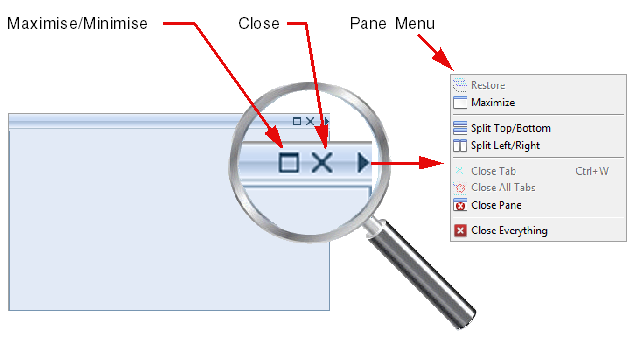
Each pane has a set of controls. These controls are the most important part of using panes to control the Cradle UI:
Pane Controls and How to Access Them
You can use these controls to:
Maximise the current pane, an alternative to double-clicking its legend
Close the current tab, if any
Empty the pane by closing all of its tabs
Close the pane, and all tabs inside it
Close all panes
More usefully, you can also:
Split the pane horizontally into two panes
Split the pane vertically into two panes
Using Panes
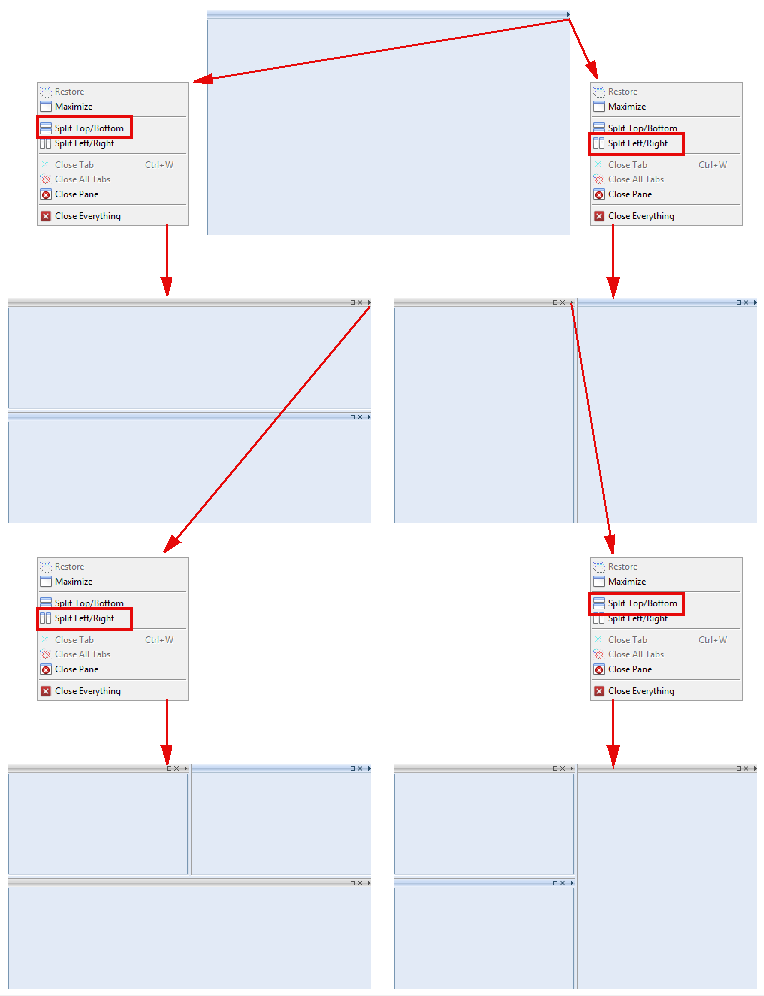
You can split panes any number of times. This divides the UI into an arrangement so you can see several queries at the same time, or so you can see many items at the same time.
As an example:
Creating New Panes by Splitting
A large screen will be helpful!
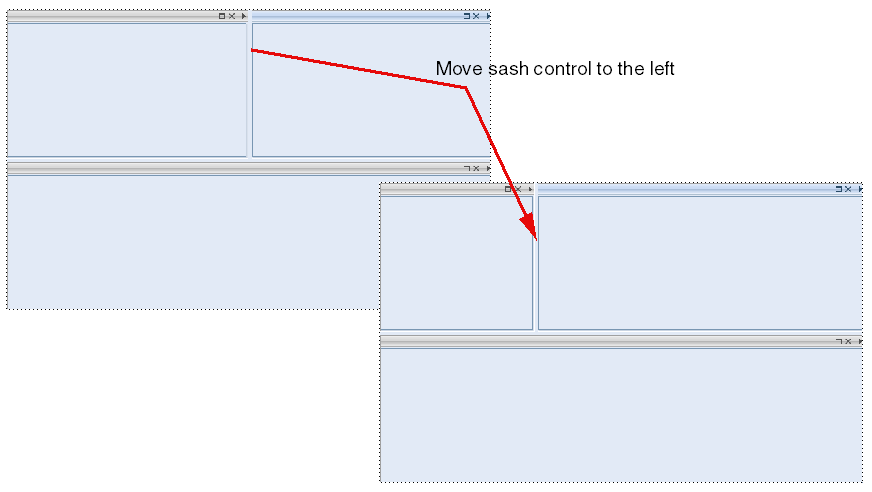
There are sash controlsbetween panes. Move your cursor between two panes and it will change to a pair of arrows. If you press, drag and release the left mouse button, you can adjust the relative sizes of adjacent panes. This will proportionately adjust the sizes of all tabs inside these panes. For example:
The UI of the WorkBench tool in 3SL’s Cradle is very flexible. It allows you to display the items and the results of running queries in individual tabs. You can split the display into panesand have many of these tabs in each pane. You may need to increase the UI Object limit if you want to have a very complex WorkBench UI.
UI Object Limit
Each part of the UI uses Windows resources called User interface objects. There is a limit on the number of these UI Objects that each WorkBench process can allocate.
The default is a maximum of 10,000 UI Objects per process. This can be increased to a maximum of 18,000 UI Objects per process by changing a setting in the Windows registry.
If you open so many tabs that WorkBench exhausts the UI Objects that it can allocate, then the WorkBench UI will hang.
Increase the UI Object Limit
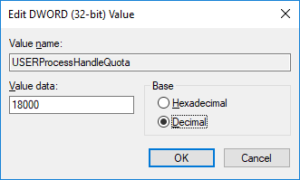
To increase the UI Objects Limit you must edit the Windows registry value:
Double click the entry for USERProcessHandleQuota, and set Decimal
Enter the new value 18000 and click OK:
USERProcessHandleQuota
Exit the registry editor
This change takes effect on any processes created from now on.
Do I Need to Do This?
In general, no you do not need to make this change.
We have only seen one case where this change was necessary. In this case, a customer had a form with 75 frames display in it. The WorkBench UI hung when a user tried to open the 6th item concurrently when using this form.
Increasing this limit allowed the user to open 10 items concurrently using this (very!) large form.
Of course, if you want to increase the UI Object limit as a precaution, then it will not do any harm!
Since Cradle is not intelligent (unlike its users!), you have to tell it what you want to it operate on, before you tell Cradle to do anything. There are several select operations in Cradle, depending on what you are working with. Most of these select operations are common to other pieces of software, so what follows may not contain any surprises.
Select Operations in Cradle
In general, you will either select:
Items, to perform an operation on them
Text, to manipulate the text in some way
How to Select Items
When you see a collection of items, in a list, table, document or tree, you can select them and then apply an operation to them. So, starting with this table of items:
A List of Items
the select operations in Cradle are:
Select all items by pressing CTRL-A:
A List of Selected Items
Cancel all selections by pressing CTRL-D:
A List of Items With None Selected
Select an individual item by positioning the cursor over it and then click your LEFT mouse button:
A List of Items With One Selected
Select a range by positioning the cursor to the other end of the range and press SHIFT and the LEFT mouse button:
A List of Items With a Range Selected
To add items to the set of selected items, or to remove a selected item from the set of selected items, position your cursor and press CTRL and the LEFT mouse button:
A List of Items With Several Items Selected
You can combine these select operations in Cradle, as shown above.
If the results are not what you want, press CTRL-D and start again!
How to Select Text
The majority of items created in Cradle contain text, either plain text or rich text. You can store any amount of text (well, up to 1 TByte) inside each attribute (called a frame) in an item. You can have any number of attributes in each item.
So, items can store a little text, or an enormous amount of text.
When you edit text, you will see a cursor that is a vertical line. This shows you where text will be entered when you type on the keyboard, or paste text that you copied elsewhere.
The select operations in Cradle for text are:
Select all items by pressing CTRL-A
Cancel the selection by pressing CTRL-D
To select a position in the text, position your cursor and press the LEFT mouse button
Select a word by positioning your cursor anywhere inside the word and double-click, press the LEFT mouse button, quickly, twice,
Select a paragraph by positioning your cursor anywhere inside the paragraph and triple-click, press the LEFT mouse button, quickly, three times
You can select a range of text by positioning your cursor at the start, or end, of the range, and press the LEFT mouse button, drag the cursor, and release the mouse button
You can also select a range of text by positioning your cursor at the start or end of the range, then press SHIFT and then press Cursor Left, Right, Up or Down to extend the range in each direction.
If you ALSO hold the CTRL key, then Cursor Left and Right will extend the selection by one word
If you ALSO press the CTRL key, then Cursor Up and Down will extend the selection by one paragraph
You can change the end of a range of selected text to the start or end of a paragraph by pressing the SHIFT key and then pressing Home or End
You can change a range of selected in large amounts by pressing the SHIFT key and then pressing Page Up or Page Down
By combining these select operations in Cradle, you can easily work with even long blocks of text.
If you have not tried some of these technique, please try them!
In Cradle it is very simple to see multiple queries!
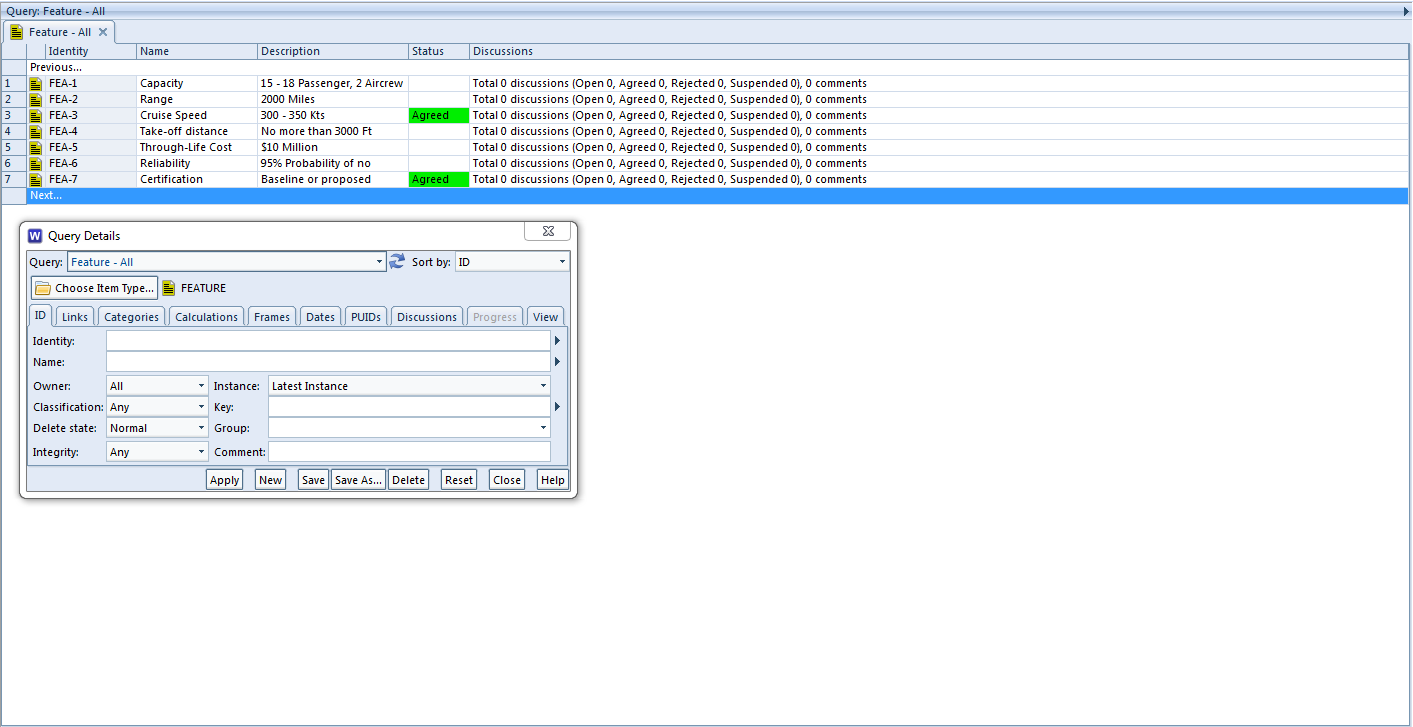
First of all run your selected Query and this will open in a pane as usual such as shown below:
Pane 1 – Query Feature
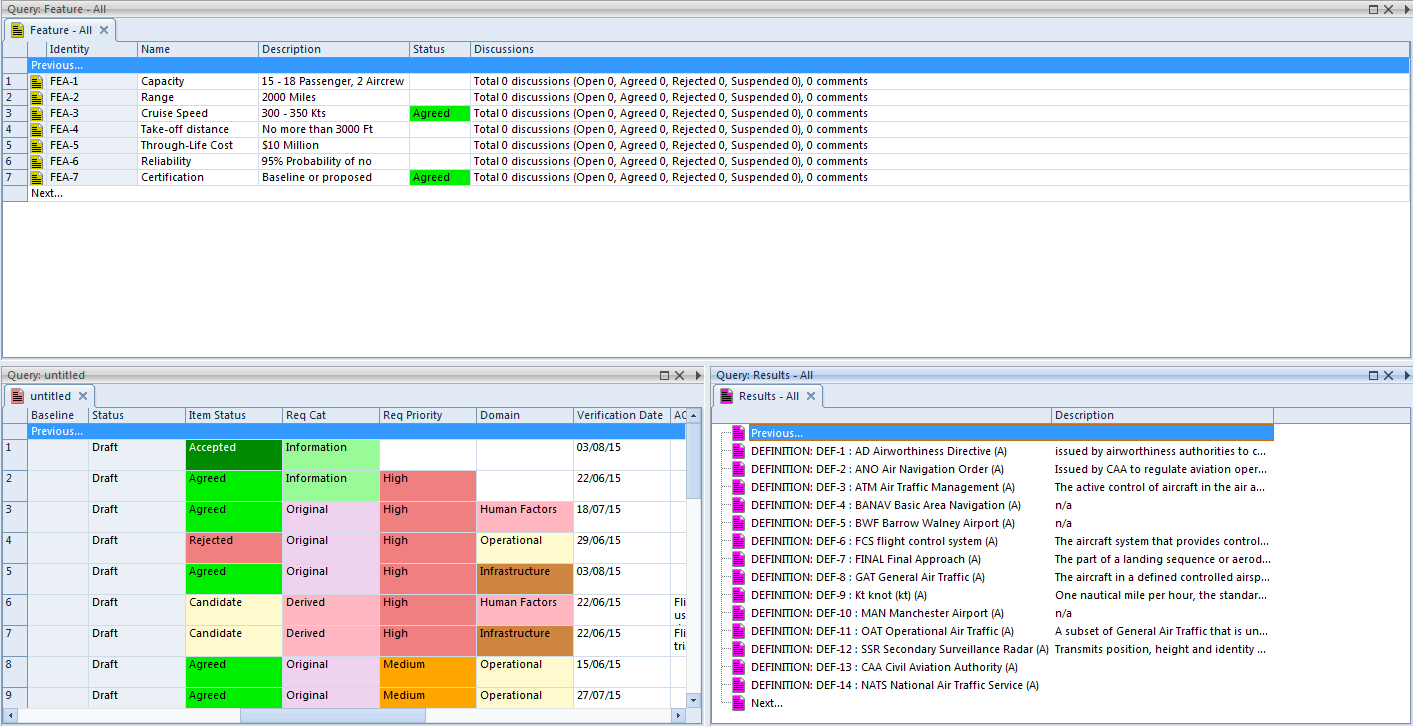
Now in the Top Right of the Pane you will see a little Arrow pointing right, if you select this you will be able to “Split Top/Bottom” or Split Left/Right” Creating a new pane. In that pane right click and you will have the option to “New Query…” This can be done multiple times. Showing multiple queries in views, multiple items in forms or multiple diagrams As you can see by my example below I have 3 Queries open all with different views and styles.
Multiple Queries
For further information on Multiple Queries click here