Cradle Enterprise Overview
Collaborative Model Based Systems Engineering across the Systems Lifecycle
Complete Application Lifecycle Management (ALM), Model Based Systems Engineering (MBSE) and documentation solution for the entire project lifecycle, fully user-definable and applicable to all agile and phase based processes.
- Supports the full systems development lifecycle at system, subsystem and lower levels
- Integrates in one product features normally spread across separate tools from different vendors
- Completely user-definable and user-extensible with point-and-click UIs
- Manage any information, including requirements, risks, interfaces, tests and verifications
- Scalable to millions of items of information
- Full traceability of data from external sources and version management of source documents
- Full traceability and coverage analyses
- User-definable views of data including tables, trees, documents, matrices, diagrams and graphs
- User-defined metrics and management dashboards
Cradle Enterprise is a complete multi-user solution to manage, trace and document all the data for your agile and phase-based projects.
Capture and Track Information
Capture information from external documents and tools, and track changes in these sources. You can build new sets of requirements, analysis, architecture and design models, tests or verifications, and link them to the source data and to each other. Check the consistency and quality of this information, and prove the integrity of the models and other data with bi-directional coverage and traceability analyses.
Customers’ confidence can be raised with proof that your work satisfies its sources and constraints, and will meet their needs.
Easily track progress with metrics and KPIs and link to your WBS and actual progress to your project planning tools.
Create Databases and Information
Create any number of databases, each with a schema and multiple projects that contain any number of items of any number of user-defined item types. Each item has any number of attributes with up to 1TByte of data, held in Cradle, or referenced in files, URLs or other tools.
All items can be linked with user-defined types of cross reference. The links have attributes to justify, explain or parametise them. Links are direct and indirect, for full lifecycle traceability, impact and coverage analyses.
External documents can be loaded into hierarchies of items. Every item in Cradle is linked to its source in a document. Changes in new document versions are automatically found and the database updated. You can prove the integrity of all source data to your customers with a range of detailed coverage analyses of their documents.
Items can be linear, hierarchical and in many-to-many relationships. Items can be split, merged and reordered. All information can be shared and reused. Cradle can support product ranges, models, variants and builds, and generate comparative analyses between them as tables, pivot tables and matrices.
Create any number of analysis, logical, process, architecture or design models in SysML, UML, SASD, IDEF, ADARTS and other notations. Optionally group models in hierarchies and link elements of all models to requirements, SBS, issues, test cases and all other information.
Track and View Information
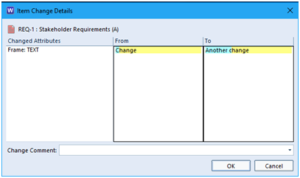
Cradle tracks all edits to every requirement, test case, verification and all other information that you want it to hold. Edits can be reversed selectively or by group. Full or partial change logs are readily available.
Control the work with team hierarchies, roles and access controls. Review items with discussions, user-defined workflows and built-in CM with baselines, full version control and formal change management.
You define how information is viewed and reported in any number of views, shown as nested tables, trees, matrices, pivot tables and as diagrams.
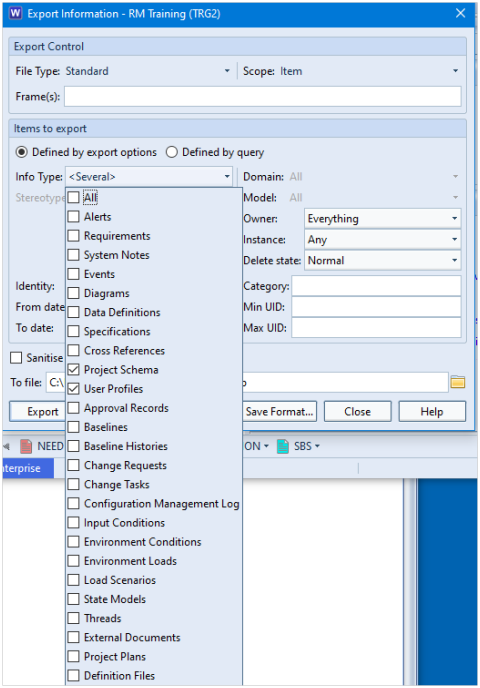
Generate versions of documents such as a URD, SRD, IRS, SDS and SSDS to match your or your client’s formats with user-defined templates and detailed traceability of which items were published in each document issue.
Manage Projects
Manage your projects with:
- Metrics, user-defined calculations of items’ values
- Key Performance Indicators (KPIs), results of metric calculations with colour-coded display bands
- Bi-directional links to Project, including user task lists and actual progress reporting
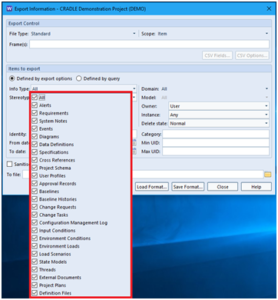
Cradle is open. It supports many import/export formats, has several interface mechanisms to link to other tools, and connects to Microsoft Office components Word, Excel, PowerPoint, Visio and Project.
Cradle is simple to customise and use through point-and-click UIs.
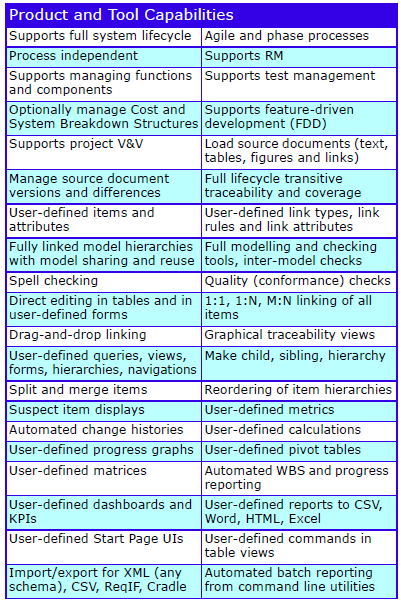
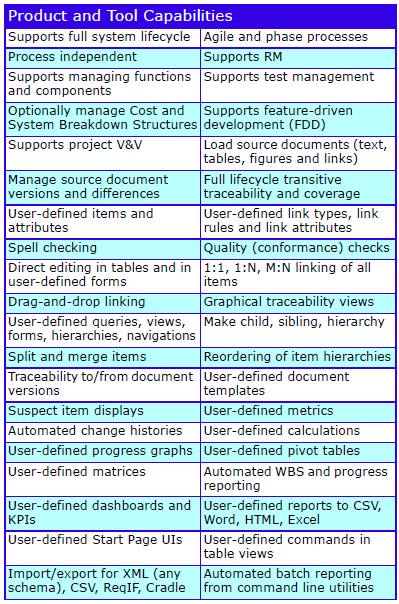
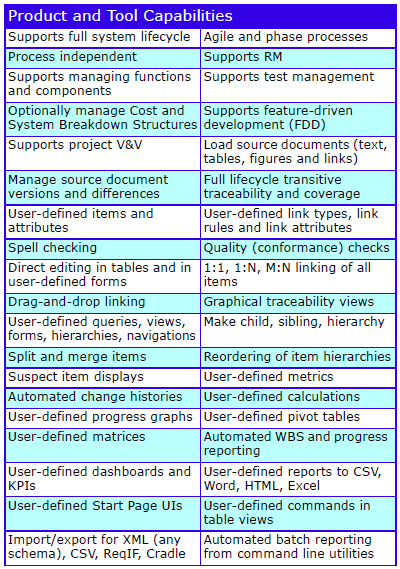
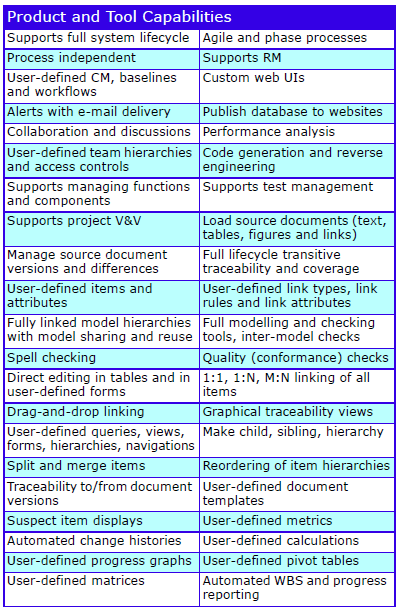
Major Features
The major features are:
Supported Platforms
The supported platforms are:

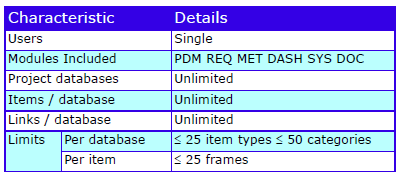
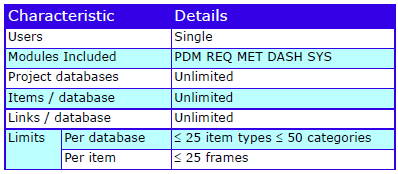
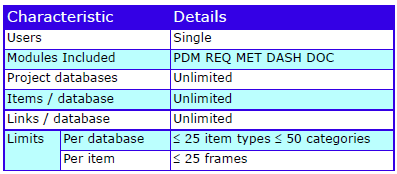
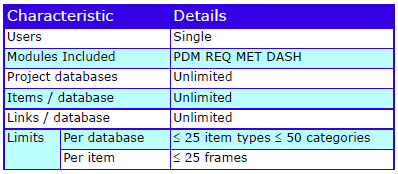
Characteristics
The characteristics are:

Cradle Enterprise is part of the Cradle product range that includes low cost, single-user tools.
Product Range Highlights
- Applies to agile and phase projects
- Application lifecycle management
- Requirements management
- Modelling / MBSE
- Test execution / risk management
- Full lifecycle integration
- V&V and compliance management
- Reporting / document publishing
- Metrics
- Dashboards
- Project plans
- User-defined UIs
- Custom web UIs
- Configuration management
- Multi user