Hiding Unused Item Types

Each Cradle project contains item types that can be linked together by cross references:

  • You define the types of items, their characteristics and their attributes
  • You define the types of cross references and their attributes, and the rules by which they link items

There are several item types that are included by default in Cradle, such as:

  • Source documents – captured using Document Loader
  • Formal documents– formal saved Document Publisher output
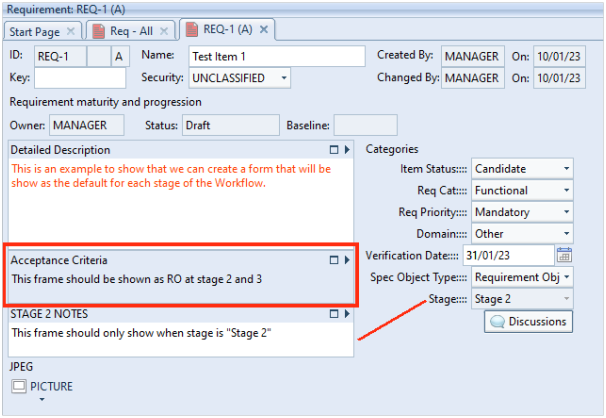
  • Requirements – standard requirement type that you might wish to replace with a system note type instead
  • Events – used in the analysis stage of a project to model the environment of a system and to describe how the system interacts with this environment
  • Essential Domain – analysis models
  • Implementation Domain – design models
  • Project plans – integration with Microsoft Project
    Items shown in interface
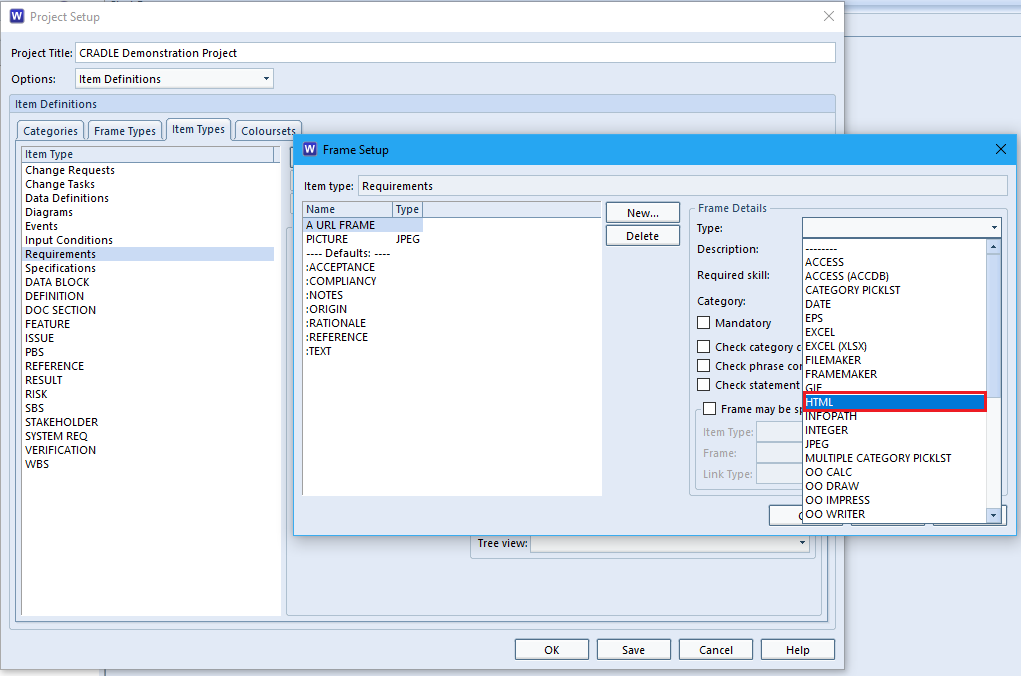
    Before hiding unused item types

    Some of the item types might not be necessary in your schema so you can remove unused item types/information in the Miscellaneous section of Project Setup:

    Hide option in Project Setup
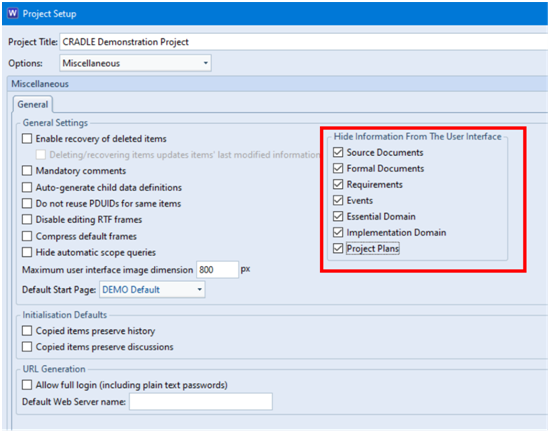
    Setting item types to be hidden

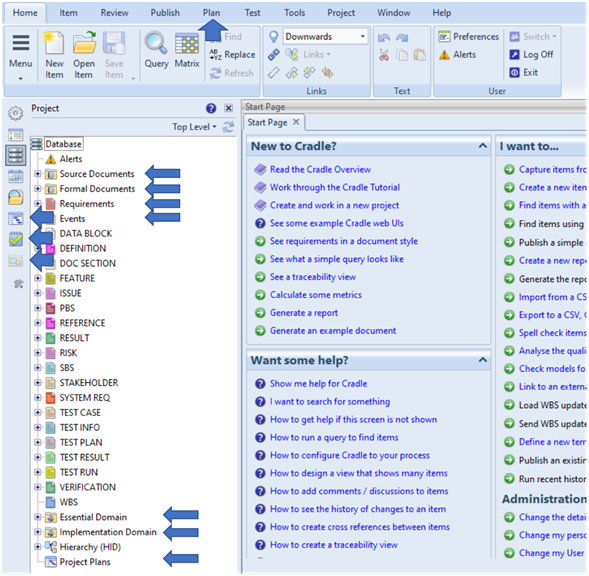
Once applied and WorkBench restarted, you will no longer see the item types/information you have chosen to hide. This includes:

  • Project sidebar nodes
  • Sidebars
  • Menus
  • Item type chooser
  • Query, View and Form Details dialogs

    Items hidden from user interface
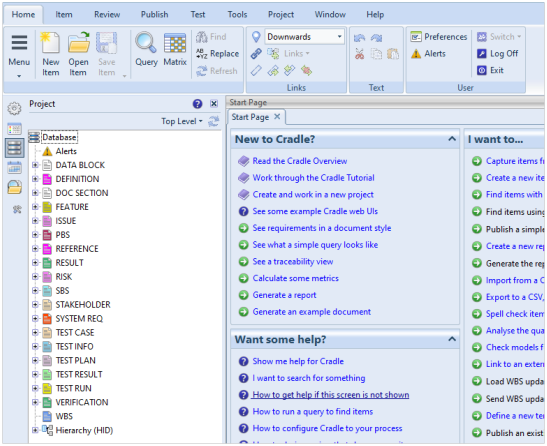
    After hiding unused item types

This also applies to the Web Access default and basic user interfaces.

Using a Form for Each Workflow Stage

Example Scenario

Cradle items can contain many frames, categories and other attributes that might not necessarily be relevant or required to be shown at different stages of your workflow. An example of which is shown below:

Item showing stage frames

The example provides frames that should only be shown at the relevant stage in the workflow and the Acceptance Criteria, we decided that we wish to show this information at all stages but displayed read-only at stages 2 and 3.

Defining a Stage Category

To start with, create a category to base the workflow on. This must be set as mandatory and have a default value set.

Setup category values

You can then assign this category to the item type. In this example we have used Requirements:

Assign Category
Assign category to item type

Defining the Workflow

In the Workflow Settings, create a workflow that uses the Stage category to advance to the next stage of the process. In this example, we demonstrate a very simple workflow that advances from Stage 1 to Stage 2 and then Stage 2 to Stage 3. The 3rd level shown here is to then advance to formal review:

Show workflow stages

You can then set this as the default workflow for the item type:

Set default workflow

Note that the Stage Category Form… button becomes active. We will come back to this later as firstly you need to create a form for each stage.

Creating Forms

Using the Form Details dialog, create a form for each stage of the workflow.

Stage 1 Form

The Stage 1 form in this example should show the frame STAGE 1 NOTES but not STAGE 2 NOTES or STAGE 3 NOTES.

Stage 1 form
Stage 1 form

Stage 2 Form

The Stage 2 form in this example should show the frame STAGE 2 NOTES but not STAGE 1 NOTES or STAGE 3 NOTES. You can also set the Acceptance Criteria frame to only be shown read-only as in the example below:

Stage 2 form
Stage 2 form

Stage 3 Form

The Stage 3 form in this example should show the frame STAGE 3 NOTES but not STAGE 1 NOTES or STAGE 2 NOTES. You can also set the Acceptance Criteria frame to only be shown read-only as in the example below.

Stage 3 form
Stage 3 form

Setting the Stage Forms

You can now return to Project Setup and press the Stage Category Form… button:

Project Setup Stage Category Form button
Stage Category Form button in Project Setup

This will allow you to specify the form to be used at each stage of the workflow.

Stage Category Form dialog

Advancing the Item

When you first create the item, the Stage category is set to Stage 1 as this is the default value for the item. You can see here that the STAGE 1 NOTES frame is shown and the Acceptance Criteria is read-write:

Advance option
Advance option in ribbon

Pressing the Advance… button closes the item and changes the Stage value to Stage 2 once confirmed in the Advance Operation dialog:

Advance Operation dialog

When you open the item again, you will see that the Stage category is set to Stage 2 and will use the Stage 2 form that shows the STAGE 2 NOTES frame and the Acceptance Criteria is read-only:

Item showing stage 2
Item in form showing stage 2

Advancing the item again uses the form that has been created for Stage 3 and so on.

Summary

WorkBench allows you to create a specific form for each stage of your workflow. This can be particularly useful if the frames, categories or attributes only need to be shown at certain stages of your process. It would simplify the user interface for the users that are modifying the items as they would not be presented with information that might be irrelevant to their task.

Forms – Collapsible Panels

WorkBench Forms

A form is a layout template that is used to display information about items within Cradle. There are multiple attributes of an item that may be displayed, from the name, to categories, to frames.  Forms can soon get complicated, this is where collapsible panels can help.

Collapsible Panels

A feature new in Cradle 7.4

Collapsible panels are placed as a row, or a column on a form definition. These can be barked to display as a normal row/column when opened or to “Show collapsed by default”

The bar at the top of the panel toggles its open state.

Q&A

Some of the questions often asked regarding forms.

Q: What if a user does not have a skill required to see an attribute?

A: The form will not display this particular aspect of the item. There is no need to create a separate form.

Q: I’ve just added some new frames and categories. Do I have to design a new form?

A: No, the Automatic scope forms will generate a basic form with the new elements included.

Q: Do I have to start from scratch designing a form?

A: No, you can choose any existing form (including the automatically generated ones) suitable  for that item type, make your changes and then ‘Save As‘ to store the newly altered definition.

Q : Do you have to show everything that every user needs on a form?

A: No, forms can have a scope of System, Automatic, Project User type, Team User, or Personal. This allows different users to show different aspects of an item most relevant to them.

Q: Can I show related items?

A: Absolutely, linked items can be shown within a form.

Q: Can I convert existing forms?

A: Yes, just select an existing Row or Column and change the Syle from Basic to Panel. then Save or Save As

X-Ray Day 2017

 X-Ray Day 8th November 2017

X-Rays  are a form of electromagnetic radiation or “ray” for short.

When first discovered, these mysterious rays were nothing like anything that had been described before, hence the ‘X’ name has stuck.

X-rays have a wavelength less than 10 nanometres, that is, they are shorter than those of UV, and longer than those of gamma rays.  It was a German scientist Wilhelm Röntgen often credited with their discovery.

Looking Inside Cradle

Thankfully there is no need to use X-Rays to look inside your Cradle project.

Information once stored can be recalled by Queries and presented in Views or Forms. Output can be directed to HTML or RTF tables, shown graphically as a Hierarchy diagram, explored by clicking links. Formal publishing to Microsoft® Word documents can be achieved through Document Publisher.

In short there is no mystery to your data once inside Cradle unlike our bones, welded joints or airport suitcases you can easily see your data.

Celebrate on X-Ray Day 2017

Celebrate the genius of a very useful tool in the x-ray machine. Whilst we don’t advise you have an x-ray for fun, you could download another useful tool here!

See More of Your Items’ Details

Items with large amounts of data in might be useful for current projects but if you can’t see all the information inside that item then this can be quite frustrating. Cradle allows you to customise views, drag out items and reshape queries to best suit you and your projects. Very useful when dealing with large amounts of data.


Needing all the details for your item to be on display?.

Once you have run a query, you may find the WorkBench ‘View’ you have chosen isn’t quite big enough to see some of the cells. This can be frustrating as there is a balance between the number of items shown and the detail shown for each item. You may need to see more information for one or for all the items shown.

Solution

You could, of course, edit the ‘View’ (provided you have the CREATE_DEFS privilege). However,  you don’t need to change it just to see more of your items’ details on the screen.

Cells in a ‘View’ can be dragged Selecting of Document View from toolbarwider or deeper. You can switch to ‘Document View’ mode to increase the cells height to match their content.

Alternatively, clicking the icon is a quick way to open in a ‘Form’.

Article Updated 30/01/2019 – Added intro

Opening an External URL reference from a Form

Referenced Information

Sometimes you need to reference an external resource from an item. These external references can be easily achieved by adding  a URL frame to a Cradle item type. Each instance of that item type can then hold a reference to an external resource. The URL can then be opened to view it from the link element in the form.

Creating a URL Frame

While the ability to reference external resources via URL in a form is useful, you must first assign the HTML frame type to your Item Type(s).

It is very easy to do this, simply open Project Setup > Go to Item Types > Select your desired Item Type and click “Frames”. From here, create a new frame and then from the Type drop down select “HTML”.

Screenshot showing how to assign a frame
Assigning a Frame

We hope you find this useful! For information on other useful frame types see this cradle help article.

Article Updated 30/01/2019 – Added extra information


Linked Items in a Form

Seeing other linked items

When you want to see the other items that are linked to the current item in a Cradle display, you can do so by showing the linked items in a Form. This is an effective way to get a comprehensive overview of the interconnections in a formatted and repeatable way.

Linked items shown in a form
Items that are linked to the current item

You can find more information on setting up a form to display this links in this Cradle help article.

Alternatives

You can see items that are linked to the subject item in a number of different ways including:

  • Configure a View to show a linked items column
  • Use the right click context menu and select  Show  Linked  Items
  • Double click the item in a Table View to expand extra rows
  • Follow the [+] expansions in a tree view

The View method is as repeatable as setting in a form, the other methods are transient.

Article updated 05/12/2018 – Added link to Cradle help