Cradle Modules – REQ

Cradle-REQ Module

The Cradle REQ module provides a complete requirements capture and engineering solution with built-in CM. It can manage needs, risks, products, features, tests, validations and any other data. It is easily applied to both agile and phase-based processes.
REQ Requirements Management Module

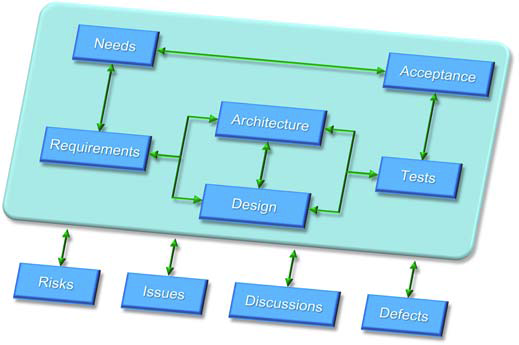
Requirements management is part of every agile and phase process. Stakeholder needs are captured, analysed and engineered. Changes are tracked in a CM system. All needs will be linked to design, build, test and acceptance information. In agile, this is in every sprint. In phase-based processes, it is less frequent. But the techniques are the same, and the same tool needs apply that only Cradle provides:

Requirement types can be defined (user, business, system, product, functional or non-functional), user stories and use cases. Link to codes, standards, regulations, knowledge or assumptions. You define other item types to be managed, such as functions, issues, tests, risks, SBS, PBS, WBS or defects. Attributes in these items are controlled, how they will be linked to each other, and their workflows.

Item Attributes

Items have user-definable attributes, each storing or linking to up to 1 TByte of data. Attribute types are user-defined, including dates, numbers, plain and rich text, single or multi-value lists, Office and other documents, and calculations.

The text in requirements, tests, verifications and other items can be quality checked against project-specific rules.

Items can be in hierarchies, groups and many:many relationships. You can create projects using a common library. Product ranges, models, variants and builds are supported. Items can be shared and reused in any of these structures.

Capturing Items

Items can be captured from external documents by Document Loader. It reproduces the document structure in a hierarchy of items. Each item is linked to its origin in the document. Figures are loaded automatically. Tables can be captured into items, images, Word objects or rich text.

Document Loader finds differences in new versions of documents. Loading the new version will update items and their links. Coverage analysis between documents and database items are provided.

Full version management of source documents is provided. Regression to previous versions is supported, with reversal of all changes.

Requirements and other items can be loaded from Word, Excel or other tools using plug-ins, data exchange or direct interfaces.

Analyses

Coverage, traceability and impact analyses are easily run, then viewed as trees, lists, tables, matrices, or in dynamic Hierarchy Diagrams with user-defined attributes. Items can be filtered, sorted, split and merged. All changes to items can be logged. Users can be alerted to changes by Cradle, email or both.

Discussions

Users collaborate by adding discussions to items and adding threads to items and adding threads of comments to these discussions.

Reviews

Once stable, items can be progressed through a series of formal reviews that log comments from all reviewers. You define the workflows. Once in a baseline, items can be subject to formal change control using change request (proposals) and change tasks (actions). You can view the database as it was in any previous baseline.

Multiple generations of requirements can be maintained and compared. Multiple sets of variants can be managed to reflect different products in a common family.

Items can be progressed within their lifecycles. The lifecycle of an item represents the series of stages that it can pass through between being created and reaching a final, rest, condition.

User-defined tree, table and matrix views can be defined from a point-and-click UI to show traceability, coverage and compliance. This includes RTMs, VCRMs and PVMs.

Linking Items

Cradle provides transitive cross referencing, in which it follows chains of multiple links between indirectly linked items, so you can see cross-lifecycle traceability in one step. For example, you can view user requirements to tests, where Cradle transparently follows intermediate links via system requirements, functions, architecture components and so on.

Requirements can be linked to test data, safety and other critical issues, risks or any project data. When used with the Cradle-SYS module, user stories and requirements can be linked to functional, behavioural, UML, analysis, architecture and design models organised into any number of model hierarchies in both analysis and design domains.

Publish Information

All information can be published in user-defined reports and formal documents.

Feature Summary
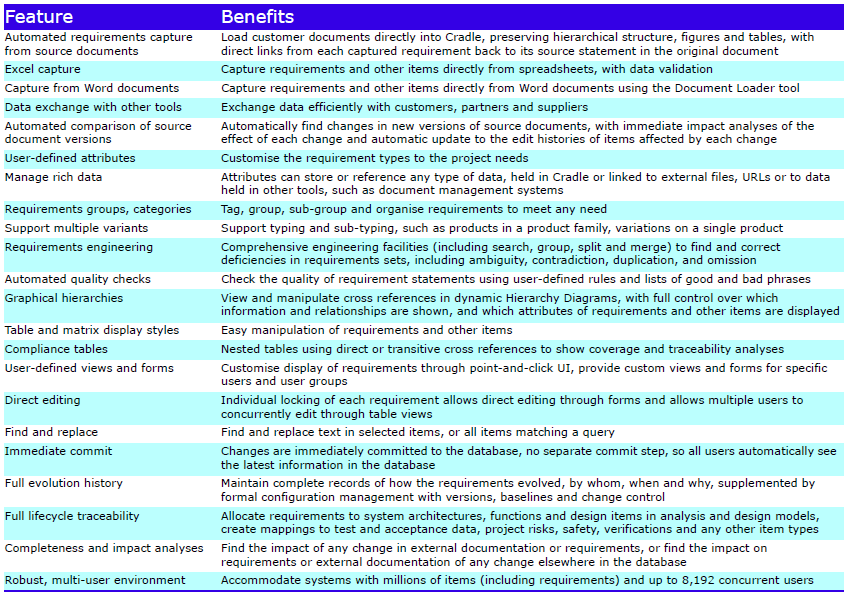
Feature Summary - REQ
Feature Summary – REQ

Please contact 3SL for further information about adding a Cradle REQ module to your existing system.

Dual Monitor Issue – Errors in Toolsuite

Some issues have been detected when running our Toolsuite applications (Document Loader or Document Publisher), e.g. when running dual monitors, with certain scaling settings etc.

Example of Toolsuite Errors

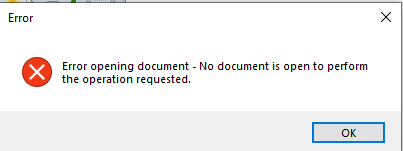
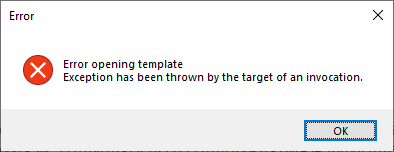
Sometimes when having more than one monitor connected you may see one of the following error messages.

Error message - No document open to perform the operation requested

Error message - Exception has been thrown by the target of an invocation

Solutions

The following solutions can fix the problem without having to remove the monitors.

Scaling

  1. Set the scaling of both monitors to 100%
  2. Restart your machine

Resolution

  1. Set the resolution of both monitors to be the same

Advanced scaling

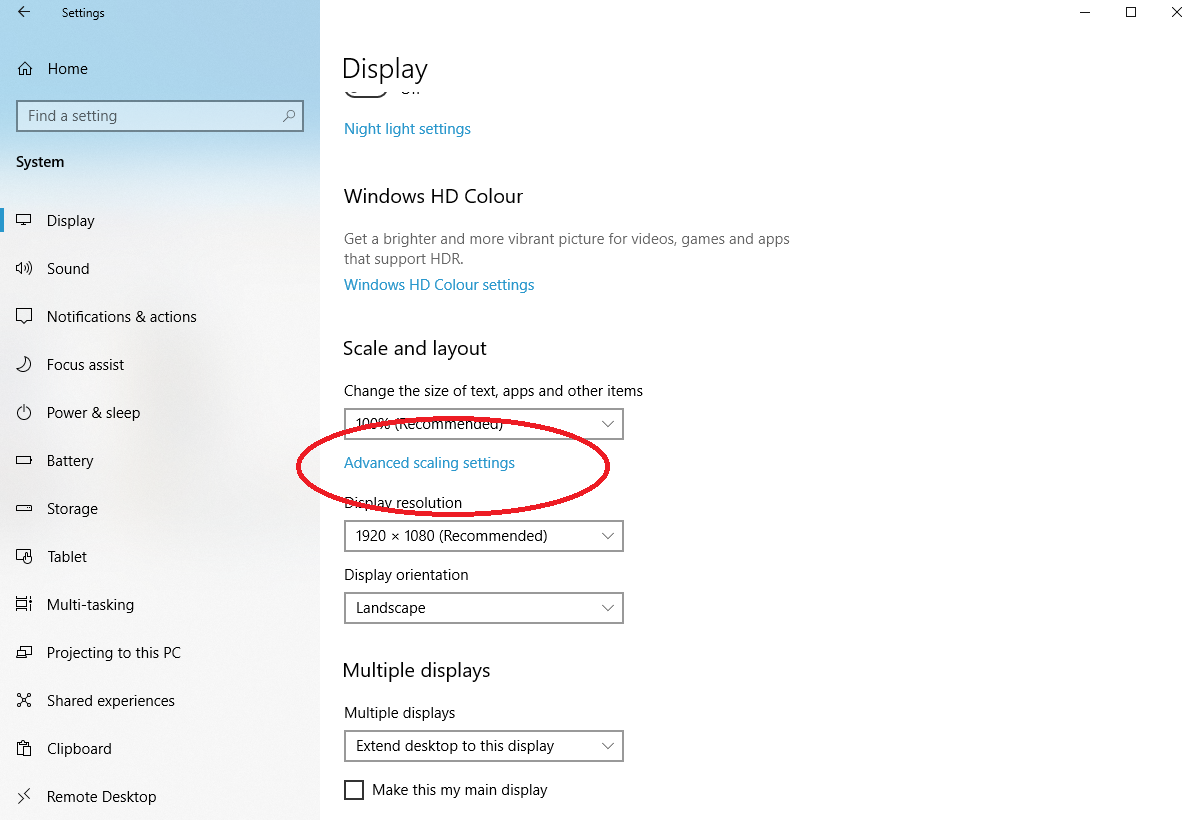
  1. In Display settings click Advanced scaling settingsScreenshot of windows display settings
  2. Enable Let Windows try to fix apps so they’re not blurry
  3. Restart your machine

High DPI scaling override

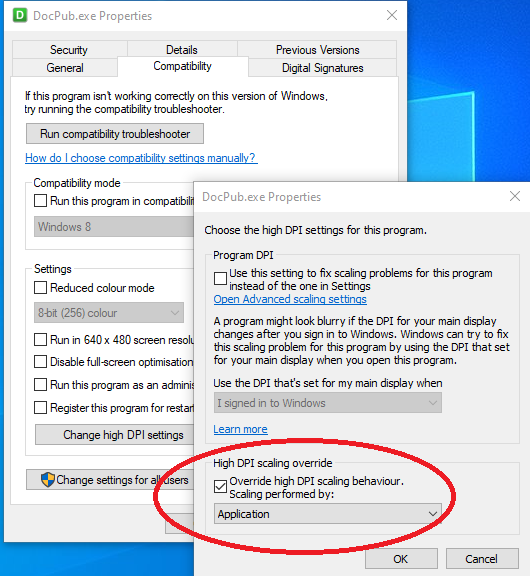
  1. Right click on DocPub.exe and choose Properties. Note: if your problem is with Document Loader then just follow the same steps but for DocLoader.exe
  2. In the Compatibility tab select Change high DPI settings
  3. Enable Override high DPI scaling behaviourScreenshot of docpub properties
  4. Restart your machine

Program DPI

  1. If the above doesn’t work then in the same dialog as High DPI scaling override enable the Use this setting to fix scaling problems…. within the Program DPI section

Optimise for Compatibility

  1. Open Word Options
  2. Select the General tab
  3. In User Interface options ensure the When using multiple displays option is set to Optimize for best appearance

    Word Options
    Word Options
  4. Restart your machine
  5. Test Document Publisher/Document Loader and IF you are still getting the error after following all of the above steps then change the option to be Optimise for compatibility and then restart your machine.

Toolsuite

An overview of the Toolsuite Products in Cradle Software

Toolsuite is a set of tools which utilises the applications in Microsoft® Office. These tools will only work on a Windows environment utilising MS Office from 2007 and up.

Supported Versions and Platforms

The Toolsuite supported versions of MS Office are:

  • 2007 32‐bit
  • 2010 32‐bit and 64‐bit
  • 2013 32‐bit and 64‐bit
  • 2016, 32‐bit and 64‐bit

Any of the Click To Run (CTR) Office suite is also supported by Cradle Toolsuite.

This can be on any of the following Windows platforms:

  • 7 32‐bit and 64‐bit
  • 8.1 32‐bit and 64‐bit
  • 10 32‐bit and 64‐bit

Also it can be installed on the following servers:

  • 2008 R2 32‐bit and 64‐bit
  • 2012 64‐bit
  • 2012 R2 64‐bit
  • 2016 64-bit

Tools

The different tools within the suite utilise the following Office applications:

  • Word
    • Document Loader for loading documents

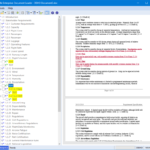
      New document version to be captured using Document Loader
      Document Loader Screen
    • Document Publisher for creating and printing of official documents
    • Spellchecker to check the spelling in item frames
    • Word/document frames for items e.g. .doc and .docx frames
    • Document Coverage shows the items covered by a document
    • Document Compare compares different versions of source documents against each other
    • Word frame to RTF Frame converter
  • Excel
    • Add-in for imports

      The Excel add-in for Cradle's Toolsuite
      Excel Add-in
    • Excel frames for files
  • Project
    • Add-in for importing and exporting to a project file
    • Project frames for files
  • Visio
    • Plug-in allows import of pages and symbols as items
    • Visio frames for files
  • PowerPoint
    • Allows WorkBench to print diagrams to RTF and convert the file to PowerPoint presentations.

Installing Toolsuite

For a successful install of Toolsuite, the MS Office needs to be of one version and not mixed versions. For example, if the user has Word/Excel 2007 but Visio/Project 2013, the plug-in or frames for Visio/Project 2013 is not installed. The installer automatically checks for the architecture of Word/Excel as each MS Office version needs different library files installed by Toolsuite. All other MS applications versions are disregarded if a different version to Word and Excel.

Upgrading or changing MS Office

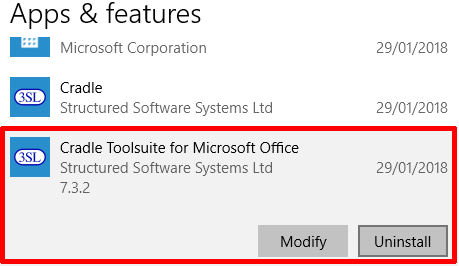
If upgrading or changing your Office then you should always uninstall Toolsuite first. Once Office is upgraded or changed, Toolsuite can be reinstalled to allow the correct library files to be installed.

Uninstall Toolsuite not Cradle

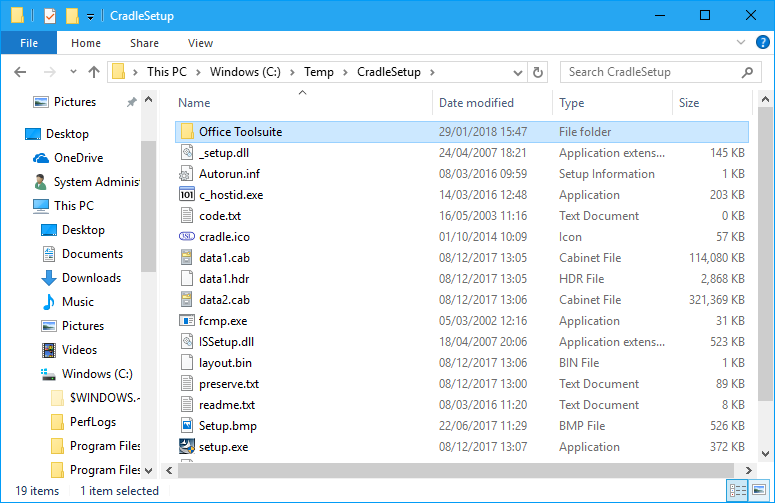
The user doesn’t need to download a separate Toolsuite installer but can find the installer within the main Cradle install folder.

Toolsuite folder
Shows the Toolsuite folder within the main Cradle install folder

During the install the InstallShield will automatically pick the version to install based on the version of Word and Excel that are installed.

Once Toolsuite is installed successfully, you can access the plug-ins by opening the relevant MS application and selecting the Cradle tab. Document Loader, Document Publisher and Spellchecker are opened through WorkBench, Project Manager or the start menu.

The ‘Word frame to RTF‘ frame converter is accessed via a command line utility. This will take Word frames and copy the data into an RTF frame. More information for using the converter can be found by entering c_word2rtf into the Search bar of our Help system or online at https://www.threesl.com/cradle/help.

Both Document Coverage and Compare are used inside WorkBench and are started by selecting one or more Source Documents and selecting the option in a context menu.

For information on binary and other frames types check our help section or search our blog.

Trouble Shooting Issues

If you are having issues with the install of Toolsuite, then try the following:

  1. Make sure your Windows platform is fully up to date including:
    a. Visual V++ Redistributables (https://support.microsoft.com/)
    b. ‘.NET’ (https://support.microsoft.com/)
  2. Ensure the installed MS Office is fully up to date and check compatibility with Toolsuite here
  3. Ensure your old office keys are no longer in the Registry especially if you are using Click-to-Run versions
  4. Check the Compatibility tab in the Properties for the Toolsuite setup.exe. Select Change settings for all users and uncheck the Compatibility mode checkbox at the top of the dialog. Click the Apply button and OK to close Properties.
  5. Make sure you perform  the install with System Administrator privileges not just logged in as an Admin user

If you are having issues after install then try the following:

  1. Make sure you have restarted your machine after the install
  2. Check you have opened your Office and registered it if you need to
  3. Check .Net framework and C++ redistributables are up to date
  4. Make sure your Toolsuite version is the same as your server version

If none of the above trouble shooting works then send an email to support@threesl.com with any logs created, exports and screenshots if possible.

For more information either look for blogs about the individual applications or see our online Help.

Cross References Mapping in a Table for Document Loader

Item Cross References

Item cross references can be captured through Document Loader in several ways. In this blog we deal with how to set Mapping Cross References in a Table. With all items in one or more tables, the linked items are in a cell using a comma to separate them. These cells will be mapped for the cross references.

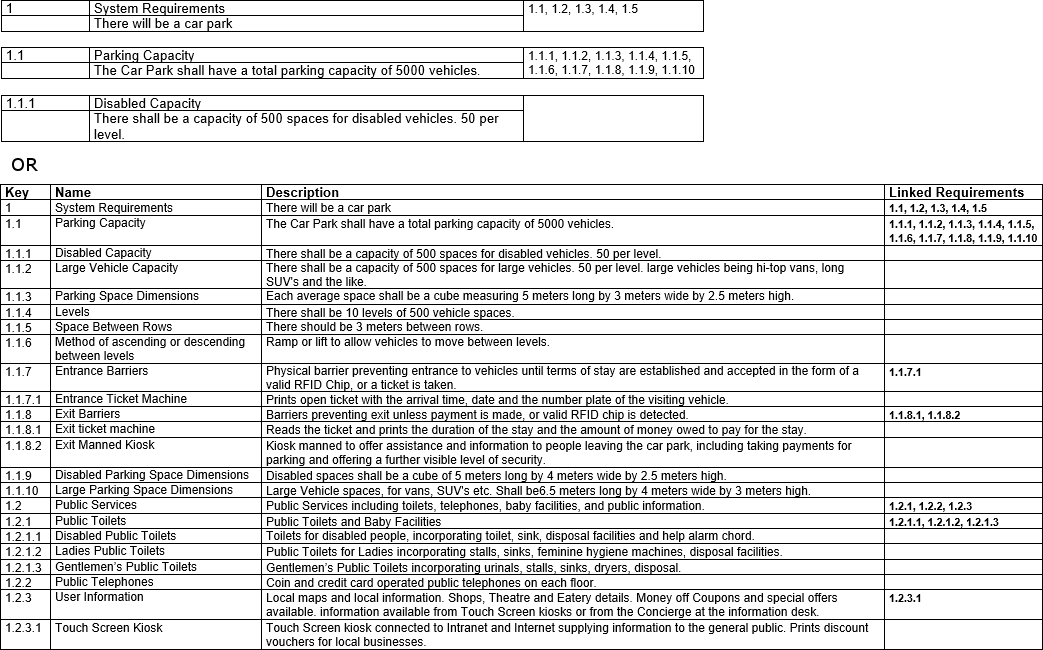
Showing different table layouts
Showing Item Per Table and Item Per Row tables

The tables above show information created in a document. The first shows each item in a separate table and the second each item is a single row.

The columns in the second table are;

  • Key – The Identifying number for the item
  • Name – The text name being assigned to the item
  • Description – The text to be captured into the frame of the item
  • Linked Requirements  – The list of Keys (1st column) to which this item is related. It is not necessary for every item to link From/To other items. For example 1.1 links to child item 1.1.1, it is not necessary to link 1.1.1 back to 1.1 in the table.

You can only set one item type to be linked per table.

Table Mapping

Document Loader allows you to map cross references From or To items of different item types. There will be two options for From and To item types for each item type in the schema. This includes Specifications but not Data Definitions or Diagrams. Cross References can be set To and From the document. This is not necessary as each item has a link added back to the document when captured.

The options will show in a list like the example below:

– Xref from <item type> by identity
– Xref from <item type> by hierarchical attribute
– Xref to <item type> by identity
– Xref to <item type> by hierarchical attribute

Mapping Item Per Table Cross References

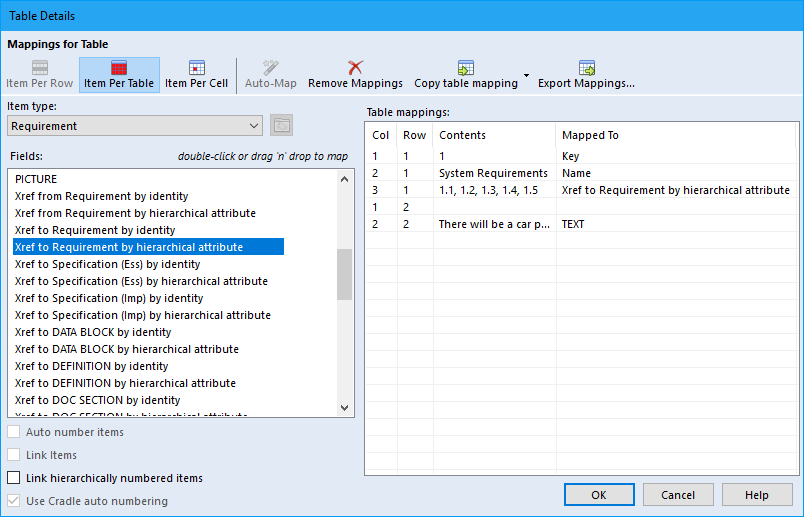
Load your document and right click on the cell you want to map and select Table Details. When the Table Details UI opens if not already selected, click on Item Per Table. To map the cells, the option is pulled over to the right column to the attribute you require it. The  attribute in the right column is selected and then double click on the required option. Map the cells making sure you map one of them to an Identity or hierarchical attribute (Key). Set the cross reference cell by selecting the appropriate option.

For example in the first single table in the first screenshot, the numbers are for the Key attribute of an item. This means using the options with the hierarchical attribute in them.

As the links in the above example are to other items of the same type the option Xref to Requirement by hierarchical attribute is used. This will capture the cross reference from item 1 to 1.1. If I had put the cross reference to item 1 in the cells of the other items, I would have used Xref from Requirement by hierarchical attribute. This would then capture the cross references in the opposite direction of 1.1 from 1.

Item Per Table options
This shows the mapping of a Item Per Table option

This mapping can be exported and used for other tables within the document and selected through the Copy table mapping drop-down.

Mapping Item Per Row Cross References

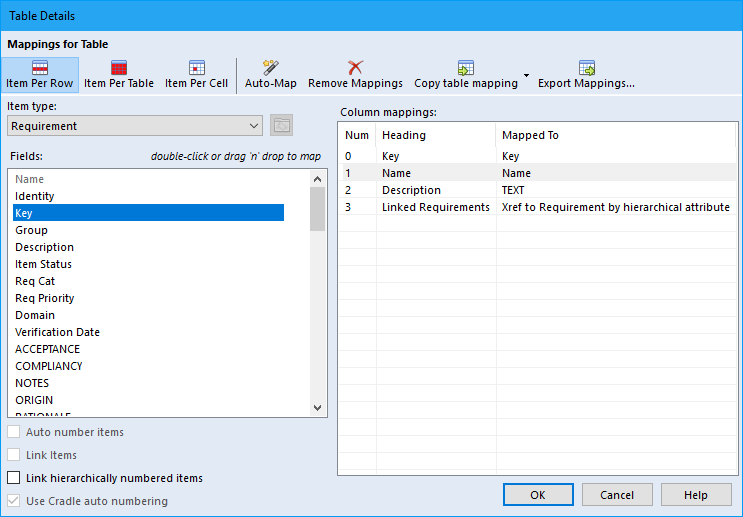
Mapping Item Per Row is similar to Item Per table but instead of mapping cells you are mapping columns. As before, right click on the table and select Table Details. As before set the attributes like Key and Name etc, then set the Linked Requirement using the Xref to Requirement by hierarchical attribute option.

This shows Table Details with the Item Per Row mapped

Capturing the information

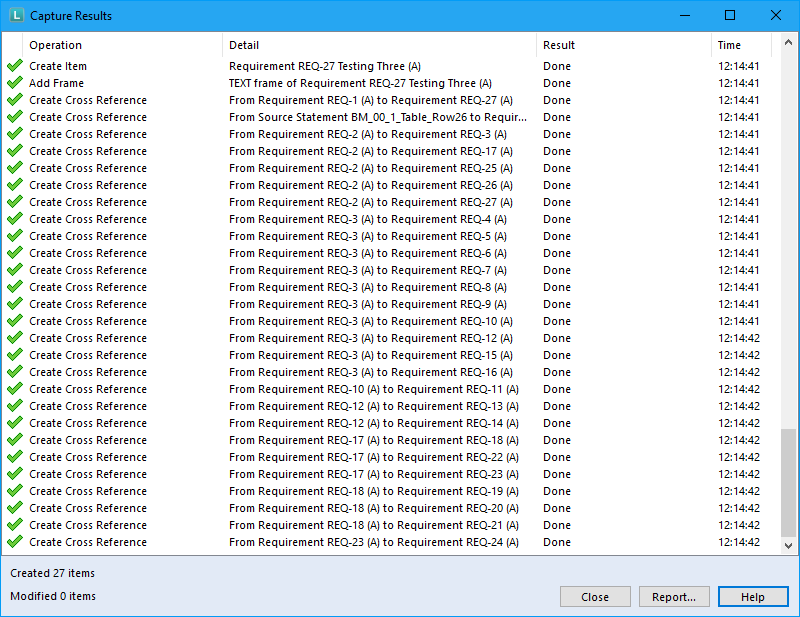
Once all the paragraphs and tables are mapped with the relevant options, the user can capture the document. The cross references from these cells are created at the end of the capture so that all the items should be in the database.

The end of the Capture Results showing the cross references created


Capturing New Document Versions

Capturing New Document Versions using Document Loader

You can capture new versions of source documents in the same way as regular documents. Document Loader compares the two versions of your document and identifies any new or modified source statements. You can select which of these revisions to load into your Cradle project database.

Adding a new version of document and Overwite/Merging

When you load the new version of your document, Document Loader adds or updates the appropriate items in your project database. A new set of bookmarks is created around each source statement and linked to the new version of your source document

Please note that Document Loader does not delete items in your project based on deleted paragraphs in your new version.

As long as you have all items baselined in the previous captured document. When making a new version of the document, Document loader will create a draft of the items.

Document Loader relies on an accurate correlation between the source statements in the current version and the new version of your source document. Before loading a new version it is necessary to consider the nature of the modifications in your document.

We advise taking a backup prior to loading a new version.

Your new version will contain minor revisions to requirement statements with new sections and subsections added. These modifications should have been made with Word’s Track Changes enabled.

If however, the new version contains strong modifications, such as restructured sections or entire sections deleted, then it may be necessary to load your document as a new source document instead. You may still update the existing items in your project, provided that your document contains the items’ identities. To do this you must set the Overwrite option to Merge.

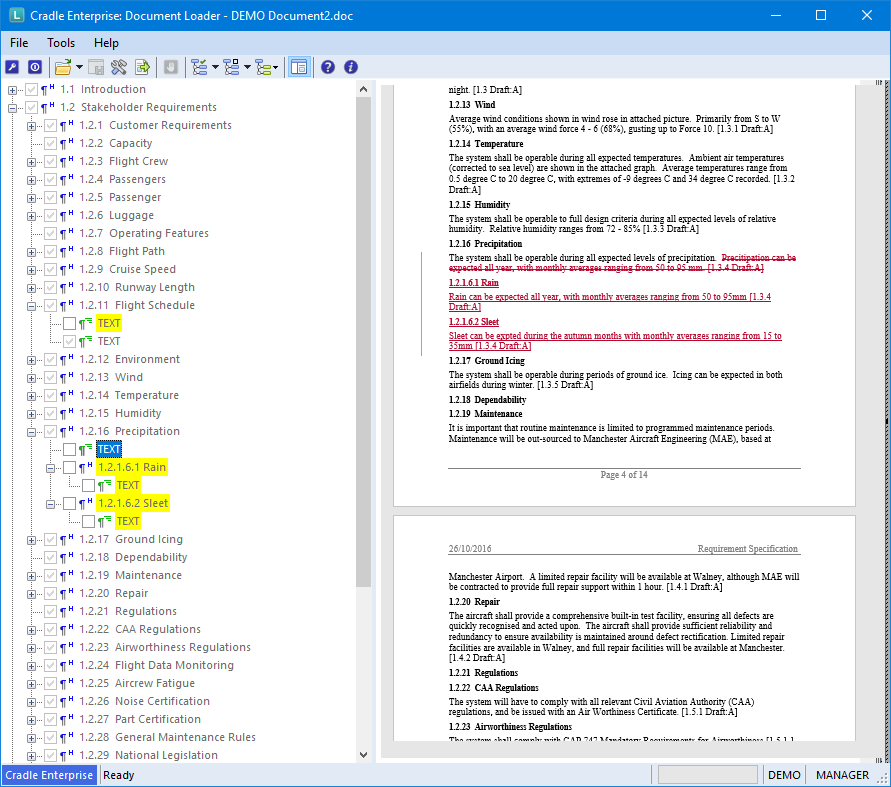
The Document Loader dialog is shown below showing a new document version ready to be captured. As you can see the changes are highlighted:

New document version to be captured using Document Loader
Document Loader Screen

Click here for step by step instructions on capturing new document versions using the Document Loader tool.

Article Updated 04/02/2019 – Updated to include new version with baselined items

Supply Chain Management

How to use Cradle for Supply Chain Management

Managing the requirements to product of  any one supplier.

Any successful project must start by carefully managing its requirements. This follows for every link in the supply chain thus ensuring the full life cycle is efficiently and completely covered. Cradle abilities in Requirements Management and Systems Engineering supports that vital role, retaining the crucial links in managing the product’s development.

Needs, Roles, Requirements, Wants, Restrictions, Drawings.

Whatever you call the pieces of information you handle, you can create an item type to hold this information. You can categorise and add attributes and details to match your business definitions. You can add frames to hold pictures, drawings, or URLs. No need to bend your process to meet the tool, configure the tool to match your working practice.

Managing the links between suppliers

Cradle can also be used to manage contractual compliance at each level in the supply chain. That is, a customer uses Cradle to define their commercial, technical, environmental, health & safety requirements and publishes them as contractual documents.
A supplier can load these documents into Cradle, automatically parse them into their component pieces. They can then develop responses and then generate the completed response document from Cradle.
The customer receives the response documents from candidate suppliers and loads them into Cradle, automatically splitting them into their component pieces – e.g. paragraphs – and linking each supplier ‘answer’ to each of their requirements (the questions). See Document Loader. Then Cradle can help to score the suppliers’ responses.

Once a supplier has been chosen, acceptance criteria, validation methods and validations can be added to the requirements and used to manage the supplier’s fulfilment of the contract.  A formal response is then produced using Document Publisher.

Whatever the level

The handy thing is that the above applies at every level in the supply chain. A company that is a ‘supplier’ in the above can use the Cradle database that they have produced to be a ‘customer’ to their suppliers, one level down the supply chain.

Having Trouble Preparing Your Documents for Capture?

Preparing Documents

Here are some small hints and tips for formatting/preparing your documents correctly, which will save you time and energy otherwise expended on laborious cut and paste exercises.

Microsoft® Word Formatting

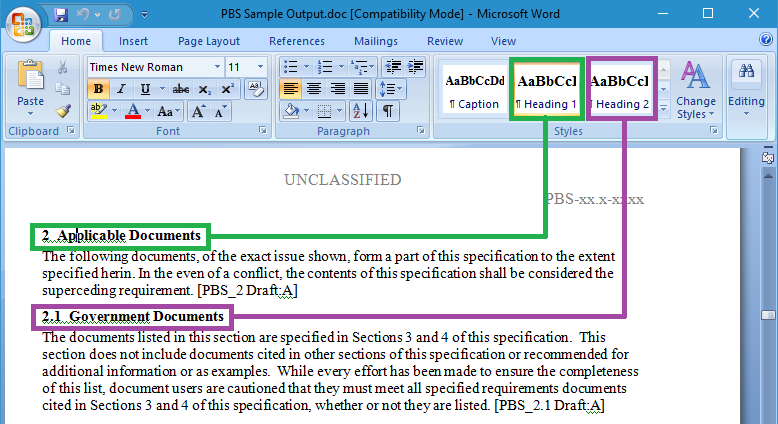
In order to parse documents, Document Loader uses  the hierarchical Word document structure. That is, it will assume that a Heading 1 is of higher importance than a Heading 2. It is important to remember that the document structure is more complex than just making a title by ‘increasing the font size’. Switching views to ‘Outline’ can help you understand how Word see the document. This will assist in preparing your documents for Document Loader to parse.

  • Document Loader expects each requirement to be in a single paragraph and formatted with an appropriate heading style to indicate its level in the hierarchy.

    Screenshot showing different heading styles in document indicating different levels in the hierarchy
    Document heading styles to indicate level in hierarchy
  • Requirement text, figures and other information should be positioned directly beneath the heading and formatted using paragraph style Normal or other body text-level style.
  • Use separate paragraphs for distinct pieces of information, e.g. Assumption text and Requirement text.
  • Always use paragraph styles rather than text formatting to change the appearance of a paragraph.
  • Heading styles apply an outline level to your paragraphs, which tell Document Loader about the level of each requirement in the hierarchy
  • Document Loader prefers pictures and OLE objects to be inserted in line with text. This means the picture is positioned in the text layer of the document, rather than floating on top of the text. In line pictures produce a better document structure.
  • If you use captions to describe the pictures in your document, make sure that the caption is positioned immediately before or immediately after the picture, and formatted with Word’s caption style.
  • If your document contains diagrams built with Word’s drawing objects, then you must ensure that all shapes in the diagram are grouped, otherwise Document Loader will parse each shape as a separate image.
  • If you plan to capture a table with a requirement in each row, then your table must be uniform, that is, no merged cells and have the same number of columns in each row.
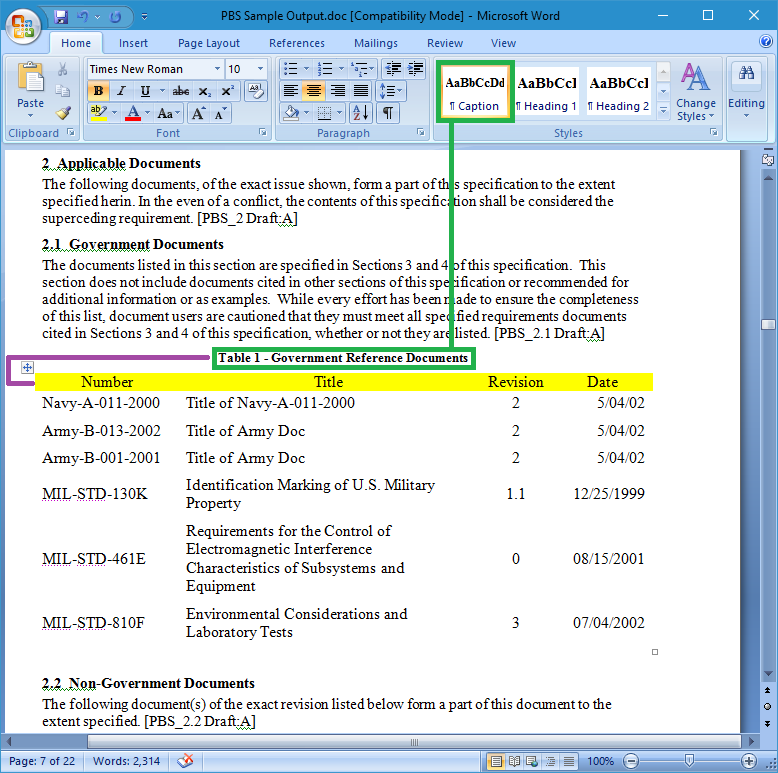
  • As with pictures, if you use captions to describe the tables in your document, make sure that the caption is positioned immediately before or immediately after the table, and formatted with Word’s caption style.

    Screenshot showing captions directly before a table you want to capture
    Caption directly above table

For more information on formatting your documents correctly please refer to our online help.

How do I save my progress in Document Loader?

Saving progress in Document Loader

If you are working on a large document and need to save  your current position, for example if you need to shut-down your PC for any reason. You can save progress in Document Loader by using a session to save a snapshot. You can then return to the same point at a later time and date. You can then continue to finish your capture or just do a little more and re-save the session to continue again later.

A session stores information about the state of Document Loader at a given point, such as:

  • A copy of the current document
  • A copy of the current capture setup definition
  • Which parts of the document have already been captured
  • The state of the Document Explorer tree nodes
  • Any mappings, e.g. table mappings
  • Any changes made in the Options dialog
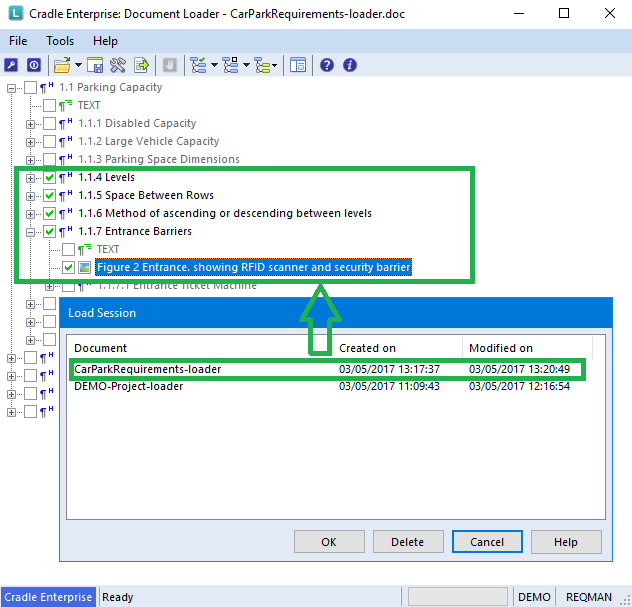
screenshot showing load session retains previous progress
Load Session in Document Loader

For further information on how to save progress in Document Loader and Save/Load and Delete sessions in Document Loader please read this post.

Article Updated –  28/01/2019 Increased image size

Using Sessions in Document Loader

Sick of having to start from scratch when working with large documents in Document Loader? Want to save your current progress and return at a later date?

You can use a session to save a snapshot of Document Loader, so you can return to the same point at a later time. Sessions are useful when working with large documents or if you need to shutdown your PC for any reason.

What is a Session?

Sessions store information about the state of Document Loader at a given point, such as:

  • A copy of the current document
  • A copy of the current capture setup definition
  • Which parts of the document have already been captured
  • The state of the Document Explorer tree nodes
  • Any mappings, e.g. table mappings
  • Any changes made in the Options dialog

How can I save a Session?

You can only save a session when working with a new document; not a new version of a document. You can save a session at any time, so long as you have a document open.

To save a session you can either:

  • Press the Save Session button button from the Toolbar
  • Select Save Session from the File pulldown menu
  • Press Ctrl + S
    (
    The Status Bar shows the progress of the Save operation)

How can I load/restore a Session?

  • To load a saved session you can either:
  • Select Load Session from the File pulldown menu
  • Press Ctrl + L
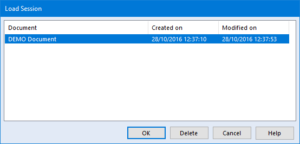
    If you attempt to load a session with a document open you will be prompted to close the current document. The Load Session dialog will be displayed as shown below:
screenshot showing the load sessions dialog
Load Session Dialog

Simply identify the session you wish to load and select it in the list. You can sort on any column by clicking on its column heading; click once for ascending order and again for descending order.
Click the OK button to load the selected session.

How can I delete a Session?

To delete a session you need to open the Load Session dialog by either:

  • Selecting Load Session from the File pulldown menu
  • Pressing Ctrl+L
    Select the appropriate session and press the Delete button. Select Yes to confirm the deletion and Cancel to remove the Load Session dialog.

Full End to End Document Processing

Concept to Creation

Whatever you are making, whatever service you are delivering, you need a tool that supports your process from end to end. You can’t expect a successful outcome without control of your project’s lifecycle.

Complete End to End Document Processing

Despite living in an electronic world, where the promise was a paperless office, we are often faced with needing to manage documents at a number of points over the duration of the project. This is not surprising, even if we don’t handle hard copy,  a document is an tangible object.

Humans relate to the concept of a complete package of information being contained in the document. They generally make good reading if you start at the beginning and read through to the end. Non-fiction documents may be more likely to be read by accessing the index or contents and turning to a page number. Sometimes in an electronic copy there may be a hyper-link to another part of the document. On the whole, however, the format is fixed. You can’t easily re-arrange a document to see its contents from a different perspective, or organise it hierarchically based on a section of your choosing.

Managed and linked requirements, designs, constraints, tests, diagrams and definitions, need to be arranged, searched and traced, to reach our end goal effectively. The ability to see which customer requirements are ultimately verified by a test, or what system requirements are impacted by a customer change to a requirement are invaluable.

Cradle for Your Document Processing

From a document point of view, the triplet of Document Loader, WorkBench and Document Publisher covers the full lifecycle.

  • Customers often provide their initial requirements in the form of a MS Word document. Document Loader will parse, tag and link this information as it is drawn into Cradle’s database.
  • WorkBench is the ideal tool to develop and design, record and trace your project.
  • When the project is at a stage that needs a formatted output, Document Publisher is used.

Continue reading “Full End to End Document Processing”