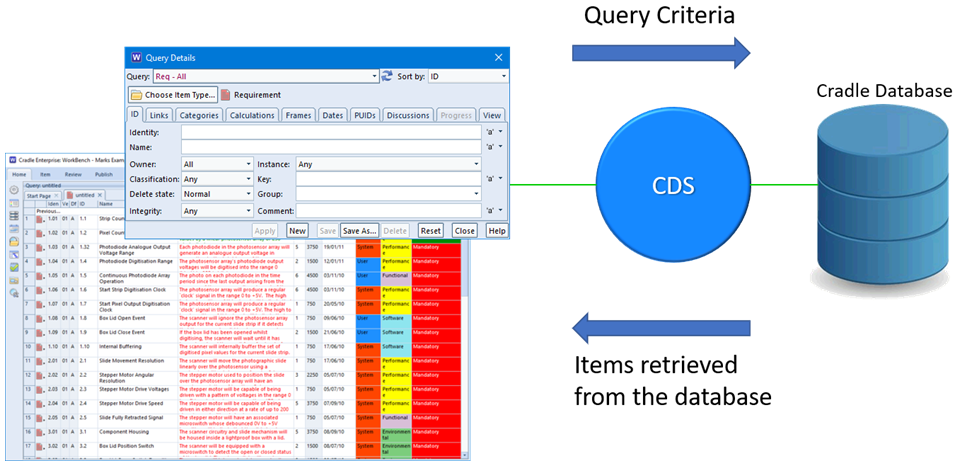
Queries are one of the most fundamental concepts in Cradle. A query performs a search of a Cradle database to find one or more items that match the search criteria defined in the query.
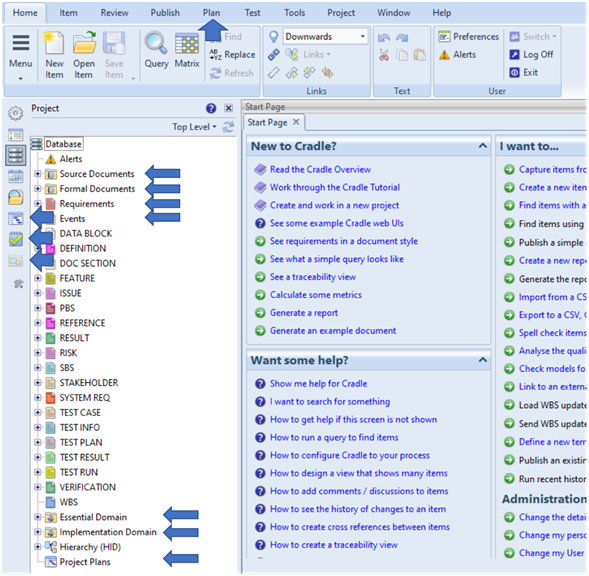
Requirements – standard requirement type that you might wish to replace with a system note type instead
Events – used in the analysis stage of a project to model the environment of a system and to describe how the system interacts with this environment
Essential Domain – analysis models
Implementation Domain – design models
Project plans – integration with Microsoft ProjectBefore hiding unused item types
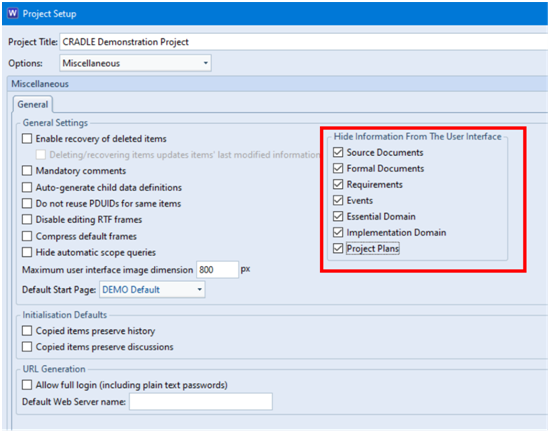
Some of the item types might not be necessary in your schema so you can remove unused item types/information in the Miscellaneous section of Project Setup:
Setting item types to be hidden
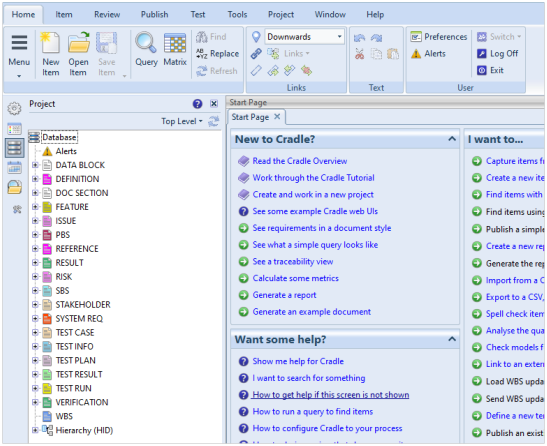
Once applied and WorkBench restarted, you will no longer see the item types/information you have chosen to hide. This includes:
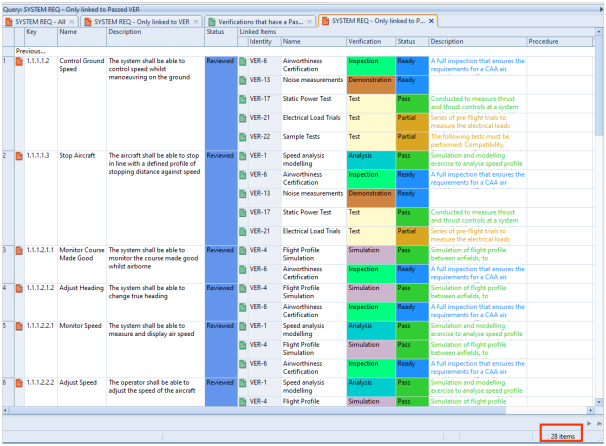
When a query is run in WorkBench, the tool will return a list of the items matching the criteria specified.
As a Cradle database can contain any number of items of information a query could find 0 to 1 million items.
Items in Cradle Database
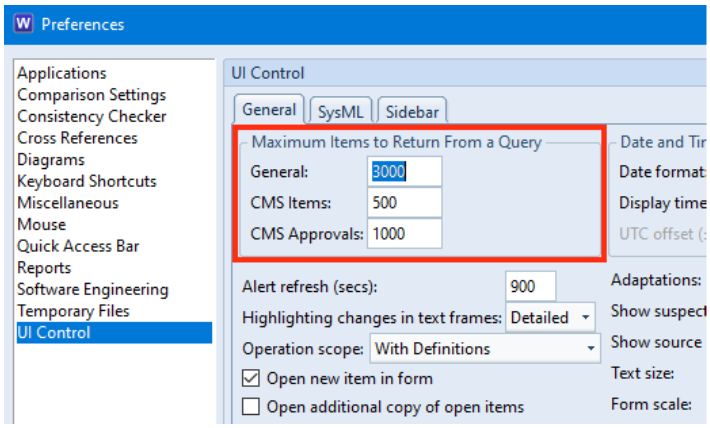
The time taken to find so many items could be excessive. Therefore, queries find and return items from the database in blocks. The default size of a block is 1000 items but can be extended to 8000 items in UI Control user preferences:
Retrieve Item Options in User Prefs
This means that when you run a query it will return at most N items.
Navigating between Blocks of Data
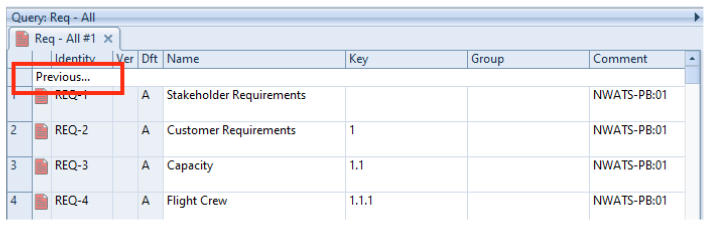
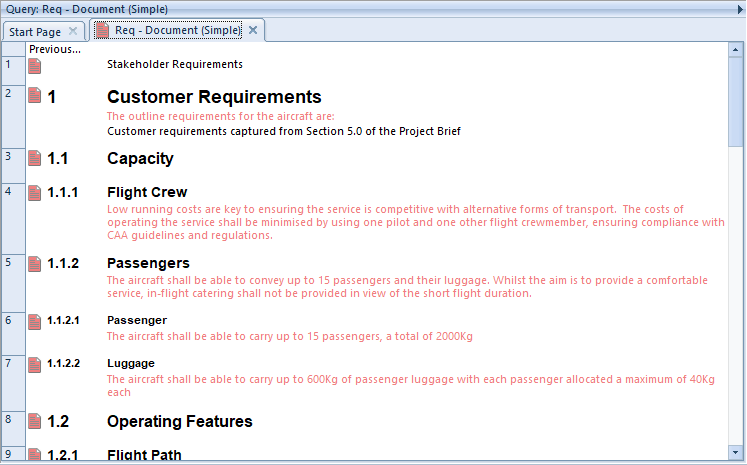
When the block is shown in the WorkBench UI, it is preceded by Previous… and followed by Next….
If you select these, then the query is re-run to find the next block or the previous block of items.
Query showing Previous optionQuery showing Next option
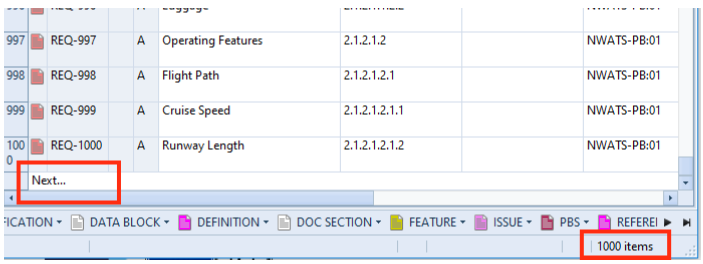
In this example, clicking the Next… option will retrieve the next set of items in the query:
Query showing items
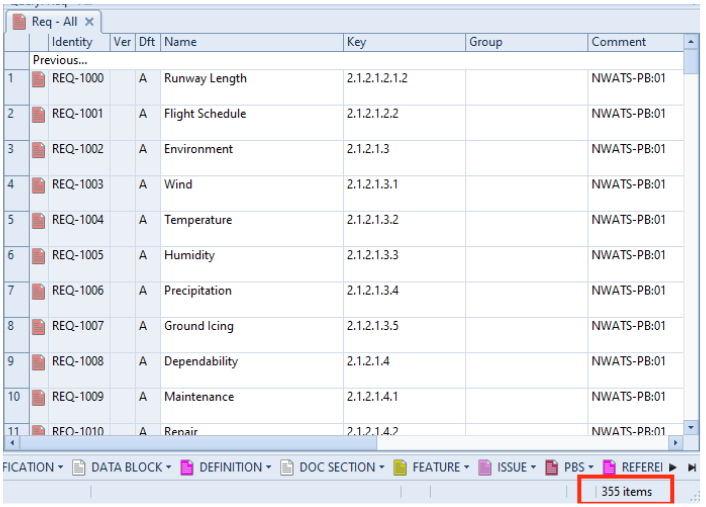
Selecting Previous… again will return you to the previous block of items.
Reporting Items
If you are creating a report or publishing a document using a query, it is likely that you would NOT wish to be restricted by blocks of items.
Reports allow you to specify:
Selected items – items highlighted in the query
All items in this set – the block of N items
All matching items in database – the totality of items matching the query criteria
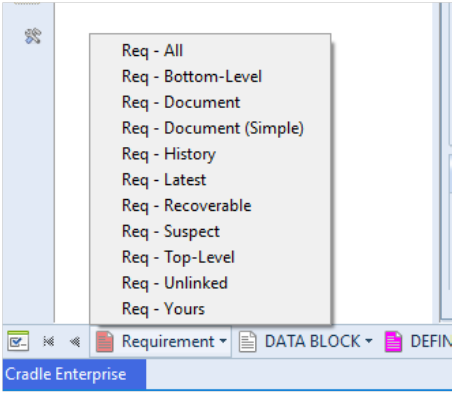
WorkBench provides a QuickAccess Bar that allows you to launch queries by item type from the bottom of the WorkBench main screen. It’s intended to provide quick and easy access to all of the relevant types of information in your Cradle database.
Default Queries
By default, WorkBench is initialised to show a standard (Automatic) set of queries each ordered by the Identity attribute
All – Lists all items that you can access.
Bottom-Level – Lists all bottom-level items that you can access. Bottom-level items are items that do not have any cross references from them to other items of the same type. For example, they have no children.
Document – Lists the latest instance of items that you can access and displays them as a document. For example in Document style.
Document (Simple) – A simplified version of the Document query.
History – Lists the latest instance of items that you can access and displays them in a view showing change histories.
Latest – Lists the latest instance of all items that you can access. There can be many instances of each item, such as many versions of the item.
Recoverable – Lists all items that are in a recoverable state.
Suspect – Lists all items that are deemed suspect.
Top-Level – Lists all top-level items that you can access. Top-level items are items that do not have any cross references to them to other items of the same type. For example, they have no parents.
Unlinked – Lists all items that you can access that don’t have cross references to or from them from any other items.
Yours – Lists all items that you own.
Quick Access Bar query options
These queries may be useful as a starter set of queries. However, it is likely that you will want to tailor the queries shown in the Quick Access Bar to meet your own project needs and use the Project queries and views to display the data.
Note that all automatic queries are ordered by Identity. You might wish to order your Quick Access Bar queries by Key, especially when working with hierarchies of items.
Adding Project Queries to the Quick Access Bar
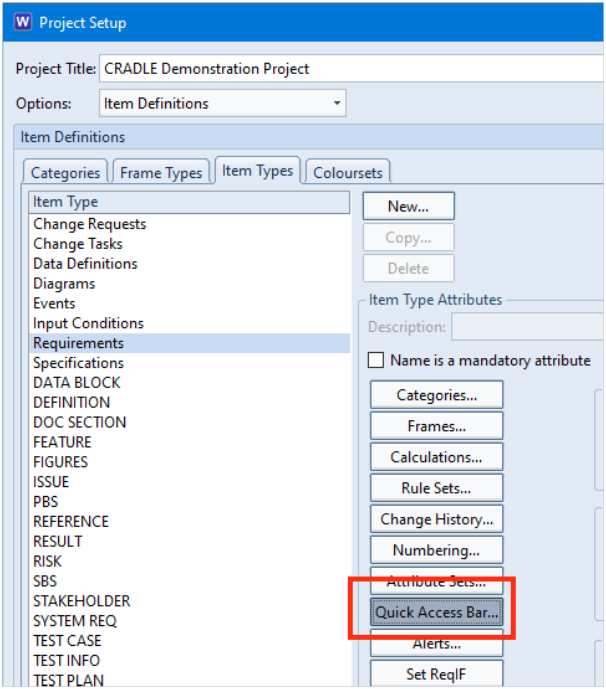
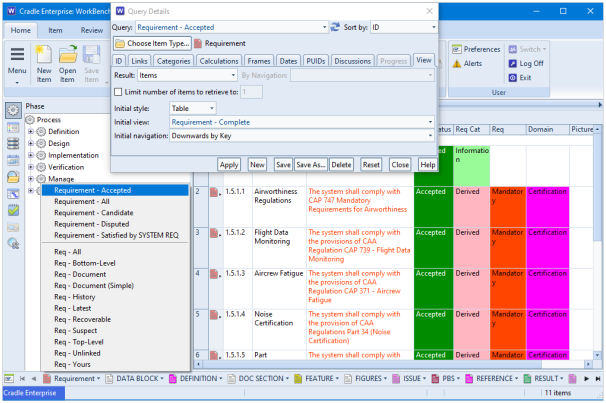
In Project Setup, you can select the item type that you wish to tailor and press the Quick Access Bar button. In this example, we will use Requirements:
Project Setup – Quick Access Bar option
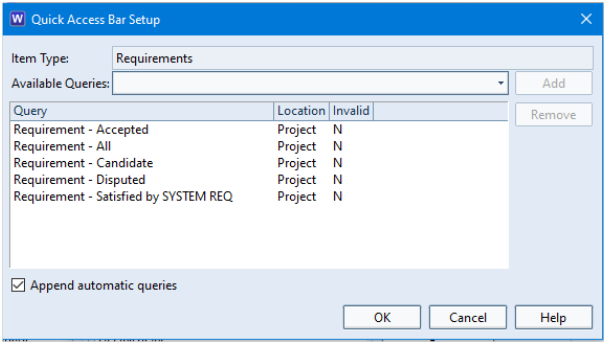
This presents you with a dialog that allows you to add up to 10 Project or System defined queries to your Quick Access Bar.
You can still show the Automatic queries by selecting the Append automatic queries checkbox:
Quick Access Bar Setup dialog
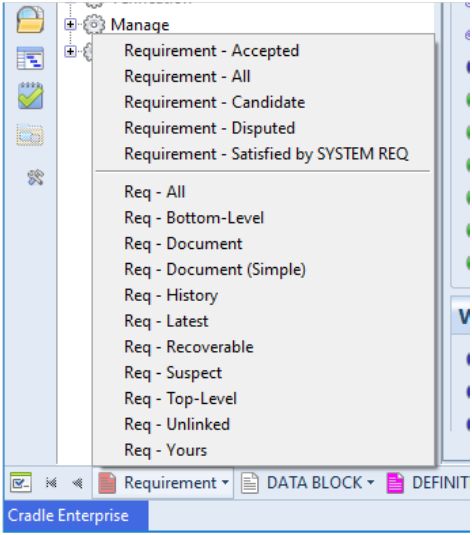
Once applied, all users in the project will see the changes to the Quick Access Bar:
Additional Queries in Quick Access Bar
These additional queries will use the view as defined in the Query Details dialog.
Quick Access Bar – Query Details
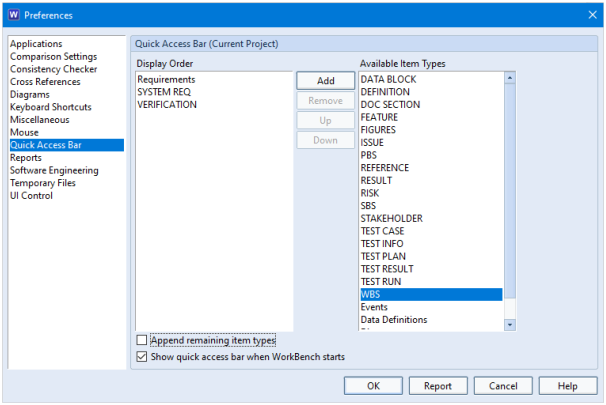
Personalising the Quick Access Bar
You may wish to personalise the Quick Access Bar for your own use to only show the item types that are relevant to you in the order that you wish them to be displayed. You can achieve this in the Preferences:
Quick Access Bar options in Preferences
If you select the Append remaining item types checkbox, all other item types are still shown on the Quick Access Bar after the ones you have selected:
Welcome to the October 2022 newsletter from 3SL that provides a mixture of news and technical information about us, and our requirements management and systems engineering tool “Cradle”. We would especially like to welcome everyone who has purchased Cradle in the past month and those who are currently evaluating Cradle for their projects and processes.
We hope that we, and Cradle, can deliver real and measurable benefits to all of the exciting development projects that we see every day through your regular contacts with our support team. If you have any problems, please do not hesitate to contact 3SL support here.
32-Bit vs 64-Bit
For our next major release – Cradle-8.0 we are considering stopping support for:
32-bit Windows
32-bit Microsoft Office
32-bit Linux
We would like to understand if this affects any of our current customer’s and potential prospects. If you can find the time, please provide your views/opinions to our Support Team at support@threesl.com.
Please note that Cradle-8.0 will not be released until mid 2023 at the earliest.
Upcoming Training Courses
We still have places left on our two remaining Cradle training courses this year.
The next scheduled course is the Cradle Document Publisher course. The dates are 17th to 20th October. Document Publisher is a Windows® based publishing tool that allows professional documentation to be produced directly from the data within your project’s database. Fully understanding how to configure templates and data manipulation will offer the best output for you to provide to your stakeholders, customers, regulators and other interested parties.
The last scheduled course of 2022 is the Cradle Requirements Managementcourse. The dates of this course are 21st to 24th November. This is a great opportunity for small teams, or a couple of new team members to get started with RM and Cradle.
Both courses are conducted over four ½ days.
Don’t miss out! To book a place on one of our online courses please click here!
Training Course Calendar 2023
We are currently preparing our training course calendar for 2023. This will be available soon.
The courses available in 2023 are:
Project Administration:Cradle Training Courses
January and July
User:
January and July
Requirements Management:
February and August
Document Publisher:
March and September
Risk Management:
April and October
Test Management:
May and November
Configuration Management:
June and December
Dates to be confirmed.
Making SWIFT Payments
Recently we have noticed some minor issues with receiving swift payments. If payments are to be made by SWIFT using a MT103 instruction, please ensure Field 71A is set to OUR instead of SHA.
We also paid our respects to Her Majesty Queen Elizabeth II.
Thank You
3SL would also like to thank all of our customers/evaluators/prospects who have found the time to send feedback on our services, e.g. training courses, Cradle support etc. We understand how busy you are, but these responses help us to both monitor and look to improve the services we provide to you. Thank you.
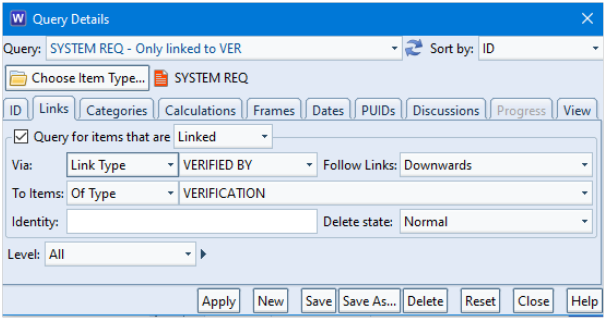
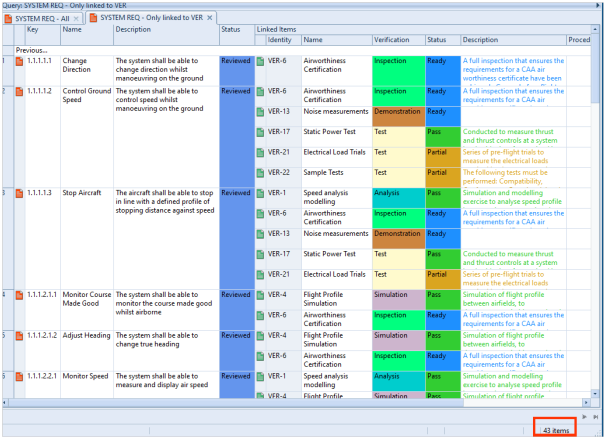
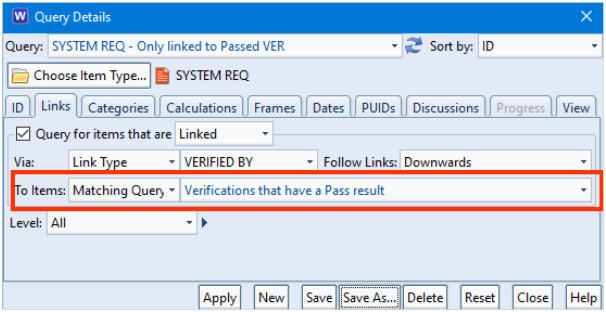
We have created some links between Cradle items but we only want to see a filtered set of these links in our table.
Rationale
Cradle has a unique ability to follow cross referencestransitively. This means that although an item might not be directly cross referenced from it’s source, it might be linked indirectly through another item/item type.
Cradle also has the ability to name cross references referred to as link types and even group sets of link types together referred to as link groups.
Combining these features can allow flexibility for the output of items that have some relationship to the source which will reduce the number of direct cross references required.
For example, we would like to show dependencies between item type A and item type C but ONLY those that have a yellow and blue link type.
Defined Links Between Item Types
We can see in the screenshot below that only A-6 and A-11 are transitively linked to items of item type C with both a blue and a yellow link:
Direct Links in a Nested Table
Setting Link Groups
We can define a link group in Project Setup in which we can select from the available link types.
Defining Link Groups
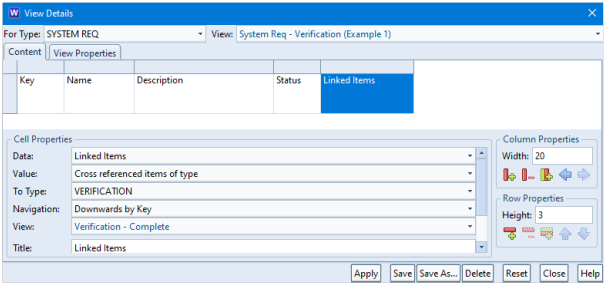
This defined link group can be used in navigations.
Defining Navigations
Navigations allow us to specify how we would like to follow the links that have been created between items. This is a very powerful feature as we can also specify that we would like to follow links transitively:
Defining Navigations to Follow Cross References Transitively
Using the Navigation in Views
We can now use the navigation to specify that we want to show links between item type A and item type C that are followed transitively but we ONLY want to show the group of links YELLOW AND BLUE. Remember that there are NO DIRECT links between these two item types. The cross references are from item type A to item type B and also from item type B to item type C:
Using the Transitive Navigation in Views
Applying this view, we can see that only the YELLOW AND BLUE links are shown in the table. The remainder appear blank:
View Showing Transitive Cross References
Using the Navigation in Queries
We might wish to only show items in our table that have these links in preference to showing all items and just appearing blank where the transitive link does not exist. We can achieve this in the Query Details dialog:
Filtering Items Non-Linked Items in a Query
This will now filter out of the list any items that do not match the navigation criteria:
Link Table Only Showing Items Where Transitive Link Exists
Showing Path in a Tree Style
If we followed the path in a tree style showing downward links, we can see that item type A (A-6 and A-11) are not directly linked to item type C (C-1). They go through item type B (B-2):
Links shown in Tree Style
Summary
Cradle provides a unique ability to allow cross references to be followed transitively (through other items).
Transitive navigations can be applied to views and queries. This provides a very powerful filtering mechanism that allows us to show non-direct dependencies between items.
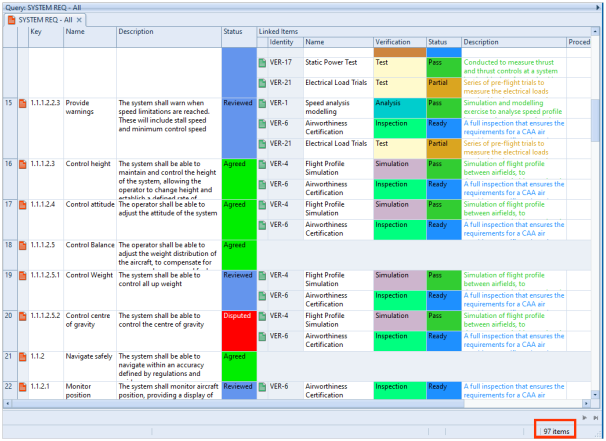
You can find items in a Cradle database by running a query. For example, you can use the pre-defined queries in the Quick Access Bar at the bottom of the UI. Once the query has run, the results are shown in a display style. Tree style is one of the four styles available:
A view is used to specify which parts (attributes) of the items will be shown. A display style controls how these attributes will be displayed, and the facilities that are available to you.
Tree Style
This is the second most frequently-used of the display styles after table style. It displays each item as a node in a tree, with a set of columns for the other attributes:
Items Shown in Tree Style
There are two views used to display trees:
A view that specifies the contents of the node shown in the tree. You specify this view in the schema for the item type.
A view that specifies the attributes shown in columns to the right of the tree
To have items displayed in this style:
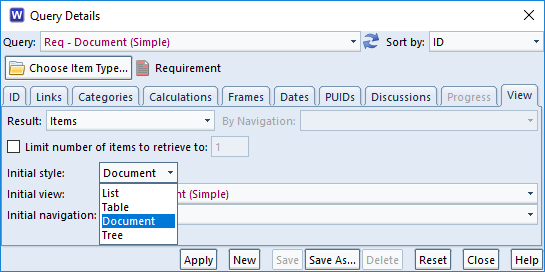
Specify it in the query to be run:
Specify Tree Style in a Query
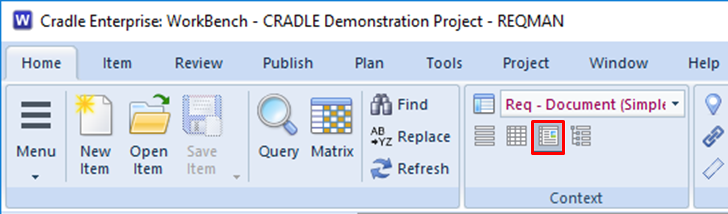
Also, select it from the Context group in the Home tab:
Choose Tree Style in the UI Ribbon
Or, right click and choose Style -> Tree from the context-sensitive menu
Finally, press <CTRL> and 4
Facilities
Use the left mouse button to select individual items
You can select a groups of items by selecting the first and then pressing <SHIFT> and the left mouse button to select the end of the group
Press <CTRL> and the left mouse button to select or de-select individual items
You can shrink and widen the display columns. Move your cursor to the edge of a column heading and the cursor will become a pair of arrows. Press, drag and release the left mouse button to change the column’s width.
You can follow cross references by expanding the tree node for the item. Cradle will find all cross references to and from the item, select which cross references to use, and display the items at the other end of these cross references as new nodes in the tree.
Use drag-and-drop items between trees to create cross references between the items
Drag-and-drop items inside a hierarchy of the same type of items to reorder that hierarchy and automatically rebuild the hierarchical numbering within it
You can expand a tree node by:
Click its + button
Select the text of the tree node and press: +
Select the text of the tree node, right click, and choose Expand from the menu
Double click on the text of the tree node
You can collapse a tree node by:
Click its – button
Double-click on the text of the tree node
Select the text of the tree node and press: –
Select the text of the tree node, right click, and choose Collapse from the menu
Advantages
The advantages of tree style are that it is:
The simplest way to explore items and their relationships
A convenient method to create cross references
The easiest way to reorganise a hierarchy of items
If you want to do anything with cross references between items, or to work in a hierarchy of items, then this is the best display style to use.
Disadvantages
The disadvantages of tree style are that:
It provides a limited ability to display information
You cannot edit information directly
Summary
Tree style is the most convenient method to work with cross references within a set of items and between one set of items and other sets of information.
Therefore, we recommend this style whenever you need to work with cross references between items and inside hierarchies.
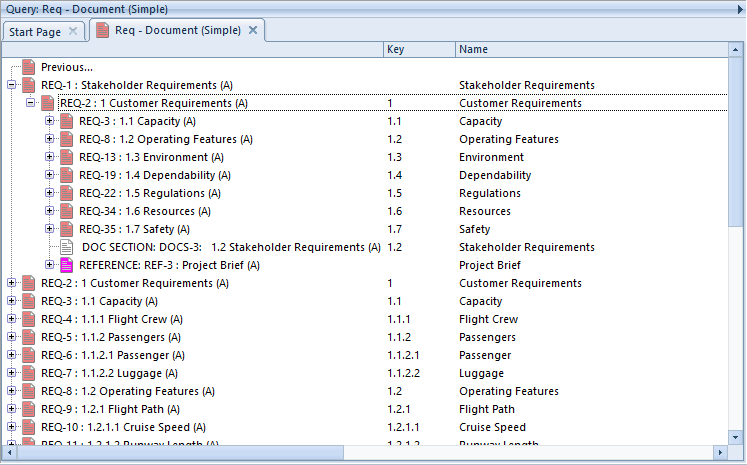
You can find items in a Cradle database by running a query. For example, you can use the pre-defined queries in the Quick Access Bar at the bottom of the UI. Once the query has run, the results are shown in a display style. Document style is one of the four styles available:
A view is used to specify which parts (attributes) of the items will be shown. A display style controls how these attributes will be displayed, and the facilities that are available to you.
Document Style
This is the second most flexible of all the display styles. It displays each item as a set of one or more rows and one or more columns (as controlled by the view), with invisible borders around each of the cells. You can edit items directly in this display style.
Items Shown in Document Style
This display style is similar to table style, except that:
The height of each item’s row is set by the information to be shown. So some rows are shallow and other rows are deep. If an attribute contains no data, its height will be close to zero.
Different sized fonts are used to display the first row in the view. The size of the font is based on the levelof the item being shown. This level is based on the number of dots (periods) in the first attribute shown in the row. This is typically the Key, or whatever attribute you may have specified to hold the item’s hierarchical number.
The borders around the rows and columns are invisible
For document style, you should use views that show attributes in successive rows, rather than successive columns. For example:
Arrangement of Attributes in a View for Document Style
The result is that items are displayed in a style that looks like a document, with large font for section headings and smaller fonts used for subsection headings.
To have items displayed in this style:
Specify it in the query to be run:
Specify Document Style in a Query
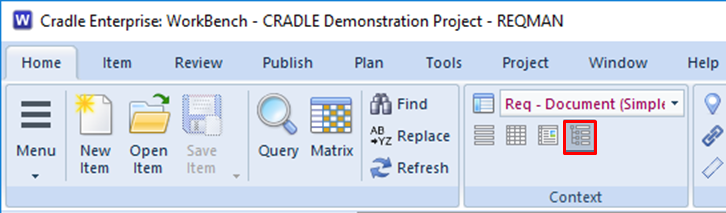
Also, select it from the Context group in the Home tab:
Choose Document Style in the UI Ribbon
Or, right click and choose Style -> Document from the context-sensitive menu
Finally, press CTRL and 3
Facilities
Document style provides a wide range of faciltiies.
Selecting Items
Use the left mouse button to select individual items
You can select a groups of items by selecting the first and then pressing SHIFT and the left mouse button to select the end of the group
Press <CTRL> and the left mouse button to select or de-select individual items
Changing the Display
You can shrink and widen the display columns. Move your cursor to the edge of a column heading and the cursor will become a pair of arrows. Press, drag and release the left mouse button to change the column’s width.
You can move any row or column in the view. Move your cursor onto any cell border and the cursor will become a pair of arrows. Press, drag and release the left mouse button to move that border.
By default, all rows are displayed with different heights, you can increase or decrease the height of any row
You can sort the data in any column. Click the column heading and choose a sort order, either ascending or descending, in either a case-sensitive or case-insensitve manner (this only applies to languages that have upper-case and lower-case characters)
Tooltips are displayed for each column. Move your cursor into a column heading and after a second, a description of that attribute will be shown. You can enter these descriptions in the schema.
You can see tooltips for some attribute values. Move your cursor into a cell that displays a category with a pick-list of possible values. A tooltip appears containing a description of that category and category value. You can enter these descriptions in the schema.
Exploring Data
You can expand rows to follow cross references. Double-click the heading for an item’s row and that row will expand to show one new row for each item linked to the original item. Repeat this as many times as you like.
You will see the level of any expanded row as the number of dots in its row heading
You can collapse rows by double-clicking the row heading.
Editing Data
You can edit items directly Click inside any cell. If you have RW access to the item, Cradle locks the item so you can edit it.
Advantages
The advantages of document style are that it is:
Flexible. You can adjust the display and sort information.
Navigable. You can explore the database by expanding rows to follow cross references.
Editable. You can edit information through the display style.
Readable. All items are shown with a display height to display their entire contents.
Disadvantages
The disadvantages of document style are that:
It takes much longer to display than list style or tree style
The rows displaying information are of different heights, so you may not see many items at the same time. You may need to scroll more than in other display styles.
Summary
Document style is the second most flexible of Cradle’s four display styles, after table style. It is not the quickest style to generate, but it does provide a familiar document-like view of information and a lot of capability.
Therefore, we recommend document style whenever you want to display items in a document format. This can be very helpful for users who are more familiar with using documents, rather than data-orientated tools.
You can find items in a Cradle database by running a query. For example, you can use the pre-defined queries in the Quick Access Bar at the bottom of the UI. Once the query has run, the results are shown in a display style. Table style is one of the four styles available:
A view is used to specify which parts (attributes) of the items will be shown. A display style controls how these attributes will be displayed, and the facilities that are available to you.
Table Style
This is the most flexible of all the display styles. It displays each item as a set of one or more rows and one or more columns (as controlled by the view), with borders around each of the cells. You can edit items directly in this display style.
Items Shown in Table Style
To have items displayed in this style:
Specify it in the query to be run:
Specify Table Style in a Query
Also, select it from the Context group in the Home tab:
Choose Table Style in the UI Ribbon
Or, right click and choose Style -> Table from the context-sensitive menu
Finally, press <CTRL> and 2
Facilities
Table style provides a wide range of facilities.
Selecting Items
Use the left mouse button to select individual items
You can select a groups of items by selecting the first and then pressing SHIFT and the left mouse button to select the end of the group
Press <CTRL> and the left mouse button to select or de-select individual items
Changing the Display
You can shrink and widen the display columns. Move your cursor to the edge of a column heading and the cursor will become a pair of arrows. Press, drag and release the left mouse button to change the column’s width.
You can move any row or column in the view. Move your cursor onto any cell border and the cursor will become a pair of arrows. Press, drag and release the left mouse button to move that border.
By default, all rows are displayed the same height, but you can increase the height of any row
You can sort the data in any column. Click the column heading and choose a sort order, either ascending or descending, in either a case-sensitive or case-insensitve manner (this only applies to languages that have upper-case and lower-case characters)
Tooltips are displayed for each column. Move your cursor into a column heading and after a second, a description of that attribute will be shown. You can enter these descriptions in the schema.
You can see tooltips for some attribute values. Move your cursor into a cell that displays a category with a pick-list of possible values. A tooltip appears containing a description of that category and category value. You can enter these descriptions in the schema.
Exploring Data
You can expand rows to follow cross references. Double-click the heading for an item’s row and that row will expand to show one new row for each item linked to the original item. Repeat this as many times as you like.
You will see the level of any expanded row as the number of dots in its row heading
You can collapse rows by double-clicking the row heading.
Editing Data
You can edit items in a table. Click inside any cell in the table. If you have RW access to the item, Cradle locks the item so you can edit it.
Advantages
The advantages of table style are that it is:
Flexible. You can adjust the display and sort information.
Navigable. You can explore the database by expanding rows to follow cross references.
Editable. You can edit information through the display style.
Compact. All items are shown with the same display height.
Disadvantages
The disadvantages of table style are that:
It takes longer to display than list style or tree style
The rows displaying information are all the same height, so you may have to click in a cell or expand a row border to see all of the information in some attributes
Summary
Table style is the most flexible of Cradle’s four display styles. It is not the quickest to generate, but it provides the most capability.
Therefore, we recommend table style as the best general purpose display style in Cradle. Unless you need something provided by a different display style, use table style.
A Regex is simply sequence of characters that define a search pattern. This pattern is then compared with the target test string and will produce a match if the pattern allows.
Cradle Queries
When retrieving information from the database, Cradle uses a query to filter the data returned. It looks for many matches against different aspects of the item.
Ending Wildcards and Contains
Wildcard matches are available on the Identity and the Key fields The ones most likely to be identifying a hierarchy.
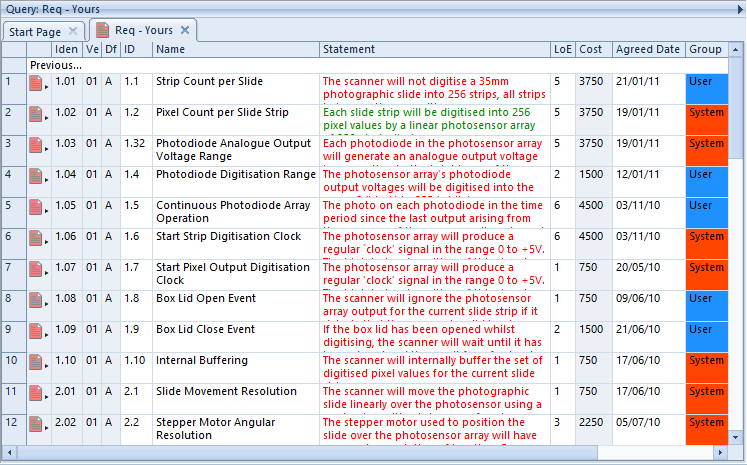
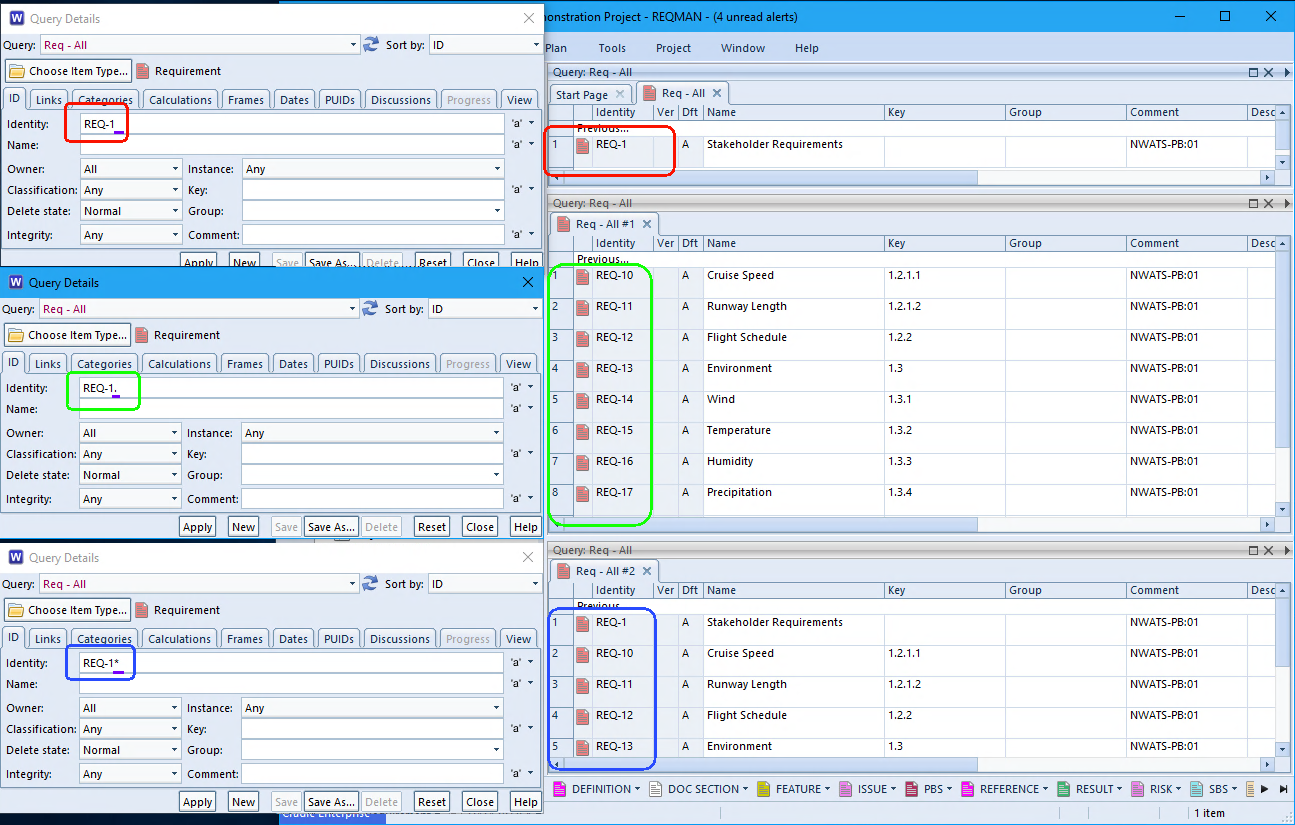
In the example below a query has been run with three values in the identity field.
REQ-1
REQ-1.
REQ-1*
The results show
Only REQ-1 returned and exact match
REQ-10, REQ-11, REQ-12 …. onwards a text match bringing back the matches greater than the stem. This is really useful for hierarchical numbers, bringing back the children of 1.1 (using 1.1.) say.
REQ-1, REQ-10, REQ-11 a text match where the stem is followed by zero or more characters. This brings back the stem value too.
Wildcard Query
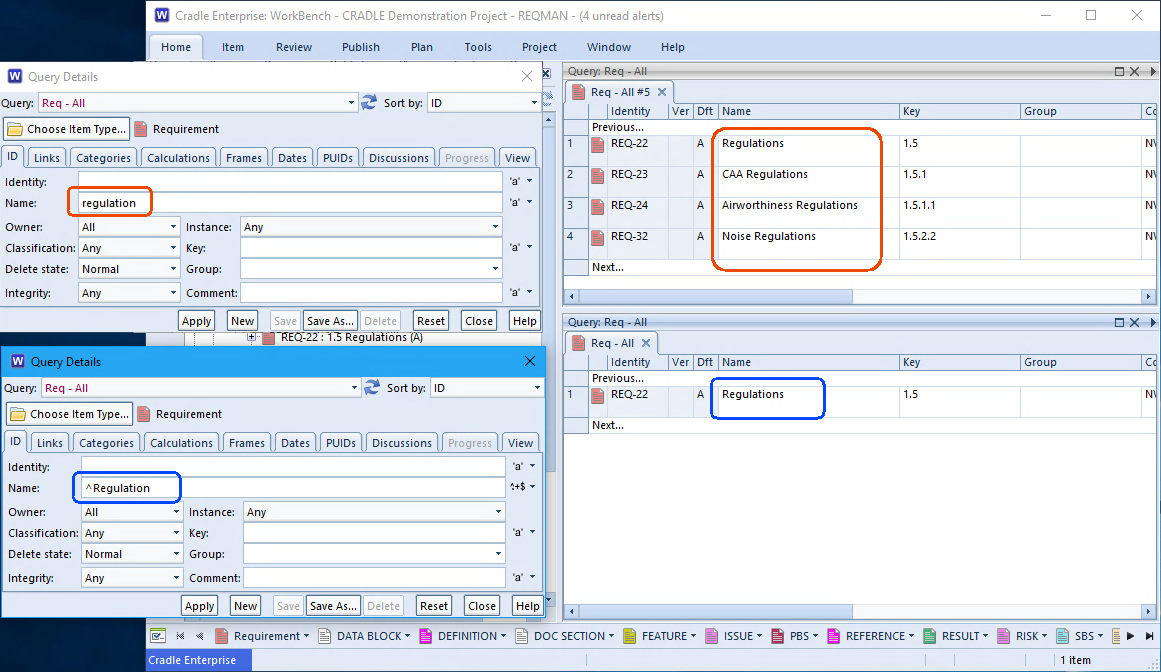
Contains matches are available on Name and Comment fields. They are case insensitive and look for the string of characters anywhere in the component.
In the example below
regulation
Results in
Regulations
CAA Regulations
Airworthiness Regulations
Noise Regulations
This can be a little too wide.
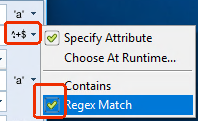
Regex Query
Regex Query
Choose Regex
In order to provide more control it is now (Cradle 7.4) possible to switch to a Regex match. Choose the dropdown at the end of the field and select Regex Match. This will change how the search text is applied.
In the example above
^Regulation
Brings back
“Regulations” only because the “^” at the beginning is a regex anchor to the start of the line.
Expressions
If we were searching for part numbers we might use ^Pt:[AB]+.* to bring back all parts starting Pt:A and Pt:B followed by any other characters.
There are many flavours of Regex, Cradle is based on the PCRE flavour. Instead of documenting the whole set of patterns, it is usually more appropriate for users to use their favourite documentation. We like www.regular-expressions.info/ and www.regex101.com/
Pros / Cons
Databases have a number of keys and indexes. Cradle is designed to work with these to produce results most effectively. Wildcard endings are more efficient as they match the way the data is sorted internally. Regex expressions have to match against all database entries. therefore there is a performance implication to using this more flexible matching. This is why both methods are provided and users can switch whichever they want on.