In Document Publisher you can define headings in several ways; this post will show how to define the Heading tag.
Before starting, Word’s Multilevel List needs to be set; use the list which has Numbering and Heading set:
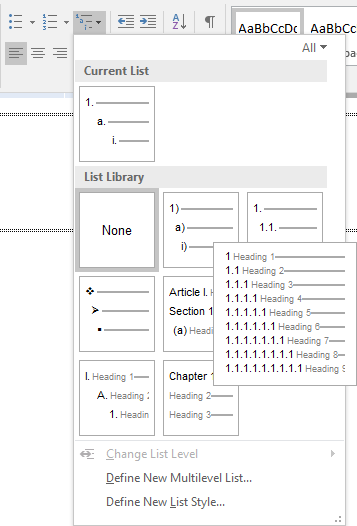
This will give the user a Heading style which numbers the names of the items output.
Add a ParagraphGroup tag and create your Hierarchy table and set the Key or Identity in the Item Selection.
Default Settings for the Heading Tag
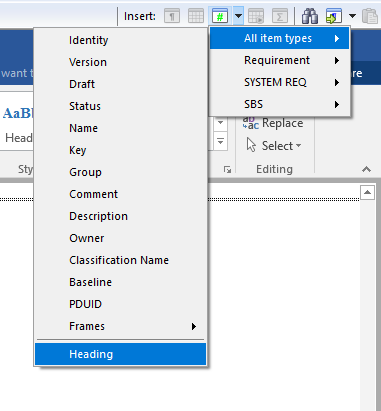
Placing cursor at the end of the word ParagraphGroup in the tag but before the bookmark, click on the arrow for the Field tag button and select the All item types option and then down to Heading tag option at the bottom.
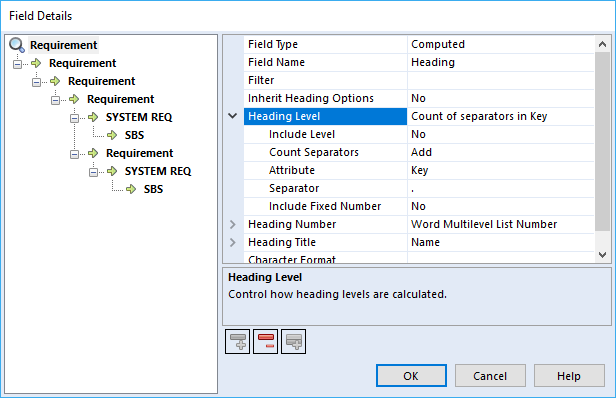
The Field Details UI will look like this when it opens:
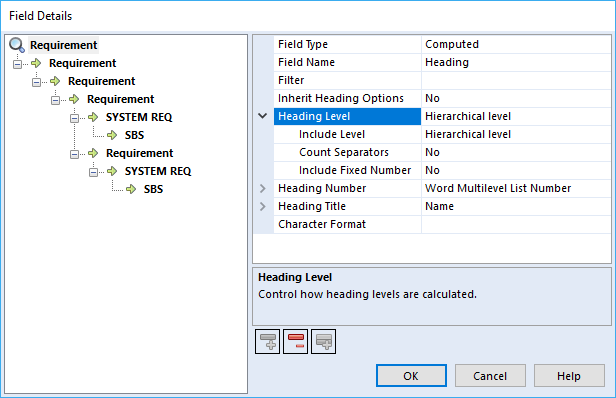
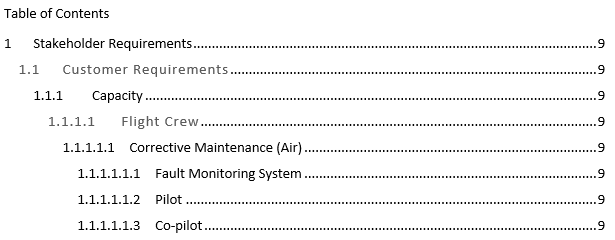
This is where the user sets the Heading tag options for each row, starting with the top row. Leaving all the options as set for each row will give the user the following output:
1  Stakeholder Requirements
1.1  Customer Requirements
1.1.1  Capacity
1.1.1.1  Flight Crew
1.1.1.1.1  Corrective Maintenance (Air)
1.1.1.1.1.1  Fault Monitoring System
1.1.1.1.1.2  Pilot
1.1.1.1.1.3  Co-pilot
Basing the Heading Level on the Item Attribute Key
The user may require that the sections start with a different number for example they may wish to use the key instead for the Heading tag.
The Word’s Multilevel List is not needed to be set for this option as the numbering is set by the Key.
Setting the Include level to No and Count Separators to Add and the Attribute to Key, the type of Separator will now not use the Hierarchy Level in the output but base the numbering on each items Key.
The user can set each of the other rows to the same settings as the top row by select the row, clicking the Remove Field button ![]()
![]() and then the Copy Field button
and then the Copy Field button ![]() .
.
This will give the user the following type of output; remember the Key starts at 0 but the Heading numbering in the Heading Styles starts at 1:
1  Stakeholder Requirements
2  Customer Requirements
2.1  Capacity
2.1.1   Flight Crew
2.1.2  Corrective Maintenance (Air)
2.1.3  Fault Monitoring System
Using the Separator Option
This option allows the user to change to which separator is used within Key or attribute the user has decided to use
Using the include Fixed Number Option
The user can use an Include Fixed Number of separators and Add or Subtract the number of separators for a different output. If the user sets it to Add and the Fixed Number to 2, it will add 2 separators to the key and the output will look like this:
1.1.1  Stakeholder Requirements
1.1.2  Customer Requirements
1.1.2.1  Capacity
1.1.2.1.1   Flight Crew
1.1.2.1.2  Corrective Maintenance (Air)
1.1.2.1.3  Fault Monitoring System
If the user set it to Subtract and the Fixed Number to 1 the output will look like this:
1  Stakeholder Requirements
2  Customer Requirements
3  Capacity
3.1  Flight Crew
3.2  Corrective Maintenance (Air)
3.2.1  Fault Monitoring System
Note: Don’t use subtract on rows where the key is only a single digit as the numbering will not be output, showing up like this:
Stakeholder Requirements
Customer Requirements
Capacity
1    Flight Crew
2    Corrective Maintenance (Air)
3    Fault Monitoring System
Using the Hierarchical Level with an attribute
The user can use the Hierarchical Level with the Key which will add the key to the level in the hierarchy and the output will show like this:
1.1  Stakeholder Requirements
1.1.1  Customer Requirements
1.1.1.1.1  Capacity
1.1.1.1.1.1.1   Flight Crew
1.1.1.1.1.1.1.1  Corrective Maintenance (Air)
1.1.1.1.1.1.1.1.1  Fault Monitoring System
The other attributes the user can use to the set the level with or without the Hierarchical level are Identity, Group and a Category. When Category is selected a new option shows to let the user pick the category they wish to use.
Using the Heading Title Option
The Heading Title option allows the user to use different sources to name the item being output. The option include:
- <None>
- Static text
- Identity
- Key
- Group
- Name
- Comment
- Description
- Category
- Frame
The Category and Frame options allow the user to select from a new option which category or frame they would like to use.
Using the Strip Prefix
This option allows the user to remove any specified text from the attribute during output. For example, the items Key may be REQ-1.1 and the user only requires the 1.1. The user would enter REQ- in the Strip Prefix option to have it removed.
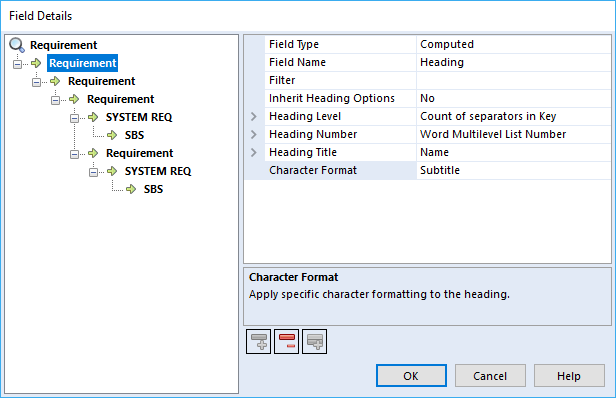
Using the Character Format Option
This option allows the heading style to be overridden but not the numbering. If the user decides that the second and fourth levels should look like the style Subtitle, it will have the font, size and colour of Subtitle but still the numbering set to Heading 2.
Using this option the output would look as below:

This style will also be reflected in the Table of Contents: