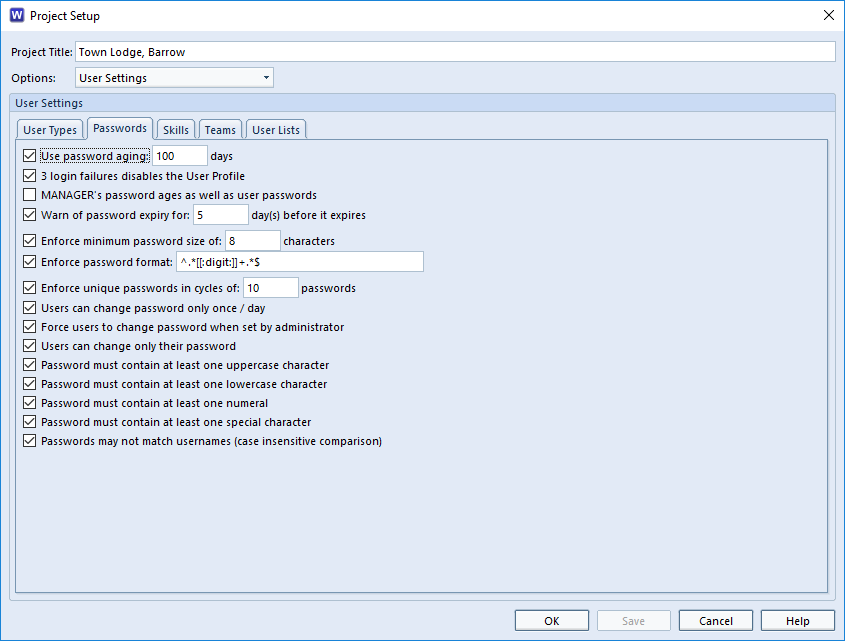
There are a number of options available to control a user’s password. These meet the majority of policies our customers have asked for. In the Users Settings section of the project schema setup the management can set the policy that users must adhere to.
Password Settings
This can include
Use password ageing
3 login failures
Warn of password expiry
Enforce minimum password size
Enforce password format
Enforce unique passwords in cycles
Users can change password only once/day
Force users to change password
Password must contain at least one uppercase character
Password must contain at least one lowercase character
Password must contain at least one numeral
Password must contain at least one special character ` ! $ ^ * ( ) _ + – = { } [ ] : @ ~ ; < > ? . /|
Passwords may not match usernames (case insensitive comparison)
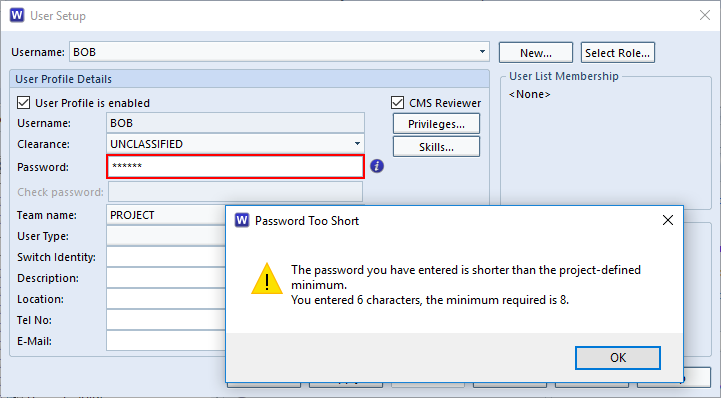
Does a user get told why their password is wrong?
When entering the password field, the box will remain with a red border until the password matches the criteria. The ℹ symbol will bring up a dialog telling you what’s causing the rejection. This will enable the user to select a password that matches your company password policy.
Password Entry
What if a User forgets?
A user with MODIFY_USER privilege can reset the user’s password by logging in and entering the User Setup dialog. If the user’s account has been disabled because of too many wrong attempts it can be re-enabled here too.
What if we can’t remember an administrator’s account password?
If you are trying to reset a User’s password and can’t remember the password of the user with MODIFY_USER privilege, you could sign on as the database manager account MANAGER. This account has all privileges including ACCESS_BYPASS and can be used to reset any of the users.
What if we can’t remember the MANAGER account password?
This super user account should be carefully guarded. Some clue or encrypted version of the password should be locked away in a safe or special password manager on a closed system depending on your company password policy. However, all is not lost, you will need to speak with your IT department, to get someone with access to the raw data files. Then you will need to contact 3SL supportsupport@threesl.com who will be able to assist in resetting the passwords to a new known value.
Can 3SL tell us what the passwords are?
No, sorry. The password file does not work like that. They would only be able to reset them to something new (which you’d be advised to get each user to change as soon as they next login)
What are the alternatives?
You could use LDAP authentication and then the passwords the user has to enter will match the policy set for your LDAP server.
Leonardo of Pisa, or as we know him Fibonacci, spotted a magical pattern in the early 1200.
Fn = F(n-1) + F(n-2) where F0 = 0 and F1 = 1 or F1 = 1 and F2 = 1 as a seed.
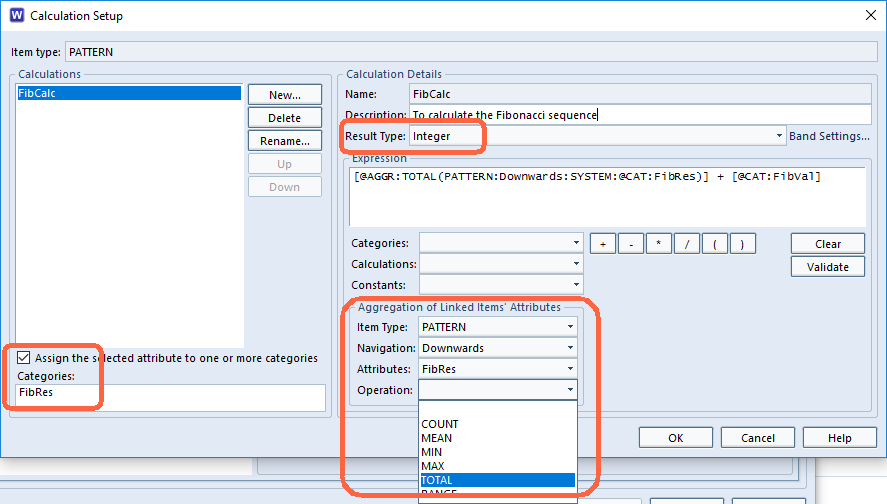
To celebrate Fibonacci Day 2017 and this most import sequence, found in nature, mathematics and the basis for the Golden Ratio, we’ve recreated a sequence in Cradle.
Using an integer Category value FibVal and FibRes and a calculation FibCalc. The calculation is set to look at its cross referenced children (a downwards navigation) and compute a sum based on the aggregate total of their FibRes category and its own seed, held in FibVal. The result is assigned to FibRes.
Fibonacci Calculation setup
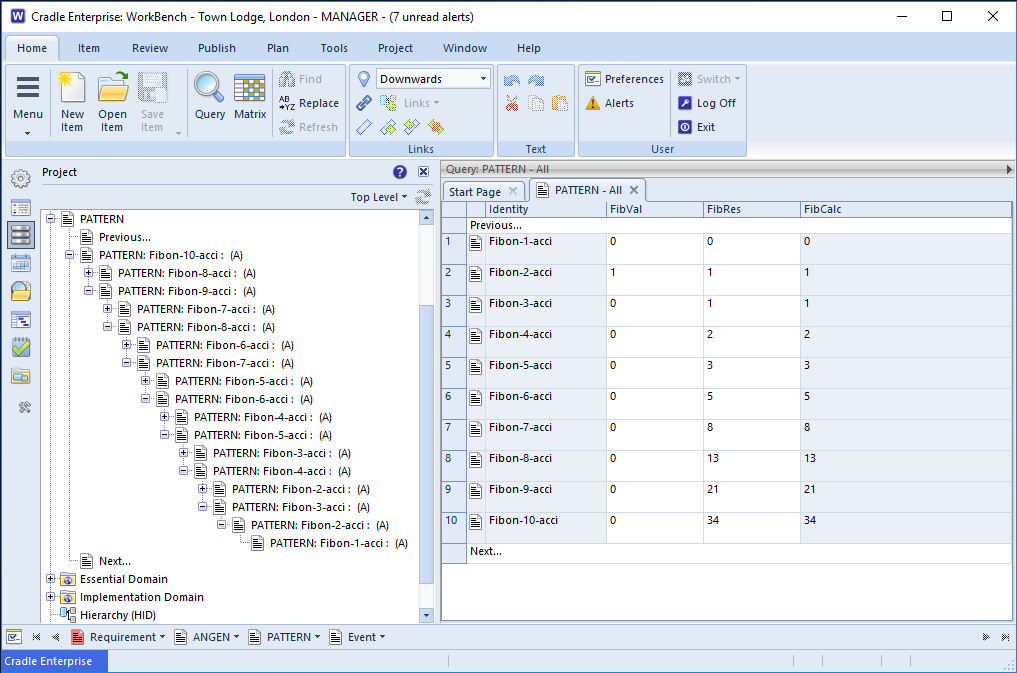
The first item were created and and seeded with 0. Then another item created and linked to it and seeded with 1. Thereafter new parent items were created and linked to their two previous children (Seed value of 0 just to keep calculation valid) .
Fibonacci Sequence
The screenshot shows the linked items (in the tree on the left). The query view (on the right) shows the values of the saved items and how they add up.
For more information on Calculations in Cradle, visit the online help. Have a go at creating your own sequence to celebrate Fibonacci Day 2017.
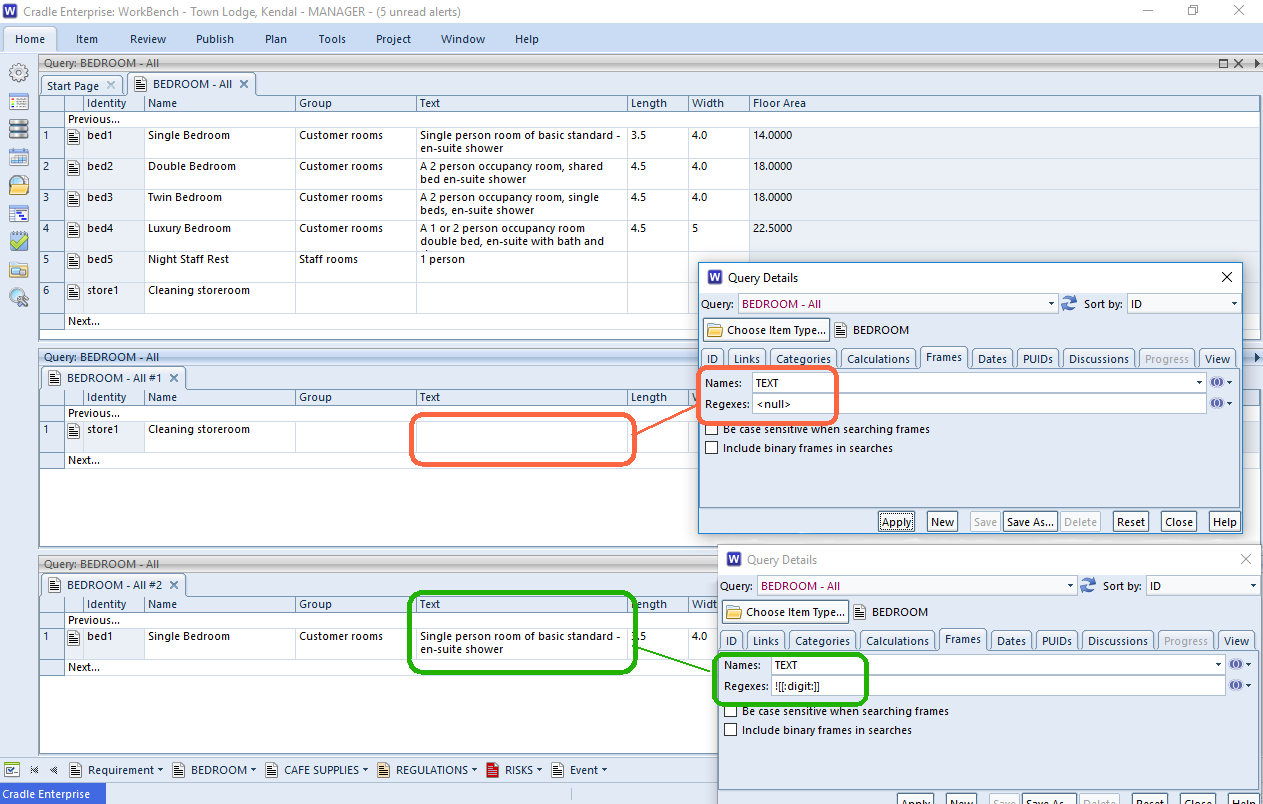
A RegEx (Regular Expression) is a pattern matching method often used in text searches and data processing. Cradle supports Regex matches in a number of query elements, so it is possible to perform complex searches on your data. This article gives an example of the use of Regexes in frames.
Example:
The mocked up example describes just one of the ways a user could search the text frames of their items achieve particular results.
Identity
Name
Group
Text
bed1
Single Bedroom
Customer rooms
Single person room of basic standard – en-suite shower
bed2
Double Bedroom
Customer rooms
A 2 person occupancy room, shared bed en-suite shower
bed3
Twin Bedroom
Customer rooms
A 2 person occupancy room, single beds, en-suite shower
bed4
Luxury Bedroom
Customer rooms
A 1 or 2 person occupancy room double bed, en-suite with bath and shower.
bed5
Night Staff Rest
Staff rooms
1 person
store1
Cleaning storeroom
The data in the table above used a Cradle Note called Bedroom and was produced by running the automatic query “BEDROOM – All”. Then the resulting table was published to HTML. There were no regexes in frames applied to the initial query.
Queries with Regexes in Frames
Simply entering “TEXT” as the Name of the frame to search and running the query will bring back bed1-bed5. The item store1 has no content to compare so can’t match.
Entering bath in the Regexes field and re-running will return bed4 this is the most basic case the text typed in is simply found as a direct match.
If you want to find the incomplete items and find those with a blank frame using the Cradle extension of <null> in the Regexes field will return store1 as this has nothing in the frame.
If we want the query to find those that have not used a digit in the description (This may be important if the output is parsed by some other program) it is possible to use a regex character class [[:digit:]] . This will find all the elements containing a digit ≍ [0-9]. However, if we want the elements that don’t contain numbers, we can use the second Cradle extension of ! to negate the result, hence ![[:digit]] will return bed1 as it used the word ‘single’ rather than a digit for its occupancy value.
Cradle also allows comma separated logical combinations of regexes in frames. Using the Venn diagram symbol you can select whether these are AND or OR combinations. Switching to AND and then using the regex[[:digit:]],![[:alpha]] would bring back items where the frame contained digits and no alphabetic characters.
Regexes in Frames
Exploring Regexes
A simple way of testing whether your regex will give you the results you want is to use a test program regex101.com/ is a good example. This allows you to quickly tweak your statement, and run it against various test data. Cradle uses the PCRE ‘flavour’ internally. The Cradle help system has further information on regexes
Described by www.worldhelloday.org/ as a demonstration of the importance in communication for the preservation of peace, we can all do our little bit to get along.
Hello from 3SL
Say ‘Hello’
Hello, 你好, Hallo, Bonjour, 여보세요, Здравствуйте, Helo to our distributors and customers.
Whichever language you use, ‘Hello’ is a greeting, a sign of friendship, tolerance, and respect. Thought to derive from a ‘holla or hollo’ used to attract attention back as far as the 14th century, it has always been used as a positive greeting, or introduction. Use it as often as you can, form good relationships with your country folk, your neighbour, your customers, suppliers and even your competitors. As Thomas Edison is said to have done, pick up the phone and say “Hello” possibly to a friend or to a customer, or just an acquaintance you’ve not been in touch with for a while. (You could call 3SL on +44(0)1229 838867)
If you would like Cradle in a language not currently translated, don’t hesitate to contact us. SalesDetails@threesl.com
Find ten contacts and just say, “Hello”, “hey there!”, “wassup” or “howdy” you know it makes sense.
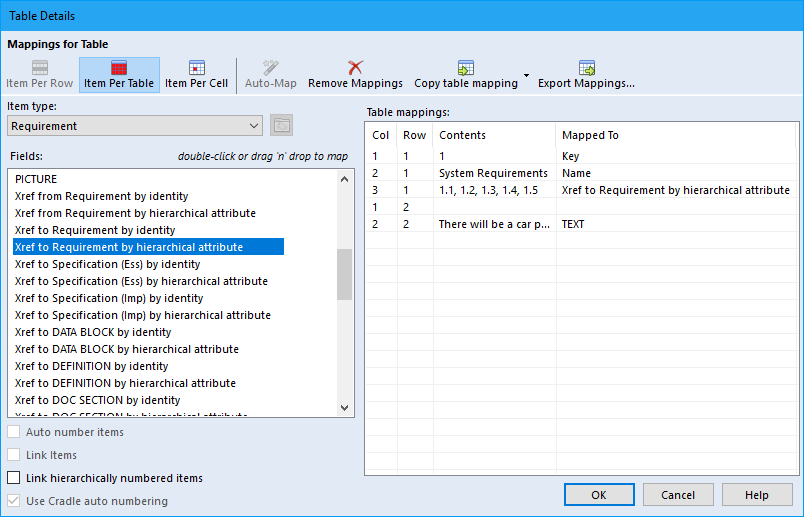
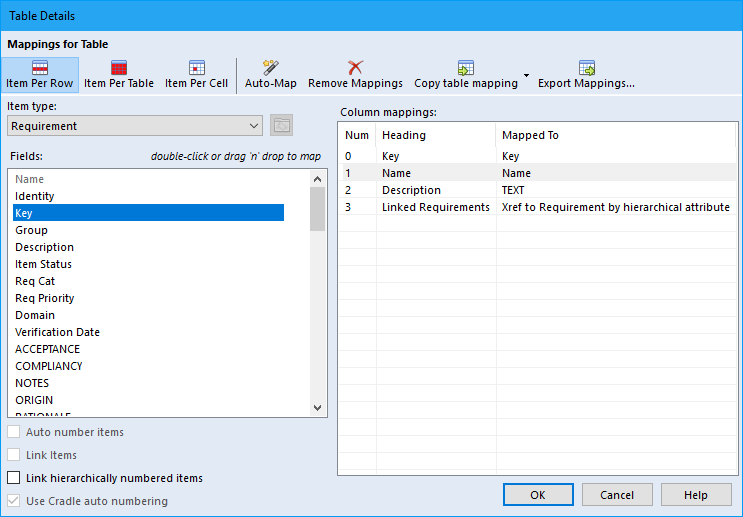
Item cross references can be captured through Document Loader in several ways. In this blog we deal with how to set Mapping Cross References in a Table. With all items in one or more tables, the linked items are in a cell using a comma to separate them. These cells will be mapped for the cross references.
Showing Item Per Table and Item Per Row tables
The tables above show information created in a document. The first shows each item in a separate table and the second each item is a single row.
The columns in the second table are;
Key – The Identifying number for the item
Name – The text name being assigned to the item
Description – The text to be captured into the frame of the item
Linked Requirements – The list of Keys (1st column) to which this item is related. It is not necessary for every item to link From/To other items. For example 1.1 links to child item 1.1.1, it is not necessary to link 1.1.1 back to 1.1 in the table.
You can only set one item type to be linked per table.
Table Mapping
Document Loader allows you to map cross references From or To items of different item types. There will be two options for From and To item types for each item type in the schema. This includes Specifications but not Data Definitions or Diagrams. Cross References can be set To and From the document. This is not necessary as each item has a link added back to the document when captured.
The options will show in a list like the example below:
– Xref from <item type> by identity – Xref from <item type> by hierarchical attribute – Xref to <item type> by identity – Xref to <item type> by hierarchical attribute
Mapping Item Per Table Cross References
Load your document and right click on the cell you want to map and select Table Details. When the Table Details UI opens if not already selected, click on Item Per Table. To map the cells, the option is pulled over to the right column to the attribute you require it. The attribute in the right column is selected and then double click on the required option. Map the cells making sure you map one of them to an Identity or hierarchical attribute (Key). Set the cross reference cell by selecting the appropriate option.
For example in the first single table in the first screenshot, the numbers are for the Key attribute of an item. This means using the options with the hierarchical attribute in them.
As the links in the above example are to other items of the same type the option Xref to Requirement by hierarchical attribute is used. This will capture the cross reference from item 1 to 1.1. If I had put the cross reference to item 1 in the cells of the other items, I would have used Xref from Requirement by hierarchical attribute. This would then capture the cross references in the opposite direction of 1.1 from 1.
This shows the mapping of a Item Per Table option
This mapping can be exported and used for other tables within the document and selected through the Copy table mapping drop-down.
Mapping Item Per Row Cross References
Mapping Item Per Row is similar to Item Per table but instead of mapping cells you are mapping columns. As before, right click on the table and select Table Details. As before set the attributes like Key and Name etc, then set the Linked Requirement using the Xref to Requirement by hierarchical attribute option.
This shows Table Details with the Item Per Row mapped
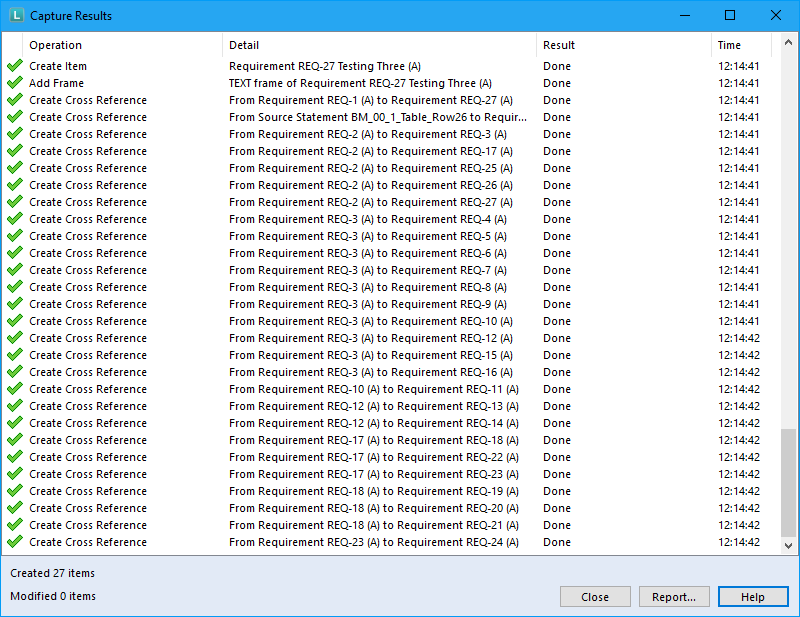
Capturing the information
Once all the paragraphs and tables are mapped with the relevant options, the user can capture the document. The cross references from these cells are created at the end of the capture so that all the items should be in the database.
The end of the Capture Results showing the cross references created
You will often want to organise information in a hierarchy. The hierarchy represents an entire collection of information. You can view the hierarchy at any level that is convenient. In effect, each level summarises the levels below it. Therefore, you may want any numerical information at the bottom of the hierarchy to be totalled at each higher level. So, it is common to use hierarchies to aggregate and apportion values.
Cradle can help you by calculating appropriate values at each level in the hierarchy. In the following System Breakdown Structure (SBS) hierarchy, the total weight of that component and everything within it is shown inside the square brackets:
SBS Hierarchy With Aggregated Total Weights
Aggregation and Apportionment
Aggregation means to add together. In the example, the components of the transformer are:
Transformer, weight 15
Transformer mount, weight 5
Therefore, the aggregate weight is 20, which is shown as the weight of the entire transformer.
Apportion means to divide, or split. If a set of pumps is to weigh at most 200kg, and there are 4 pumps, then we can apportion this weight budget equally between the four pumps. So, each pump is to weigh 200kg divided by 4, which is 50kg for each pump.
So we normally aggregate actual values up a hierarchy.
Therefore we normally apportion a budget value down a hierarchy.
Use Hierarchies to Aggregate and Apportion Values
You can aggregate values up a hierarchy by:
Create an integer attribute that stores the value for each item
Create a calculation that adds the item’s value and the total of the values of all its children
Store this calculated value as the total for this item and its children
Another way to say this is:
value for an item = user-supplied value
total for an item = value for the item + total of the ‘total for an item’ for all children
You can apportion values down a hierarchy in a similar way:
Create an integer value that stores the budget value for the item
Create a calculation that divides the item’s parent budget value
Store the calculated value as the budget for this item
Integer Attributes
You can create integer, or positive integer, attributes in items. An integer attribute can only store an integer value. You can only store integers greater than or equal to zero in a positive integer attribute.
You can create integer attributes as categories and then assign them to your items. For example, you can create an integer attribute Weight by:
Creating an Integer Attribute
Ensure you are logged-in as a user who has PROJECT privilege so you can change the schema
Select Project Setup from the Project tab
Set Options to Item Definitions and select the Categories tab:
Select New… and enter the name of the new attribute, for example Weight, and set its type to be Integer or Positive Integer:
Assign the new Weight category to an item type by:
Assign an Integer Attribute to an Item Type
Select the Item Definitions tab
Choose the item type
Select Categories
Select an unused category assignment and select the new Weight category:
Repeat this process to create another positive integer attribute Total Weight and also assign it to the item type. This is the attribute that will receive the result of the aggregation calculation.
The Aggregation Calculation
The last step to use hierarchies to aggregate and apportion values is the aggregation or apportionment calculation.
Still inside the schema and with the same item type selected:
A New Calculation
Select Calculations…
Select New and enter the calulation‘s name, such as Weight Calcs
To define the expression, we start by choosing the item’s own weightcategory:
Add a Category to a Calculation
Then click the + button or manually enter + into the calculation to perform an addition
Add Linked Items Into a Calculation
Then choose to total the Total Weight of all child items. We find the child items by finding all items of the same type that are linked to the current item by following all cross references found by the navigation Downwards. When we find these linked items, we get the Total Weight value from them:
Select Validate to check the expression that we have created
Store the Calculation in an Attribute
Finally we specify that we want the result of the calculation to be stored in the integer category Total Weight that we calculated. This means that each item’s total weight will be available to its parent item when it get values from its children, see 2 above
Using the Results
We can use hierarchies to aggregate and apportion values and the results can be used either directly from the calculation, or by saving the result of the calculation in an attribute.
You can either display a calculation or the category that stores its result. The values can be shown in views. This is what what we did to produce the SBS display at the start of this blog entry. Here is the view:
Displaying a Calculation in a View
You can use a calculation, or the category that stores its result:
In other calculations, or
As part of rule sets, or
To calculate part of a metric, or
To calculate KPIs (key performance indicators) in dashboards
Like many settings a report’s setup can be saved. This creates a report definition file that can be stored in the Project, User, User Type, Team or Personal areas. It can then be recalled by each user that is permitted to see those ‘directories‘.
The report definition can hold the content definition and design layout of the report.
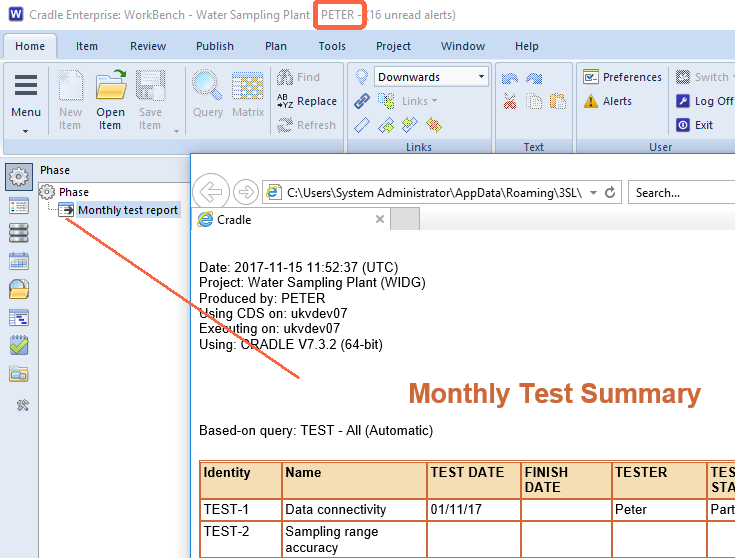
Example – A query based report.
In this example ‘Alan’ has set up an Item Summary report based on the Test – All query. This has been saved as Monthly test report and the output shown in a browser. The example shows a selected Style, and the Options that have been selected elements that are required in the report columns.
Save Report Definition
A different user ‘Peter’ does not have the permission to create or alter definitions, but can still run the report each month as it has been added to the Project’s phases.
Report from a Phase
Phases/Definition Sidebar
You have users that are not permitted to access definitions directly. They might be the user that needs to trigger the report each month, then there are two ways they can access it. Opening the Definitions sidebar and drilling down to Reports -> Project the report could be triggered from here. Alternatively it could be added as a phase. Users accessing the phase sidebar can then select and run the report definition directly without access to the report definition itself.
Permissions
You’ll need the CREATE_DEFS privilege to be able to edit the report definition.
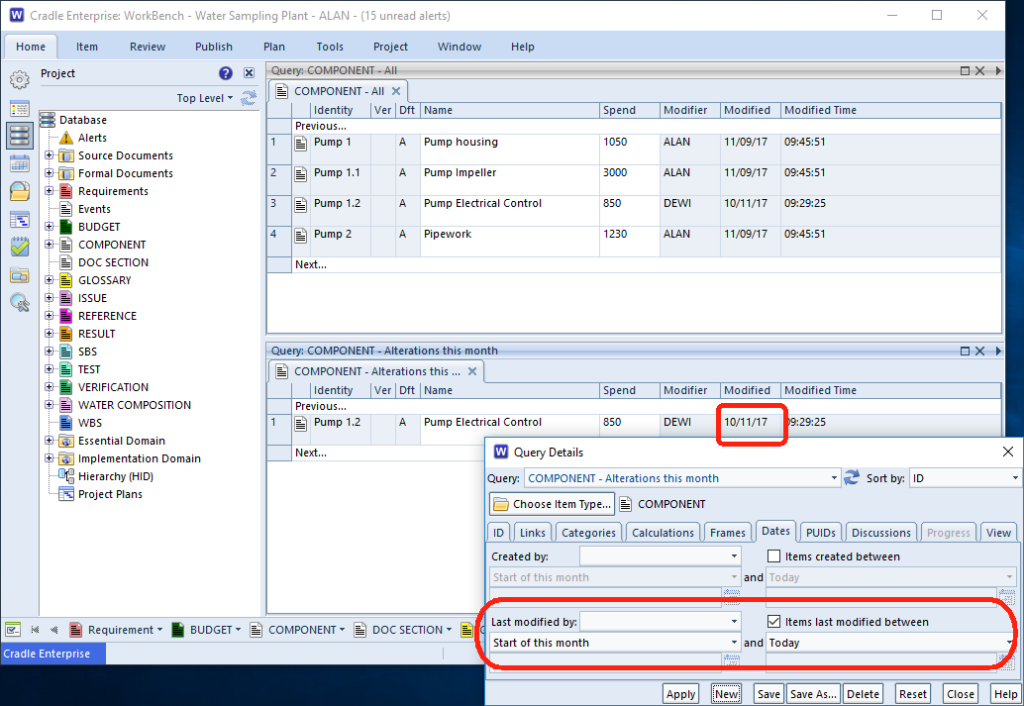
For many of us the clocks have gone back and we’re entering that period where it is dark when we travel to work and dark when we travel home. This means the brightest thing we may see all day is the monitor glaring in front of us. Of course we should be mindful of problems sitting in front of a VDU and ensure we take regular breaks, but it does mean you can concentrate on your projects without wanting to be outside*1 ! However, back to the date theme, not every Cradle user is aware that they can use relative queries on dates. Using these relative values, queries can be set to list all the activity in the last month or last week. So you can indeed “Remember, remember any issues/requirements/tests raised (as opposed to rased) in November.”
Relative Dates
The query results at the top of the above screenshot, shows all components in a project. The relative modified date query in the lower half shows only those components modified between the beginning of the month and today.
There are a number of relative dates you can use, Start of this week, Start of three months ago, End of last month and so on. You can read more about query dates in the Cradle Help under the “Select the Dates Tab”
*1 Apologies to our customers in the Southern hemisphere – you may want to wait six months before this statement makes complete sense!
Cradle 7.3.2
If you want the extra facilities or small bug fixes in Cradle 7.3.2, you can download it from the website and install new clients and server across your organisation. There is no need to obtain an additional security code for this point release upgrade. Those on single user versions of Cradle 7.3 can also take advantage of the upgrade. If you have any problems please email or call the Support Department support@threesl.com +44 1229 838867 or contact your local distributor.
Banking Changes
Updated ring fence information and dealing with 3SL’s banking details posted here.
Opportunities
Opportunities with 3SL producers of Cradle
3SL are on the lookout for talented individuals to join our team. We’re open to creating roles for people with mixed skills. See here for more details.
have a quick way of seeing if an article of interest has been published or updated Grab a range of items – Short-Cuts in Cradle. We try and retweet interesting stories from our customers, so if your company uses Cradle and isn’t following, make sure those in the media department know and let us know if we are not following your company’s main Twitter account.
When you want to configure multiple bits of information in one view cell (say a reference number made up from a category value and the item name and a bit of fixed text) Multiple Data Cells is the option to choose.
If you would like information in your Document Publisher template to be variable, our resident DocPub expert tells you how with Parametrics in Document Publisher
Every user requirement must be a clearly stated expressions of a stakeholder need for an externally-observable characteristic of the system being developed. Therefore, it must be possible to check that the system we have built satisfies all of its user requirements. Since there are different ways to check things, it is helpful to identify the 4 types of requirement confirmation and to tag all requirements with one or more of these types as early as possible in their development.
Verification and Validation in the Systems Lifecycle
Verification and Validation
But first, we need to define some terminology. The terms verification, validation and the acronym V&V are often used for checking compliance with requirements. Sometimes they are used differently, which can be confusing. So, we will define them first:
Verification is the activity of checking that the implementation, build or construction of a component, and the system itself, has been done properly. It is the idea of checking that a power outlet has been wired correctly and that it is properly earthed. Verification means to answer the question “have we built it correctly?”.
This is a good question to ask, but it does not answer the question “have we built the correct thing?”. That is validation. So, validation means to check that the system conforms to what its stakeholders asked for.
V&V is the combination of these two. Depending on your preference, it could mean either Verification and Validation, or Validation and Verification. Most of us in 3SL prefer the second, as it is a little easier to say. The two are equivalent. As a result, V&V simply means to check everything, from the quality of the raw materials, and the fabrication or assembly of components, to the final inspection, configuration, alignment or calibration of the finished product.
The 4 Types of Requirement Confirmation
The 4 types of requirement confirmation are:
Inspection, or I
Analysis, or A
Demonstration, or D
Test, or T
We usually abbreviate these types to IADT. They are often called validation methods.
Most requirements will have one of these validation methods, but sometimes a requirement will have more than one.
The Requirements Confirmation Methods
We can describe the 4 types of requirement confirmation as follows.
Inspection
Inspectionis the examination of the product or system using basic senses. This means to do one or more of look at it, touch it, smell it (rarely applicable), taste it (even more rarely applicable!). So, we would physically examine a product and check that all its physical characteristics are as required and that it has all of the controls that it is supposed to have. Similarly, for a software system, we would check that its UI is as required, that it has all of the data entry fields and buttons that it is supposed to have. For a web application, we would check its appearance on different screen sizes.
Analysis
Analysis is the validation of a product or system using calculations and models. We will use analysis to make predictions of the product or system’s performance based on some representative, actual, test results. We can use analysis to calculate failure points based on actual test results, without resorting to destructive testing (expensive as we can only do it once!).
Demonstration
Demonstrationmeans that we use the product or system as it is intended to be used. So we can follow the functional user requirements and check that the product or system does what the user requirements say that it should do. We will press every button and use every control in a product to confirm that the product does what it is supposed to do. For software, we enter data as users will do and ensure that the software performs the actions that it is supposed to do and check that its reports are correct.
Test
Test is a more precise and controlled form of demonstration. We test a product to confirm that it behaves precisely as specified under a set of carefully specified test conditions. We repeat these operations using different sets of test conditions, following precisely-specified steps to complete the test. Therefore, this is often to verify performance requirements.
Use in the Process
It is good practice to specify the confirmation criteria for each requirement as it is written. This is because it helps reviewers to confirm that the requirement has been written clearly, by answering questions such as “could I inspect the product and confirm this requirement?”, or “could I demonstrate that this requirement has been met with the finished product?”, and so on.
Once the requirement and its confirmation method(s) are agreed, we can create its confirmation item(s). If a requirement is simple, then it will have one confirmation. If complex, we will create more than one confirmation.
Similarly, if the requirement has multiple confirmation methods, then we will need a confirmation item for each of them.
Therefore, the goal would be a single validation for each requirement, because an atomic requirement (one that says only one thing) should only need one validation.
Of course, both user requirements and system requirements will have a confirmation method. So we would normally talk about validationsand verifications, and not the more general term, confirmations. Therefore, we would refer to:
The validation methodof each user requirement
Writing validation items for user requirements
The verification methodof each system requirement
Writing verification items for system requirements
Although it is impossible to generalise:
The confirmation methods of user requirementsare predominately Inspection and Demonstration
The confirmation methods of system requirementsare predominately Test and Analysis