A context diagram aids visualisation of where a project sits in relation to its external interactions. We don’t want to model those external systems, but we do want to know how they interact with our system.
Automatic wipers for a car don’t need to know how the weather works, but they do need to sense the presence of water on the windscreen. The context would, therefore, include the weather as an external influence with ‘rain’ or ‘rain present’ being signalled to our system. If our company only produces the wiper element the actual car is outside our scope. However, this is where we get our power from and it’s where we will install them so the car is part of our context. The interactions with the car such as ’12v supply’ and ‘user control signal’ are likely to show a part of the holistic context.
Data Flow Diagram (DFD)
In terms of functional analysis and design the DFD shows the external elements with which our main system interacts on the context diagram. This usually has only one process on it, and that is our system of interest.
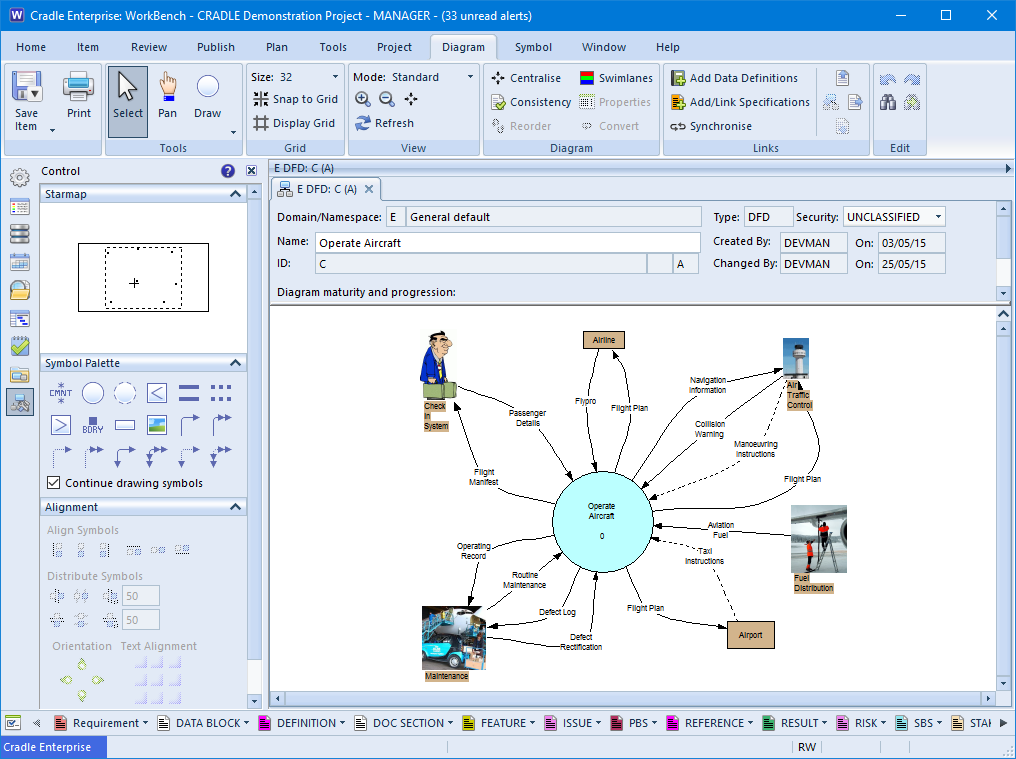
Context Diagram – DFD
Taken from the Cradle demonstration project this diagram shows our system of interest is operating the aircraft. The externals that we interact with form the context within which the project operates. This includes the booking system, the fuel suppliers, the control tower and so on.
When the design and analysis are broken down at lower levels, the passenger details or navigation information will have to be handled by parts of the target system. If there is anything that does not balance at the lower levels, then a function must be missing. It implies that we have an input stimulus or an expected output and have nothing to handle or provide it.
Block Definition Diagram (bdd)
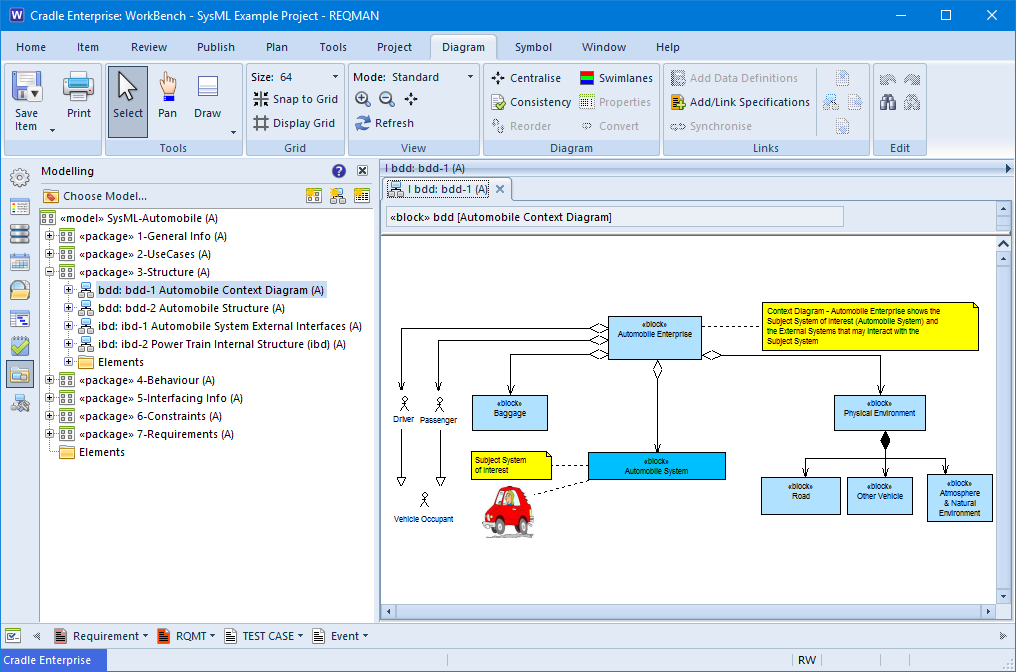
Context diagram notations are not restricted to Yourdon, a SysML bdd is also used to describe the context. Information gathered from the use cases and operational scenarios can be used to build a holistic view.
Context Diagram – bdd
Visual
Whilst not necessary, adding images to your context can aid communication to your stakeholders and customers. They don’t really have to understand the notation to visualise the ‘Passenger’ as a person interacting with the flight. In Cradle, images can be added to the diagram as standalone images, or can actually replace the symbol on the diagram. (The image in the latter will follow all the rules and have the underlying specification of the real diagram element).
A user wants to output bottom level items in Document Publisher. As bottom level items do not have anything linked below them, this can be set in a hierarchy table.
How this works for Bottom Level Items
All it takes is 3 rows in a hierarchy. The first row works as any item above the bottom level items. The second row will actually be for items on the bottom level. The third level is used as a check that the items are bottom level. It makes sure that no items are linked in a Downward direction using that Link Type for the 2nd row to be output.
If there are items linked below the item, using the Link Type set, then it is not a bottom level item and will not be output. Although this can be used with many different hierarchy levels, as long as the last row is always set as below.
Creating the hierarchy Table
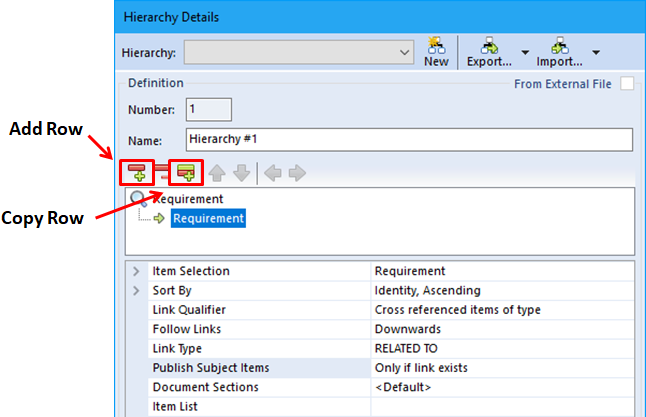
So open the Hierarchy Details dialog and set the top item type to the type you require (here we are using Requirements). Leave level this as it is already set. Click the Add Row button and set the Follow Links to Downwards. The arrow next to the second level item show point towards it. Set the Link Type for this level, in this case it is RELATED TO. Next is the Publish Subject Items option which sets what will be published based on your links. Set Publish Subject Items to Only if link exists.
Select the second level item type and click the Copy Row button.
Adding and Copying rows in Hierarchy Details in Document Publisher
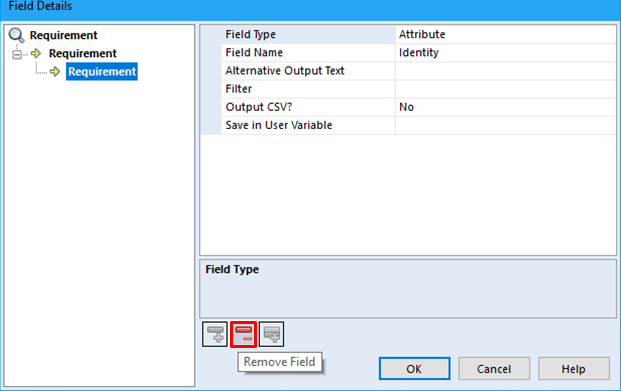
Select the last row and click the Indent button. The Publish Subject Items now needs to be set to Only if link does not exist.
Removing options set from the top and bottom nodes.
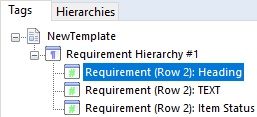
The nodes without any options set should be grey, click OK and repeat for each Field required. All item attribute nodes in the Tags sidebar now show as on (Row 2).
Showing all the item nodes are set to Row 2
Generating the template
When the template is generated, only the second row item will be output containing the bottom level items. For a short example to be output, the Key is set to 1.1*.
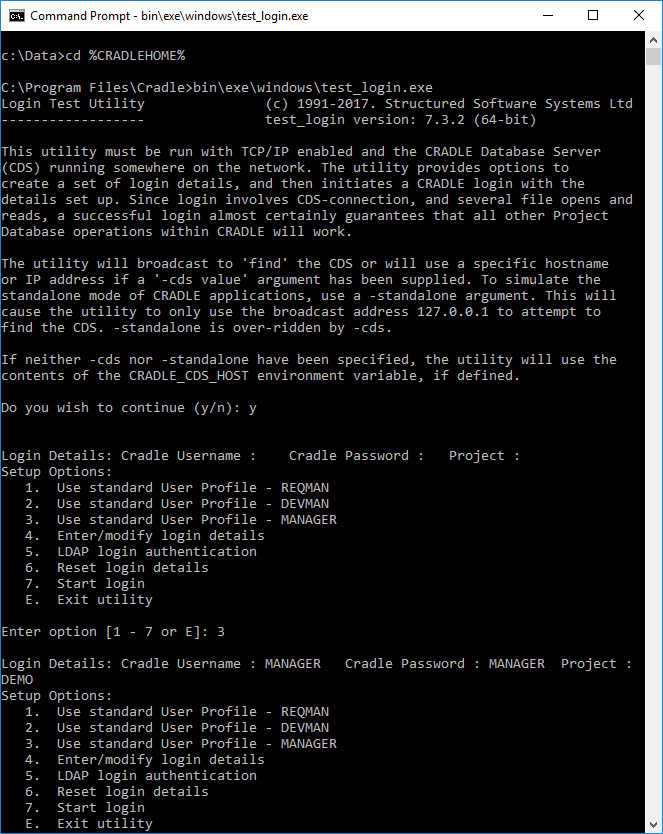
Test_Login is a command line utility supplied with the Cradle Suite to help diagnose connection problems between the Cradle client and CDS (Cradle Database Server).
Steps
At a command prompt cd %CRADLEHOME%\bin\exe\windows\or cd $CRADLEHOME/bin/exe/linux-ia32 or linux-x86_64
Execute test_login.exe or ./test_login.exe
Agree to continue with 'y'
For a basic test select 3 to login to the DEMO project as MANAGER
Select 7 to start the test
This will then tell you the method being used to find the CDS for now press 'y'
Move through the stages pressing 'y' each time and observe the result
Test_Login
If all is well the process will complete without errors.
If there is a problem an error will be raised (for example if a connection can’t be established because the CDS is not accessible or running Stage 1 would fail. At this point a user could try different CDS connection methods to diagnose the issue.
The ability to try different users and projects allow elimination of problematic installations or bad users.
Watch this space for updates during our 30th Birthday Year……..
Happy Birthday!
Happy 30th
Thank you to all our loyal customers and friends past and present. We’re proud to have been of assistance in your projects.
Thank you too to all the staff who over the years have changed Cradle into the multi module full lifecycle suite it is today.
Mark Walker founder and Managing Director of 3SL said:
“I am delighted with the success of Cradle and the way 3SL has been able to develop a tool that has influenced and supported so many projects world wide”
Structured Software Systems Limited’s official start date was 1st December 1987 and trades under the catchier moniker 3SL.
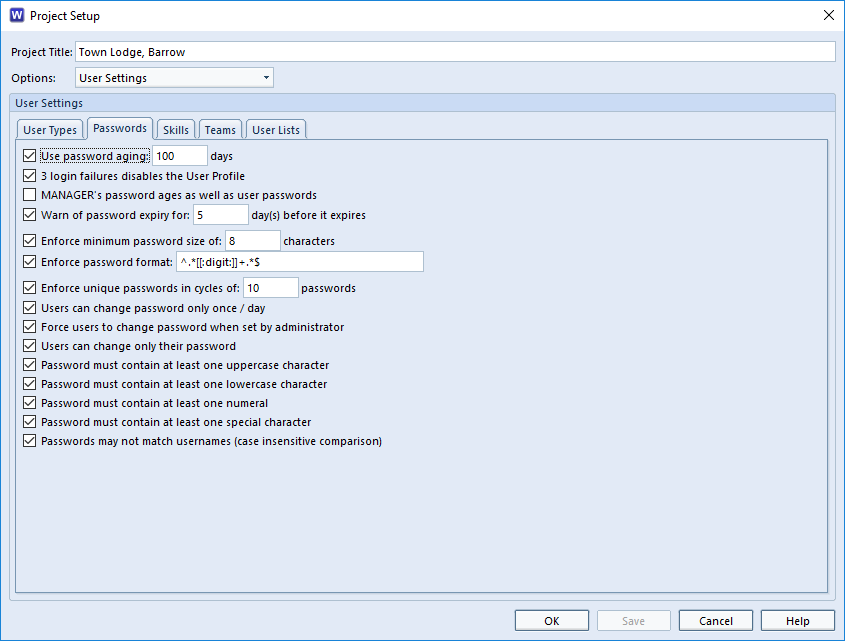
There are a number of options available to control a user’s password. These meet the majority of policies our customers have asked for. In the Users Settings section of the project schema setup the management can set the policy that users must adhere to.
Password Settings
This can include
Use password ageing
3 login failures
Warn of password expiry
Enforce minimum password size
Enforce password format
Enforce unique passwords in cycles
Users can change password only once/day
Force users to change password
Password must contain at least one uppercase character
Password must contain at least one lowercase character
Password must contain at least one numeral
Password must contain at least one special character ` ! $ ^ * ( ) _ + – = { } [ ] : @ ~ ; < > ? . /|
Passwords may not match usernames (case insensitive comparison)
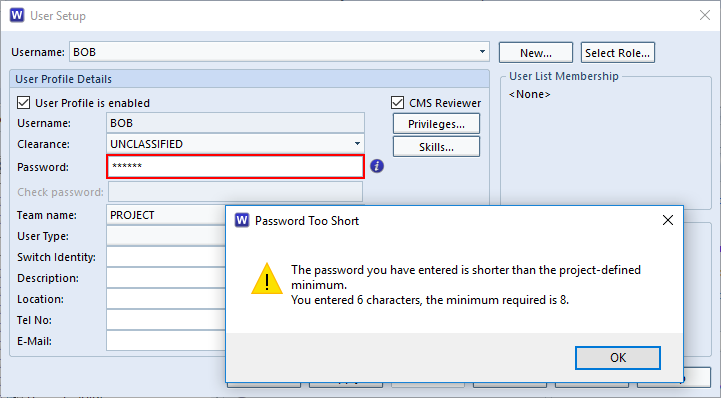
Does a user get told why their password is wrong?
When entering the password field, the box will remain with a red border until the password matches the criteria. The ℹ symbol will bring up a dialog telling you what’s causing the rejection. This will enable the user to select a password that matches your company password policy.
Password Entry
What if a User forgets?
A user with MODIFY_USER privilege can reset the user’s password by logging in and entering the User Setup dialog. If the user’s account has been disabled because of too many wrong attempts it can be re-enabled here too.
What if we can’t remember an administrator’s account password?
If you are trying to reset a User’s password and can’t remember the password of the user with MODIFY_USER privilege, you could sign on as the database manager account MANAGER. This account has all privileges including ACCESS_BYPASS and can be used to reset any of the users.
What if we can’t remember the MANAGER account password?
This super user account should be carefully guarded. Some clue or encrypted version of the password should be locked away in a safe or special password manager on a closed system depending on your company password policy. However, all is not lost, you will need to speak with your IT department, to get someone with access to the raw data files. Then you will need to contact 3SL supportsupport@threesl.com who will be able to assist in resetting the passwords to a new known value.
Can 3SL tell us what the passwords are?
No, sorry. The password file does not work like that. They would only be able to reset them to something new (which you’d be advised to get each user to change as soon as they next login)
What are the alternatives?
You could use LDAP authentication and then the passwords the user has to enter will match the policy set for your LDAP server.
Leonardo of Pisa, or as we know him Fibonacci, spotted a magical pattern in the early 1200.
Fn = F(n-1) + F(n-2) where F0 = 0 and F1 = 1 or F1 = 1 and F2 = 1 as a seed.
To celebrate Fibonacci Day 2017 and this most import sequence, found in nature, mathematics and the basis for the Golden Ratio, we’ve recreated a sequence in Cradle.
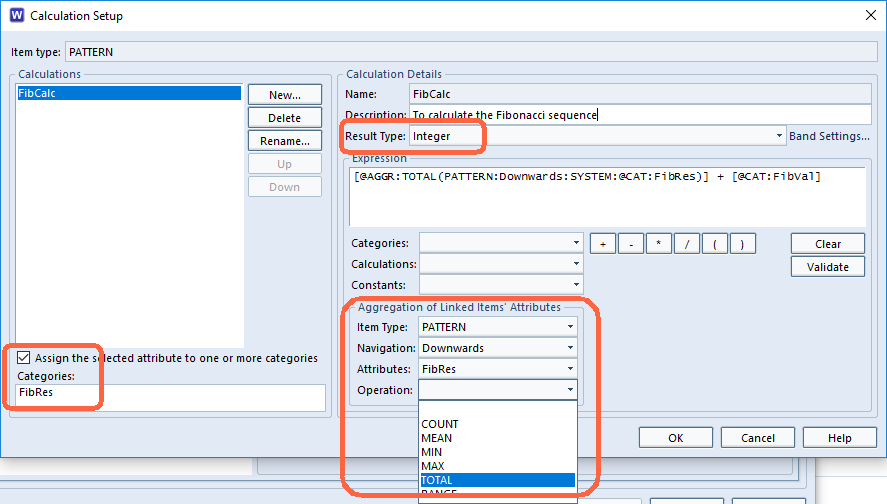
Using an integer Category value FibVal and FibRes and a calculation FibCalc. The calculation is set to look at its cross referenced children (a downwards navigation) and compute a sum based on the aggregate total of their FibRes category and its own seed, held in FibVal. The result is assigned to FibRes.
Fibonacci Calculation setup
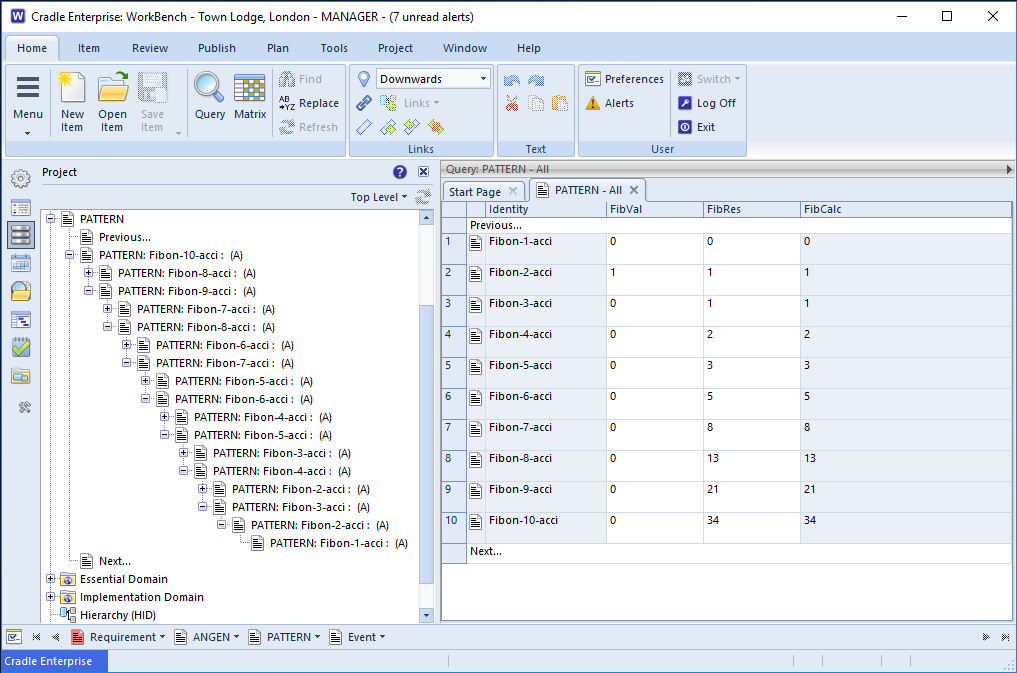
The first item were created and and seeded with 0. Then another item created and linked to it and seeded with 1. Thereafter new parent items were created and linked to their two previous children (Seed value of 0 just to keep calculation valid) .
Fibonacci Sequence
The screenshot shows the linked items (in the tree on the left). The query view (on the right) shows the values of the saved items and how they add up.
For more information on Calculations in Cradle, visit the online help. Have a go at creating your own sequence to celebrate Fibonacci Day 2017.
A RegEx (Regular Expression) is a pattern matching method often used in text searches and data processing. Cradle supports Regex matches in a number of query elements, so it is possible to perform complex searches on your data. This article gives an example of the use of Regexes in frames.
Example:
The mocked up example describes just one of the ways a user could search the text frames of their items achieve particular results.
Identity
Name
Group
Text
bed1
Single Bedroom
Customer rooms
Single person room of basic standard – en-suite shower
bed2
Double Bedroom
Customer rooms
A 2 person occupancy room, shared bed en-suite shower
bed3
Twin Bedroom
Customer rooms
A 2 person occupancy room, single beds, en-suite shower
bed4
Luxury Bedroom
Customer rooms
A 1 or 2 person occupancy room double bed, en-suite with bath and shower.
bed5
Night Staff Rest
Staff rooms
1 person
store1
Cleaning storeroom
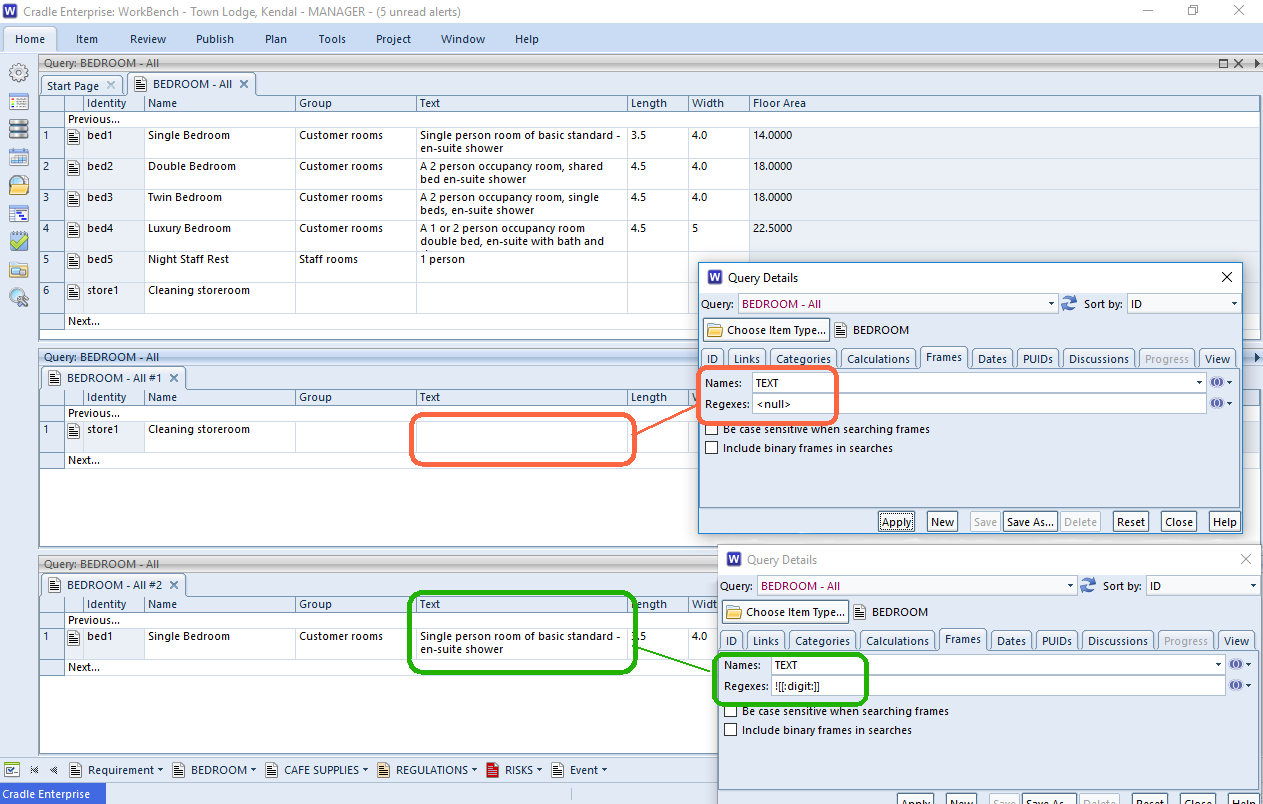
The data in the table above used a Cradle Note called Bedroom and was produced by running the automatic query “BEDROOM – All”. Then the resulting table was published to HTML. There were no regexes in frames applied to the initial query.
Queries with Regexes in Frames
Simply entering “TEXT” as the Name of the frame to search and running the query will bring back bed1-bed5. The item store1 has no content to compare so can’t match.
Entering bath in the Regexes field and re-running will return bed4 this is the most basic case the text typed in is simply found as a direct match.
If you want to find the incomplete items and find those with a blank frame using the Cradle extension of <null> in the Regexes field will return store1 as this has nothing in the frame.
If we want the query to find those that have not used a digit in the description (This may be important if the output is parsed by some other program) it is possible to use a regex character class [[:digit:]] . This will find all the elements containing a digit ≍ [0-9]. However, if we want the elements that don’t contain numbers, we can use the second Cradle extension of ! to negate the result, hence ![[:digit]] will return bed1 as it used the word ‘single’ rather than a digit for its occupancy value.
Cradle also allows comma separated logical combinations of regexes in frames. Using the Venn diagram symbol you can select whether these are AND or OR combinations. Switching to AND and then using the regex[[:digit:]],![[:alpha]] would bring back items where the frame contained digits and no alphabetic characters.
Regexes in Frames
Exploring Regexes
A simple way of testing whether your regex will give you the results you want is to use a test program regex101.com/ is a good example. This allows you to quickly tweak your statement, and run it against various test data. Cradle uses the PCRE ‘flavour’ internally. The Cradle help system has further information on regexes
Described by www.worldhelloday.org/ as a demonstration of the importance in communication for the preservation of peace, we can all do our little bit to get along.
Hello from 3SL
Say ‘Hello’
Hello, 你好, Hallo, Bonjour, 여보세요, Здравствуйте, Helo to our distributors and customers.
Whichever language you use, ‘Hello’ is a greeting, a sign of friendship, tolerance, and respect. Thought to derive from a ‘holla or hollo’ used to attract attention back as far as the 14th century, it has always been used as a positive greeting, or introduction. Use it as often as you can, form good relationships with your country folk, your neighbour, your customers, suppliers and even your competitors. As Thomas Edison is said to have done, pick up the phone and say “Hello” possibly to a friend or to a customer, or just an acquaintance you’ve not been in touch with for a while. (You could call 3SL on +44(0)1229 838867)
If you would like Cradle in a language not currently translated, don’t hesitate to contact us. SalesDetails@threesl.com
Find ten contacts and just say, “Hello”, “hey there!”, “wassup” or “howdy” you know it makes sense.
Item cross references can be captured through Document Loader in several ways. In this blog we deal with how to set Mapping Cross References in a Table. With all items in one or more tables, the linked items are in a cell using a comma to separate them. These cells will be mapped for the cross references.
Showing Item Per Table and Item Per Row tables
The tables above show information created in a document. The first shows each item in a separate table and the second each item is a single row.
The columns in the second table are;
Key – The Identifying number for the item
Name – The text name being assigned to the item
Description – The text to be captured into the frame of the item
Linked Requirements – The list of Keys (1st column) to which this item is related. It is not necessary for every item to link From/To other items. For example 1.1 links to child item 1.1.1, it is not necessary to link 1.1.1 back to 1.1 in the table.
You can only set one item type to be linked per table.
Table Mapping
Document Loader allows you to map cross references From or To items of different item types. There will be two options for From and To item types for each item type in the schema. This includes Specifications but not Data Definitions or Diagrams. Cross References can be set To and From the document. This is not necessary as each item has a link added back to the document when captured.
The options will show in a list like the example below:
– Xref from <item type> by identity – Xref from <item type> by hierarchical attribute – Xref to <item type> by identity – Xref to <item type> by hierarchical attribute
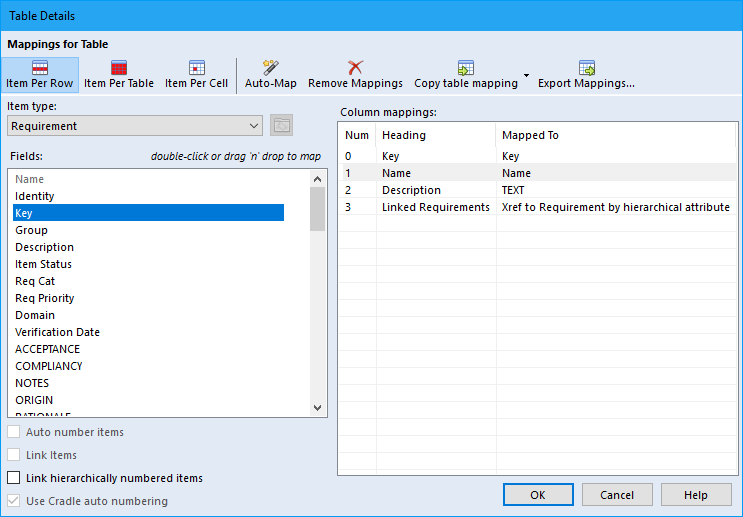
Mapping Item Per Table Cross References
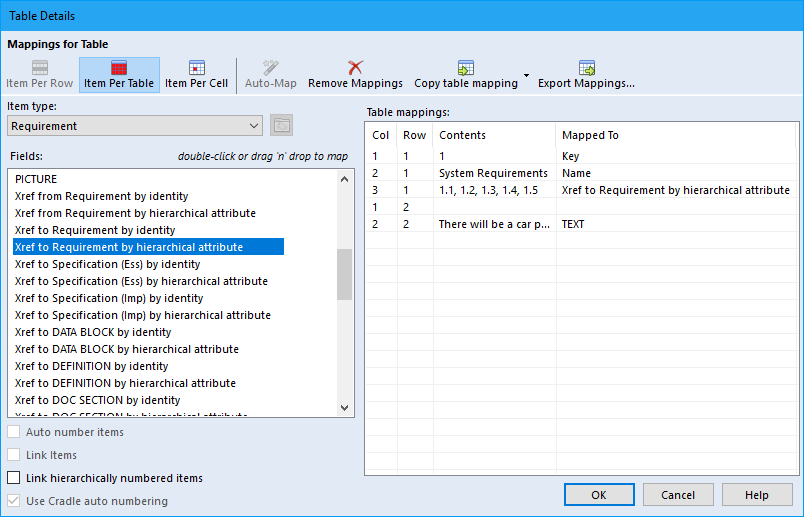
Load your document and right click on the cell you want to map and select Table Details. When the Table Details UI opens if not already selected, click on Item Per Table. To map the cells, the option is pulled over to the right column to the attribute you require it. The attribute in the right column is selected and then double click on the required option. Map the cells making sure you map one of them to an Identity or hierarchical attribute (Key). Set the cross reference cell by selecting the appropriate option.
For example in the first single table in the first screenshot, the numbers are for the Key attribute of an item. This means using the options with the hierarchical attribute in them.
As the links in the above example are to other items of the same type the option Xref to Requirement by hierarchical attribute is used. This will capture the cross reference from item 1 to 1.1. If I had put the cross reference to item 1 in the cells of the other items, I would have used Xref from Requirement by hierarchical attribute. This would then capture the cross references in the opposite direction of 1.1 from 1.
This shows the mapping of a Item Per Table option
This mapping can be exported and used for other tables within the document and selected through the Copy table mapping drop-down.
Mapping Item Per Row Cross References
Mapping Item Per Row is similar to Item Per table but instead of mapping cells you are mapping columns. As before, right click on the table and select Table Details. As before set the attributes like Key and Name etc, then set the Linked Requirement using the Xref to Requirement by hierarchical attribute option.
This shows Table Details with the Item Per Row mapped
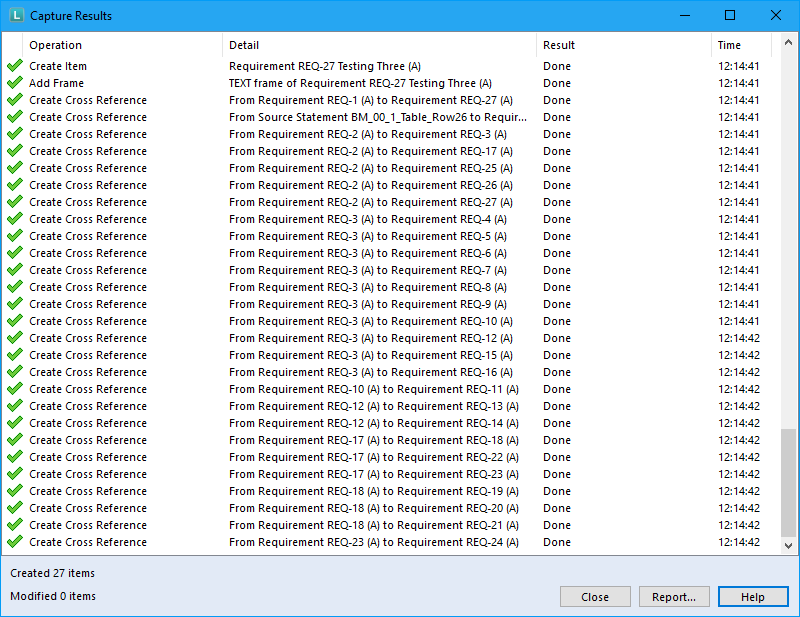
Capturing the information
Once all the paragraphs and tables are mapped with the relevant options, the user can capture the document. The cross references from these cells are created at the end of the capture so that all the items should be in the database.
The end of the Capture Results showing the cross references created
You will often want to organise information in a hierarchy. The hierarchy represents an entire collection of information. You can view the hierarchy at any level that is convenient. In effect, each level summarises the levels below it. Therefore, you may want any numerical information at the bottom of the hierarchy to be totalled at each higher level. So, it is common to use hierarchies to aggregate and apportion values.
Cradle can help you by calculating appropriate values at each level in the hierarchy. In the following System Breakdown Structure (SBS) hierarchy, the total weight of that component and everything within it is shown inside the square brackets:
SBS Hierarchy With Aggregated Total Weights
Aggregation and Apportionment
Aggregation means to add together. In the example, the components of the transformer are:
Transformer, weight 15
Transformer mount, weight 5
Therefore, the aggregate weight is 20, which is shown as the weight of the entire transformer.
Apportion means to divide, or split. If a set of pumps is to weigh at most 200kg, and there are 4 pumps, then we can apportion this weight budget equally between the four pumps. So, each pump is to weigh 200kg divided by 4, which is 50kg for each pump.
So we normally aggregate actual values up a hierarchy.
Therefore we normally apportion a budget value down a hierarchy.
Use Hierarchies to Aggregate and Apportion Values
You can aggregate values up a hierarchy by:
Create an integer attribute that stores the value for each item
Create a calculation that adds the item’s value and the total of the values of all its children
Store this calculated value as the total for this item and its children
Another way to say this is:
value for an item = user-supplied value
total for an item = value for the item + total of the ‘total for an item’ for all children
You can apportion values down a hierarchy in a similar way:
Create an integer value that stores the budget value for the item
Create a calculation that divides the item’s parent budget value
Store the calculated value as the budget for this item
Integer Attributes
You can create integer, or positive integer, attributes in items. An integer attribute can only store an integer value. You can only store integers greater than or equal to zero in a positive integer attribute.
You can create integer attributes as categories and then assign them to your items. For example, you can create an integer attribute Weight by:
Creating an Integer Attribute
Ensure you are logged-in as a user who has PROJECT privilege so you can change the schema
Select Project Setup from the Project tab
Set Options to Item Definitions and select the Categories tab:
Select New… and enter the name of the new attribute, for example Weight, and set its type to be Integer or Positive Integer:
Assign the new Weight category to an item type by:
Assign an Integer Attribute to an Item Type
Select the Item Definitions tab
Choose the item type
Select Categories
Select an unused category assignment and select the new Weight category:
Repeat this process to create another positive integer attribute Total Weight and also assign it to the item type. This is the attribute that will receive the result of the aggregation calculation.
The Aggregation Calculation
The last step to use hierarchies to aggregate and apportion values is the aggregation or apportionment calculation.
Still inside the schema and with the same item type selected:
A New Calculation
Select Calculations…
Select New and enter the calulation‘s name, such as Weight Calcs
To define the expression, we start by choosing the item’s own weightcategory:
Add a Category to a Calculation
Then click the + button or manually enter + into the calculation to perform an addition
Add Linked Items Into a Calculation
Then choose to total the Total Weight of all child items. We find the child items by finding all items of the same type that are linked to the current item by following all cross references found by the navigation Downwards. When we find these linked items, we get the Total Weight value from them:
Select Validate to check the expression that we have created
Store the Calculation in an Attribute
Finally we specify that we want the result of the calculation to be stored in the integer category Total Weight that we calculated. This means that each item’s total weight will be available to its parent item when it get values from its children, see 2 above
Using the Results
We can use hierarchies to aggregate and apportion values and the results can be used either directly from the calculation, or by saving the result of the calculation in an attribute.
You can either display a calculation or the category that stores its result. The values can be shown in views. This is what what we did to produce the SBS display at the start of this blog entry. Here is the view:
Displaying a Calculation in a View
You can use a calculation, or the category that stores its result:
In other calculations, or
As part of rule sets, or
To calculate part of a metric, or
To calculate KPIs (key performance indicators) in dashboards