The structure of each Cradle database is defined in a schema. Cradle is supplied with four default schemas that you can use. You can create new default schemas. You can initialise your new Cradle database using any of your default schemas.
Default Schemas
A Cradle system can contain any number of databases. Each database can be used for one or more projects. Each database has a structure that is defined in a schema.
When you create a new database, you specify a default schema that will be used to initialise the schema in the new database Cradle is supplied with four default schemas, called: empty, default, quick-start and SysML. 3SL provides documents that explain the contents of these default schemas.
New Default Schemas
Cradle can support any process for any type of project. The schema defines the types of information that you will need to follow your process.
You can create new default schemas to support any type of process for any type of project. For example, look at the following types of projects and lists of the item types that will be included in their schemas:
- Agile projects:
- Sprint, iteration
- Feature
- Build and release
- Test cases, test results
- Business Analysis projects:
- Needs, goals, objectives
- Business functions, processes, tasks
- Organisations, groups, teams
- Deliverables, reports and other document types, artefacts, builds
- Personnel types, skills, roles
- Enterprise Architecture projects:
- Needs, goals, objectives
- Processes, functions, tasks
- Resources, systems, buildings and other facilities, area breakdown structure, site breakdown structure
- Delivery phases, releases and builds
- Organisations, groups, teams
- Deliverables, reports and other document types, artefacts, builds
- Personnel types, skills, roles, organisation breakdown structure
- Requirements Management projects:
- Needs, goals, objectives
- Business requirements, user requirements, system requirements
- Validations and verifications
- Application lifecycle management projects:
- Needs, goals, objectives
- Business requirements, user requirements, system requirements
- Validations and verifications
- Analysis models, logical models, architecture models, design models – built using MBSE using one or more of functional analysis, SASD, IDEF, ADARTS, UML and/or SysML notations
- System breakdown structure (SBS)
- Test cases and test results
- Project Management projects:
- Needs, goals, objectives
- Business requirements, user requirements, system requirements
- Product requirements, managed in a library
- Validations and verifications
- System breakdown structure (SBS)
- Product breakdown structure (PBS)
- Part catalogue, suppliers, orders
- Production schedules, production runs, batches, samples
- Quality records, test cases, samples, test results
Location and Structure of Default Schemas
Each default schema is stored in the sub-directory:
admin/defaults
inside the Cradle installation on the server.
Inside this directory are:
- A file called: prj_params that contains the schema
- A directory tree containing the project-scope definitions, such as queries, views, forms and so on, called: definitions
Creating New Default Schemas
You can create your own default schemas by:
- Decide on a name for your new default
- Create a new directory with this name inside the admin/defaults directory in the Cradle installation on your server
- Place the schema for the new default inside this directory in a file called: prj_params – you can copy the prj_params file from inside the database directory of an existing database, or use Cradle’s export to create it (see below)
- Optionally copy some or all of the Project scope definitions from the definitions directory in an existing database
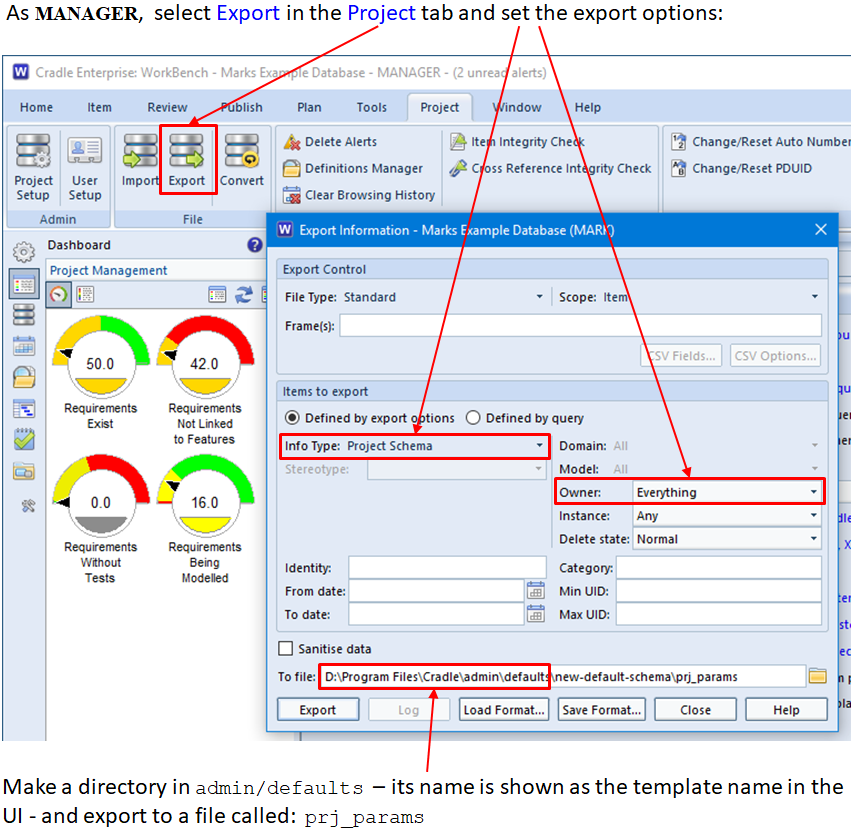
Export to Create a New Default Schema
You can export the schema using the Export Information dialog that is shon when you select Export from the Project tab in WorkBench.
If you can run WorkBench on the server, then you can export the schema directly into the new defaults directory:
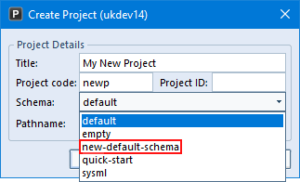
Using Your New Default Schemas
When you create a new database in Project Manager, select the Schema drop-down list. This will display the list of default schemas. Any new schemas that you have created will appear in this list, for example: