How to Recover Deleted Items

Recovering Deleted Items

The recoverable status means that when you delete items, they are not removed from the database, but is placed into a recoverable state from where you can restore the item if you need to. The ability to recover deleted items in this way is similar to the Trash folder you may find on a mail program or Bin on an operating system home screen. When an item is restored all cross references to/from the item are also restored.

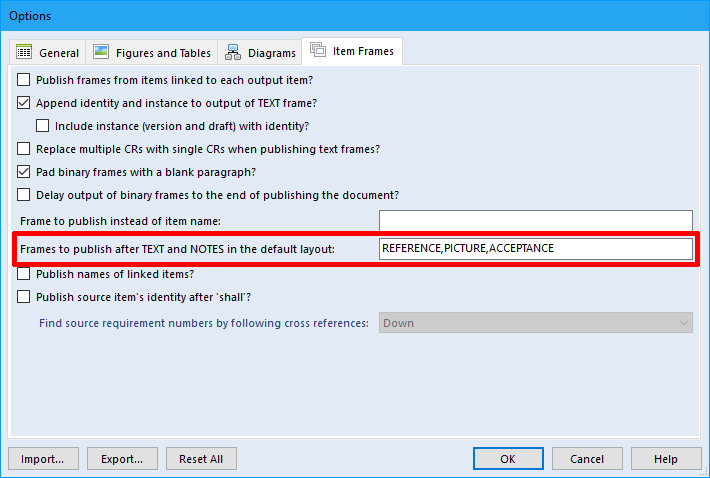
To set the recoverable option you need to set the Enable recovery of deleted items option within the Miscellaneous section in Project Setup:

Project Setup dialog showing settings to recover deleted items
Project Setup dialog

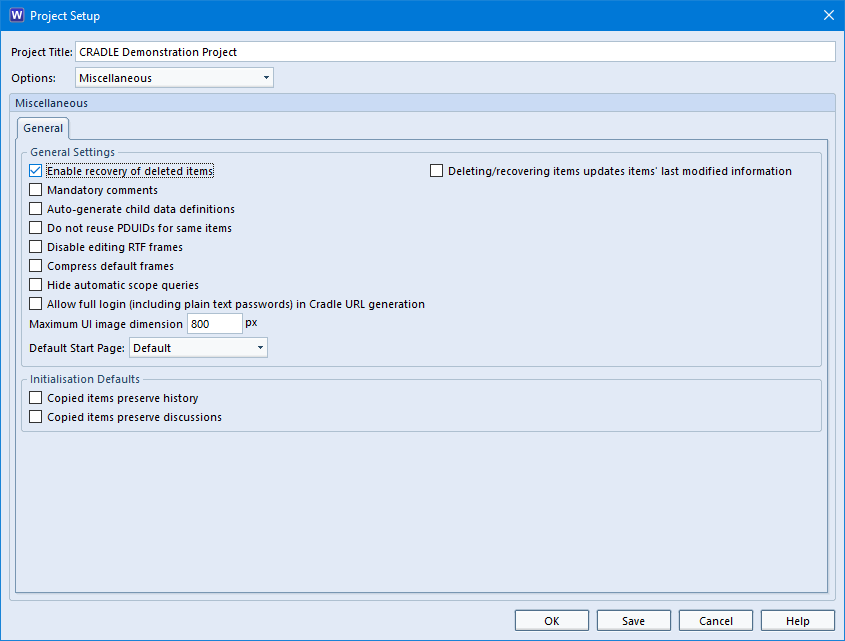
You will notice when you select this option the Deleting/recovering items …. option becomes enabled. This controls whether deleting a draft item (making it recoverable) should also modify the item’s last modifier/last modified date/time attributes. If set, this also affects those attributes when recovering an item, i.e. the date/time will reflect when the item was recovered.

Full Deletion

To really delete items from the database you can either:

  1. View the recoverable items and delete them, or
  2. Overwrite with a new item with the same identity as an item that is recoverable (you will receive a warning message so that you do not do this unintentionally)

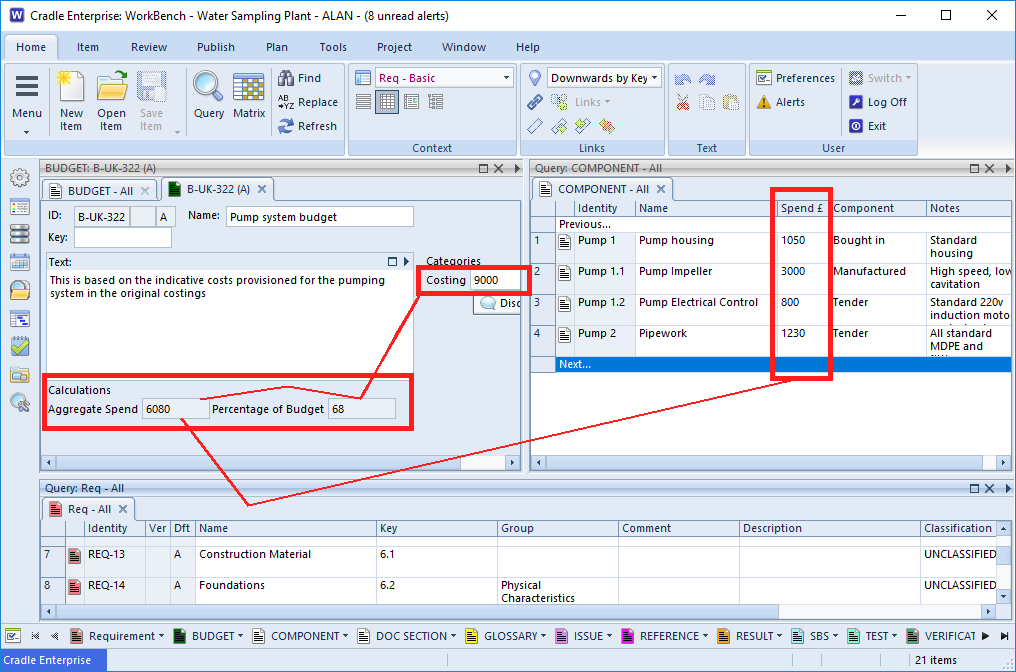
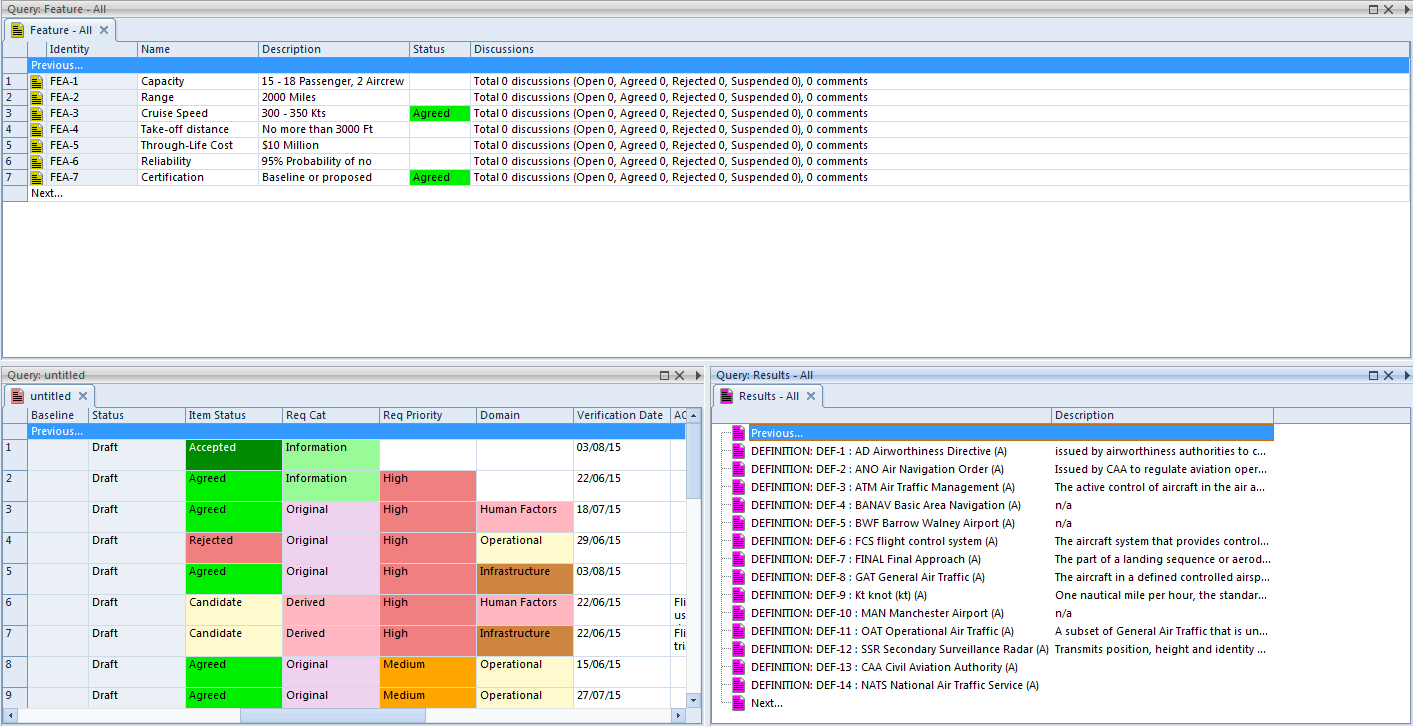
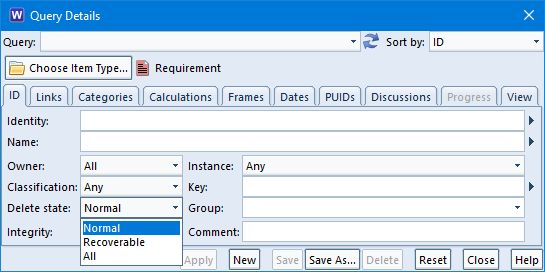
You can view the recoverable items by using the Delete State element in queries:

Delete states available within queries
Query Details Dialog

Tip: You can stop users from deleting items by disabling the delete item privilege in user setup. We feel that deleting an item is more of a project admin task and not for general users.

Viewing Deletions

As you can see there are three values:

  • Normal (the default) – selects items that are not recoverable
  • Recoverable – selects items that are recoverable, that is, the items that have been deleted and which can be restored
  • All – selects items irrespective of their recoverable status

Read the Cradle Help for information on how to recover deleted items.

When items are deleted (i.e. placed into a recoverable state) and change history is enabled for that item type, a comment of Item deleted is added to the change history of the recoverable item. Also, if the item is recovered a comment of Item recovered is added to the change history.

Article updated 05/12/2018 – Added tip

Banking Changes

Changes to 3SL Bank Account Numbers

In response to the 2008 financial crisis, the UK Government has decided that all major banks must protect their personal, retail and most business banking operations from their more risky, often speculative, investment banking and international banking operations.

photos of city banks (Pexels.com)
City Banks

Most major banks in the UK will do this by  creating a new ‘ring fenced‘ banking operation that is protected from future problems in the financial markets.

Most of the UK’s major banks will effect this change in April 2018.

For 3SL, these banking changes will mean that there will be a new BIC (bank identifier code) within the IBAN (international bank account number) of all of our bank accounts. In  effect, all of the IBANs for our bank accounts will change in April 2018.

It is also possible that banking changes may effect another part of our bank account numbers, called the sort code (similar to the ATA, routing number or branch number codes in other countries’ banking systems). If there is a change to our sort code, the change is likely to occur in January 2018.

If you are an international supplier to 3SL, or one of our international customers, then it is possible that our IBANs will change in January 2018, and they will definitely change in April 2018 when the new ‘ring fenced’ bank in Barclays PLC receives its new BIC.

All of these changes are being completed in advance of the UK Government’s deadline of January 2019.

Our current IBANs will remain available for 36 months after the change in April 2018.

We apologise for the inconvenience that these changes will cause to our UK and international customers and suppliers.


Updates:

6th June 2018 – Barclays have confirmed the new SWIFT BIC code is BUKBGB22. Our sort code and account numbers have stayed the same but our IBAN numbers have changed. Please contact salesdetails@threesl.com to request our IBAN numbers.

September 2017 Newsletter

September – Autumn on the way

Autumn leaf Pexels.com
Autumn

It’s back to school and college for many of our young people. As businesses it should also be a time to reflect what lesson’s we’ve learned so far this year now we’ve arrived at Q3.

Take Stock

  • Which of your projects are on schedule,
  • Which of your projects are on budget,
  • Which of your projects are not really being measured?

These are all questions that a good PM (Project Manager) should be able to answer quickly and succinctly. Unfortunately that’s not always the case. Dates and milestones were not clearly defined so schedule is difficult to measure. What part of the budget applies to what part of the solution is not clear so spend can not be measured accurately. How many Requirements have actually been split into System Requirements or Functional Blocks is not calculable.

Don’t Panic

Cradle’s features can offer assistance with these issues.

  • Cradle offers the ability to link Work Breakdown Structure (WBS) items to Microsoft® Project allowing a direct connection between the Project Plan and packages of work related to designs, functions, tests etc. in the Cradle project
  • If a Budget item is created in Cradle, it could be easily linked to other components of the project. They could then have a category of actual spend. Using Cradle’s calculation facility, these linked items can be totted up and shown in the parent item.

    screenshot of aggregate calculations
    Aggregate Spend with Calculations
  • Dashboards are a quick visual aid showing your Key Performance Indicators (KPI) showing percentage of Requirements with System Requirements attached is a good way of monitoring progress.

Control and Relax

Move into Q4 with all the project knowledge you need to finish the year on a high.

Cradle 7.3

We trust you have all had your Security Codes for Cradle 7.3 and have successfully downloaded and installed the latest version of Cradle. If you haven’t received your Cradle-7.3 Security Code please contact the Support Department support@threesl.com

Banking Changes

There are some changes afoot for those that deal with 3SL financially.

In response to the 2008 financial crisis, the UK Government has decided that all major banks must protect their personal, retail and most business banking operations from their more risky, often speculative, investment banking and international banking operations.

Most major banks in the UK will do this by  creating a new ‘ring fenced’ banking operation that is protected from future problems in the financial markets.

Most of the UK’s major banks will effect this change in April 2018.

For 3SL, these banking changes will mean that there will be a new BIC (bank identifier code) within the IBAN (international bank account number) of all of our bank accounts. In  effect, all of the IBANs for our bank accounts will change in April 2018.

It is also possible that banking changes may effect another part of our bank account numbers, called the sort code (similar to the ATA, routing number or  branch number codes in other countries’ banking systems). If there is a  change to our sort code, the change is likely to occur in January 2018.

If you are an international supplier to 3SL, or one of our international customers, then it is possible that our IBANs will change in January 2018, and they will definitely change in April 2018 when the new ‘ring fenced’ bank in Barclays PLC receives its new BIC.

All of these changes are being completed in advance of the UK Government’s deadline of January 2019.

We believe that our current IBANs will remain available for 36 months after the change in April 2018.

We will provide more information as it becomes available. In the mean time, we apologise for the inconvenience that these changes will cause to our UK and international customers and suppliers.

Social Media

Twitter

When we posted a suspect on Twitter in the Made In Britain (@MadeinBritainGB)  #MadeInBritainHour we had quite a few people thinking about suspect items


mock up mug shot
Not your Usual Suspect

Hints of the Month

Don’t want everyone changing an item’s category? This article highlights Category Skills

Many : Many, One : Many, Many : OneCardinality Rules can be set on Cross References.

And one for I.T. a little help if things need a tweak or unfortunately go wrong.

You can read Hints & Tips in the 3SL Blog.

Publish Subject Items in Document Publisher

Using the ‘Publish Subject Items’ option

The Publish Subject Items option in the Hierarchy Table can allow a user to stop items being published. This is based on a link(s) existing or not. Users need to understand it affects not only the type it is on but can affect the Subject type as well.

Publish Subject items Options
Hierarchy Details – Publish Subject items Options

Publish Subject Items – Always

When the option is set to ‘Always’, this means that the target items will be published in the document. It does not matter if there are linked items below or not.

Publish Subject Items – ‘Only if link exists’

When the option is set to ‘Only if link exists‘ then the item type will only get published if the item linked to the source has the correct link type and is not excluded because of a filter.

With ‘Only if link exists‘ set on the ISSUE item type and a filter:

– Requirement (Source Item)

– ISSUE (Target Item with filtering)
– RISK (Target Item)

With the hierarchy set as above, if a Requirement only had 1 ISSUE linked to it and this link was removed due to filtering. This means the source item will not be published as there are no linked items to be output. If the Requirement has 2 ISSUEs linked to it and only one is removed through filtering then the source item, the single linked ISSUE and any linked RISK items will be published .

With ‘Only if link exists‘ set on the ISSUE item type and no a filter:

– Requirement

– ISSUE
– RISK

With the hierarchy set as above, the Requirement will be published as well as both ISSUEs and any linked RISK items.

Publish Subject Items – ‘Only if link does not exist’

When the option is set to ‘Only if link does not exist‘ is set on a target item then the source item is only output if the target item is not linked.

With ‘Only if link does not exist‘ set on the RISK item type:

– Requirement

– RISK

Any Requirements that are not linked to a RISK or have the wrong link type will be published. Those Requirements that are linked will not be published.

Publish Subject Items – ‘Only if all links exist’

When the option is set to ‘Only if all links exist‘ then the source item will be output if all linked items have the correct link type and are not removed through filtering.

With ‘Only if all links exist ‘ set on the ISSUE item type and a filter:

– Requirement

– ISSUE (with filtering)
– RISK

If the Requirement has a single ISSUE linked to it and the filtering removes this link then neither the Requirement nor the ISSUE will be published.

When a Requirement has two ISSUEs linked to it and the filtering removes one link then neither the Requirement nor the ISSUEs will be published.

With the filtering removed from the ISSUE item type then the Requirement, ISSUEs and RISK items will be published.

Publish Subject Items – ‘Only if all link do not exist’

When the option is set to ‘Only if all links do not exist‘ then the source item will be output as long as non of the linked items have the correct link type or at are removed through filtering.

With ‘Only if all links do not exist ‘ set on the ISSUE item type and a filter:

– Requirement

– RISK

If a Requirement has a RISK linked in the right way then the source item will not be output. If a Requirement has either no linked RISK items or the link type is wrong then the source item will be output.

For help on Document Publisher click here

For blog posts on Document Publisher click here

How do I change an item’s owner?

Did you know you can change the owner of an item?

Changing an item’s owner is really easy.  Simply select the item you want to reassign to  different owner and from the context menu (right click) select -> More -> Set Owner…   The following dialog will then open:

.
Set New Owner

There are obviously some restrictions, you can’t set the owner to PROJECT and bypass configuration management, you need the right privileges within your team. This is explained in the Cradle help

You can also Set Owner Including Related Items, by navigating to the same place as Set Owner and the option below that one is for Related Items.

If you would like further information regarding Owner of an Item click here.

Star Trek Day 2017

Happy #StarTrekDay 2017

Celebrate the forward vision of Roddenberry of a collaborative World where we all work together to keep the peace.

Parody image
The 3SL Enterprise

OK to celebrate so you could just go and watch all the episodes of Trek, or you could think about the future…

Let your projects live long and prosper. Boldly go into the known with #3SL Enterprise the full muti-user  version  of Cradle. Don’t leave things to chance, plan your requirements and link with your designs to ensure a fully traceable deliverable system.


Creating a RTF Frame

Displaying and Editing RTF Inside Cradle

This blog will help explain what RTF frames are and how they are used within Cradle.

Rich Text Format can be used to enhance the data shown in Cradle. This is displayed in a Rich Text Frame. Whether this is to allow BOLD, Underline or a different Font. Generally requirements and specifications should be broken down into atomic components. The ‘detail’ should be expressed in a short and concise  statement or paragraph. However, higher level requirement or tables are often useful and in these cases the emphasis / layout provided by RTF is desired.

demonstration of RTF in Cradle
RTF Frame Display

To create the RTF Frame, open WorkBench and navigate to Project Setup. Inside Project Setup from the Options dropdown menu select “Item Definitions” and open the tab Frame Types.

In most cases using the shipped schemas, you’ll see a frame of type RTF, however, the steps to create a frame are: Select New… this will open the “New Frame Type”  dialog in which you can give your frame any name, for this I have named mine the “Blog RTF“, You will now see the Frame you have created in the list, select Edit… in this dialog you now have several settings, the “Base Type” will allow you to change the Frame Type, you will want to change this to “RTF“. Other options are available such as being able to restrict the RTF Frame by choosing a Required Skill, provided that you have a set of predefined skills in your project schema.

Now to assign this frame to an Item Type, first you will want to open “Item Types“. Select your item of choice, for this I have selected System Note – Feature. Select “Frames…” and give this a sensible name such as “RTF“.

Frame Setup dialog showing RTF frame assigned to FEATURE item type
RTF assigned to FEATURE

For more information regarding Frames select here

Article Updated 04/02/2019 – Added intro

Captions for Images in Document Publisher?

Question: I have images that need to go into a document and want to have captions with them when published, how do I do this?

Create a Frame in WorkBench

To have captions for images without using RTF frames, add a new frame, name it the same as your image frame with the TITLE appended to it e.g. PICTURETITLE or PICTURE_TITLE. Leave this frame as a plain text frame.

Adding a text frame to use as the caption for an image

Run or open and item with the image you wish to set a caption for. Then enter the caption for the image in this new text frame.

PICTURETITLE frame for the captions

Set the Options for Captions in Document Publisher

Open your template in Document Publisher and open the Option UI. Select the ‘Figures and Tables’ tab and enter the name of this frame in the box for ‘Title frame’.

Figures and Tables tab in Options

If using a default Paragraph Group tag without Field tags then a user can add the PICTURE frame name to the ‘Frames to publish after TEXT and NOTES in the default layout’ under the ‘Item Frames’ tab.

Item Frames Tab in Options

This will then output the default layout including the frames from the ‘Frames to publish after TEXT and NOTES in the default layout’ option. The text in the PICTURETITLE frame is used for the caption for each image. The captions then for each image will then be entered into the List of Figures during publishing.

List of Figures for both default and field tag output
An image using the title frame for the caption
An image using the title frame for the caption via the default layout

Using Field Tags

If the user wishes to use Field tags the option will work with these too. Add the field tag for the image in this case the PICTURE frame. As the template is published, the caption for the image is set from the PICTURETITLE frame. Again this will be picked up in the List of Figures when published.

Using Field tags in a Paragraph Group tag to output images with captions

Using the PICTURE frame Field tags will also work within a Table or an Inserted Table. It will output the caption with the image and add it to the List of Figures when published.

Using Captions for images within a Table
List of Figures Including the tags in a Table

For more information on Document Publisher click here

Article updated 05/12/2018 – Changed to be an FAQ

How do I see multiple queries at the same time?

Run and Display Multiple Queries Simultaneously

In Cradle it is very simple to see multiple queries!

First of all run your selected Query and this will open in a pane as usual such as shown below:

Query feature
Pane 1 – Query Feature

Now in the Top Right of the Pane you will see a little Arrow pointing right, if you select this you will be able to “Split Top/Bottom” or Split Left/Right” Creating a new pane. In that pane right click and you will have the option to “New Query…” This can be done multiple times. Showing multiple queries in views, multiple items in forms or multiple diagrams As you can see by my example below I have 3 Queries open all with different views and styles.

WorkBench showing multiple queries
Multiple Queries

For further information on Multiple Queries click here

Letter Writing Day 2017

Remember Personal Communication –  Letter Writing Day.

In these days of mass communication, where one ‘letter’ is emailed to hundreds of recipients or a comment is Tweeted (is that really a verb) to gazillions, it is still really personal to write.

Think how much nicer a Birthday card on the shelf is, (was going to say mantelpiece but in modern underfloor heated super insulated homes there probably isn’t a fireplace), compared to a e-Post “Hiya”. It shows someone has put time and thought into writing to you personally.

www.daysoftheyear.com/days/letter-writing-day   #letterwritinday

We are as guilty as the next, in not sending individual letters to all our customers. Instead we ask you to sign up to our newsletter and then write to you once a month. You’ll find our newsletter easier to read than if we had to hand write it out thousands of times!

So think of a friend or a loved one. Find some paper and a pen and jot them a note, send them a post card, or draw them a doodle.

If you’ve not got enough time, then you could just print out the following, sign and send it. You’ll need an envelope and a stamp……


Letter requesting quotation
Letter to 3SL