Named user licences are a simple way of working in a small team. Cradle’s variants support single user,named user and enterprise editions. Additionally there are facilities for SaaS and subscription options. A single user licence is just what it says, it is for one person on one machine. When there are multiple users of a system, it is usual for the server to reside on one machine and the clients on user’s desktops. In a full enterprise version you can install as many clients as you need and simultaneously use the number of clients purchased in your licence.
Named user licensing is a way of having a team of engineers, working on a project, but (now don’t tell our boss this, but tell yours) at a lower cost.
The restriction being that each of the users is named and locked to the licence. So whilst you could install numerous clients only those login names would be allowed to connect to the server.
We realise that staff can change, and with each maintenance renewal you can make any changes you like. If you purchase extra licences you can also change the users for free. 3SL reserve the right to charge for more frequent alterations.
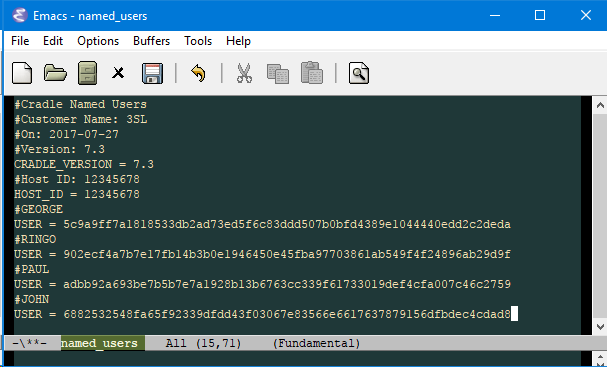
It’s all in a file (and the security code)
The named users are contained in a file. If you have system level access to the Cradle installation all you need to do is drop the new file in. If you change the number of users you would also have to configure a new security code.
Using Project Manager with Multiple Projects and Passwords
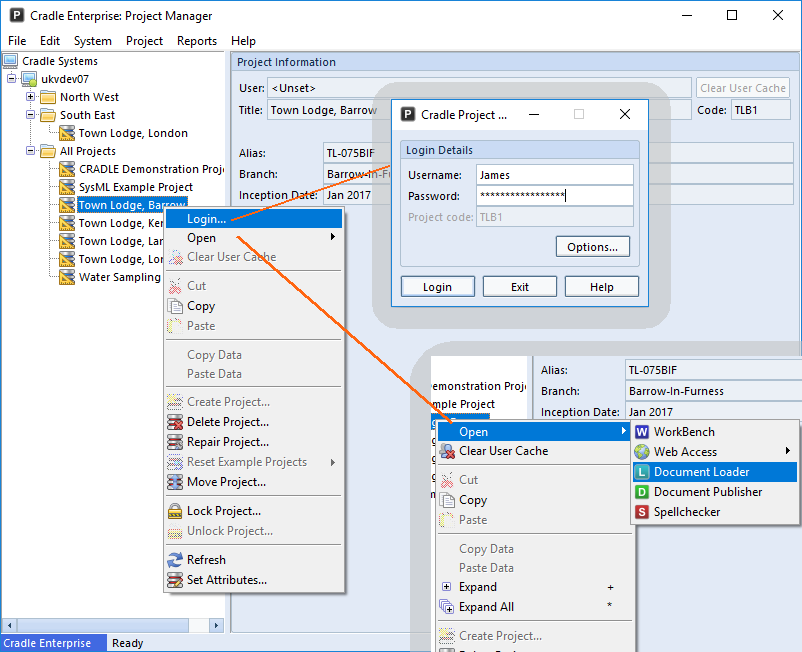
In an environment where you have numerous projects that you switch between, using Project Manager to Login can save retyping your Cradle password.
If you have many projects that you need to switch between and don’t have a limitless desktop to open multiple copies of Cradle or don’t want to lock multiple licences, use Project Manager to look after switching.
Once you Login to a project through Project Manager your Cradle password is cached for that session. You can then access the project through WorkBench, Web Access, or the Toolsuite applications; Document Loader, Document Publisher or Spell Checker. When you exit a tool, you can open another project through Project Manager as you work through your day. When you need to re-enter any previous projects, you’ll only need to use the Open command as your login details will be cached.
If you need to clear the cache (for security reasons) then simply use the Clear User Cache option. Alternatively close Project Manager.
Another option to change to a different user is to use the “Switch Identity” option, this can be enabled in the “User Setup” A User Profile’s switch identity can only be set if you have read-write access to the User Profile. If you have no access to a User Profile, you cannot see any part of it, including the switch identity. If you have read-only access to a User Profile, the switch identity is disguised in the same manner as the User Profile’s password.
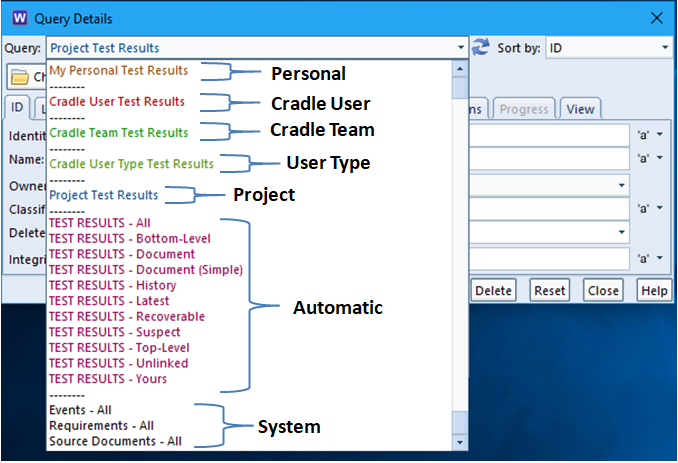
There are seven main groups into which Cradle definitions can be filed. These are common for each type of definition, say a view or a query.
Personal – These are available to the Operating System User whichever project they are logged into – ‘Peter’ may be the ‘admin‘ on one project and the ‘design manager‘ on another but will be able to see this definition whichever he logs into. This only makes sense if the item types are the same in both or the definition is very generic showing say ID and Status, common to all.
User – These are based on the Cradle User name and are available to that role name on every project. On three different projects the role QA manager may be held by three different people. Definitions here would be available to anyone logging in as QA manager.
Team – Definitions here are available to anyone in the same Cradle team on a particular project.
User Type – Users can be grouped by type within a project and this allows definitions to be shown to users of a matching type.
Project – These are queries available to anyone on that particular project
Automatic – Each time a new item type is added, Cradle generates a set of useful definitions to help you get started. These are idea to open tweak and ‘Save As’ to match your personal preferences. They are also useful if you want to write a phase or reference a view in a query as these standard definitions will exist without you having to create them.
System – Some hard wired definitions covering the minimum shipped functionality in Cradle.
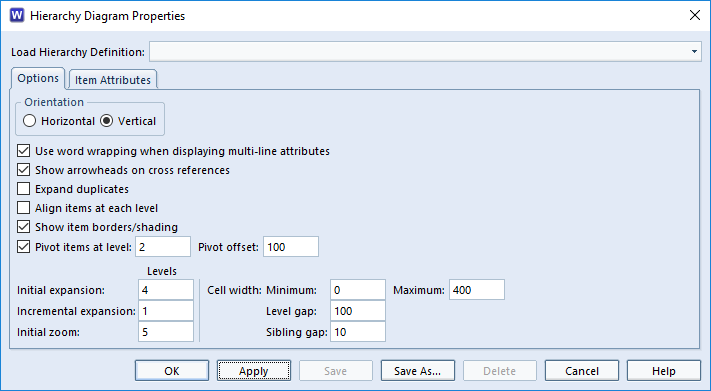
Yes you can control the shape of a HID (Hierarchy Diagram). In the hid properties you can control the shape and data shown in your HID.
The cross reference links between each item control the connections shown on the HID. The whole HID layout can be Vertical or Horizontal. The number of levels shown when first rendered (rather than dynamic click and expand) can be controlled. Whether an item is shown more than once if it has multiple cross references and general layout parameters. These are further detailed in How to Set Hierarchy Diagram Properties. Once you are happy with the layout it can be saved for use next time you need a similar pattern.
HID Properties Dialog
Your data may produce a short wide tree or a long narrow tree. This can be difficult to see on the screen. This video shows how changing the pivot point, (the node at which the orientation changes from listing horizontally to vertically) can alter the overall display to be more usable.
Support have asked me to switch on tracing, what is it, and how do I do it?
Occasionally some customer installations don’t allow Cradle to function as required. In order to get to the bottom of this the Cradle Support Team may ask you to ‘turn on tracing’. This will give a comprehensive report of what’s happening internally in Cradle. You can then send these logs for diagnosis. This will then help us resolve your installation issue as fast and efficiently as we can.
Cradle Tracing Configuration
The files
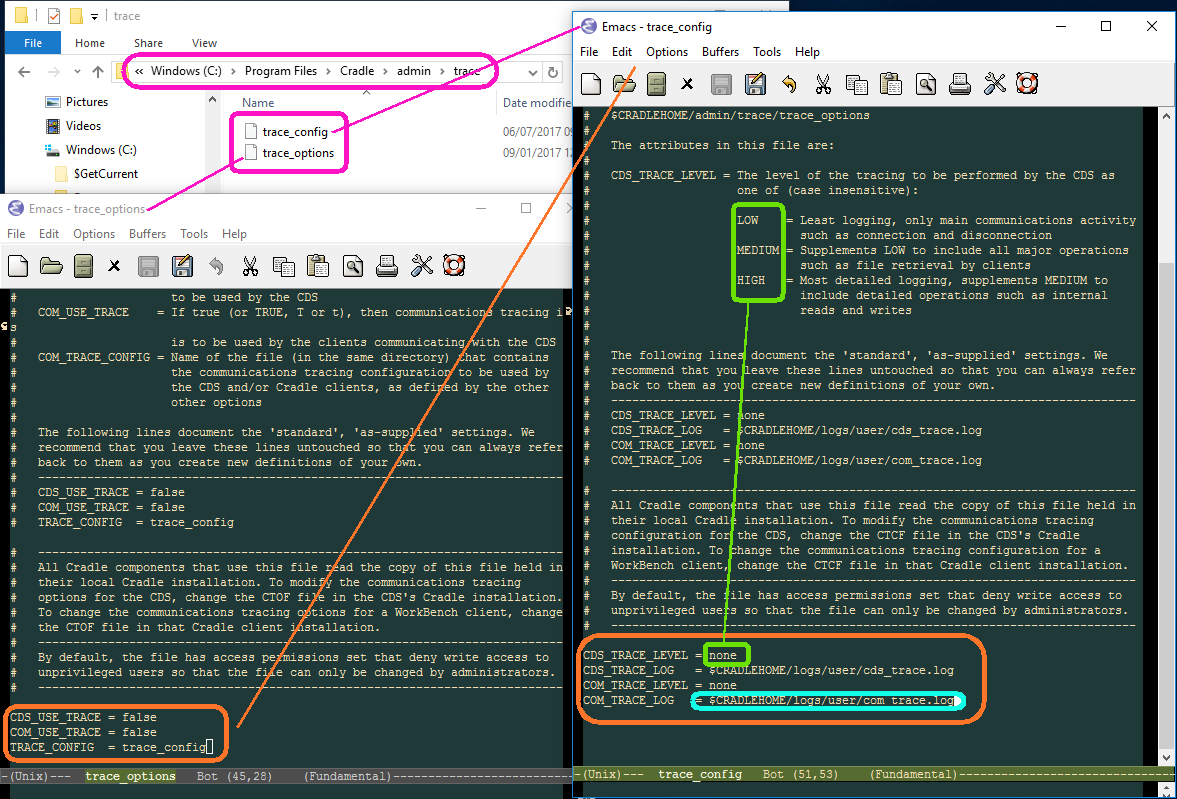
The files trace_options and trace_config control how tracing is performed. By default they are located in %CRADLEHOME%\admin\trace
trace_options
This file controls when to collect, and is used to simply switch tracing on or off. Setting CDS_USE_TRACE to true will set CDS (Cradle Database Server) tracing on. The file must be the one located on the machine running the CDS. Setting COM_USE_TRACE to true will set tracing on for any client communications. The file that you alter must be on the client machine in question.
The TRACE_CONFIG option allows you to choose which file you want to use to control the tracing, most of the time we suggest you leave it as trace_config in the same directory.
trace_config
This file controls what to collect and where to send the output. The CDS_TRACE_LEVEL and COM_TRACE_LEVEL both control how much tracing to do from LOW, through MEDIUM to HIGH. This will give basic ‘someone logged on’ reports at LOW through to ‘this message was sent from this process to that client’ at HIGH. Support will advise which level to use, but be wary of leaving HIGH switched on for too long as it will create very large reports.
The CDS_TRACE_LOG and COM_TRACE_LOG are the location where we will write the file. The default logs folder is usually best.
When you have finished tracing don’t forget to set the values in trace_options back to false.
It would be a bit silly to have a requirements management tool and not use it to manage your requirements, wouldn’t it? Cradle’s continued development is controlled within Cradle. Changes, testing and feature management are all controlled in a Cradle database. This allows us to track each change from the initial proposal or enhancement request through development and testing through to final documentation and release.
Ongoing Feature Development
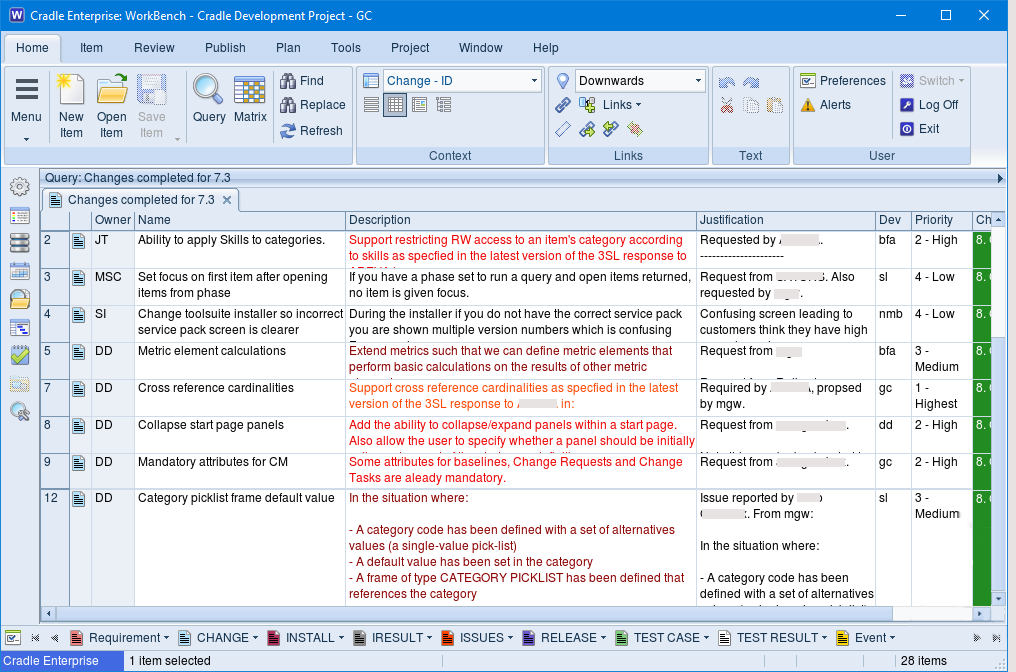
This is the basic case of ‘Cradle designed in Cradle’. You can see from this sneaky peek at our 7.3 release a number of features you’ll benefit from in the coming months.
Cradle Development Database
Obviously we have removed customer references, but this simple view shows the ‘Change‘ items that follow a lifecycle through Cradle. The Change has a set of Test Cases written to cover different aspects from usability through to access permissions and of course that it matches the original design requirement.
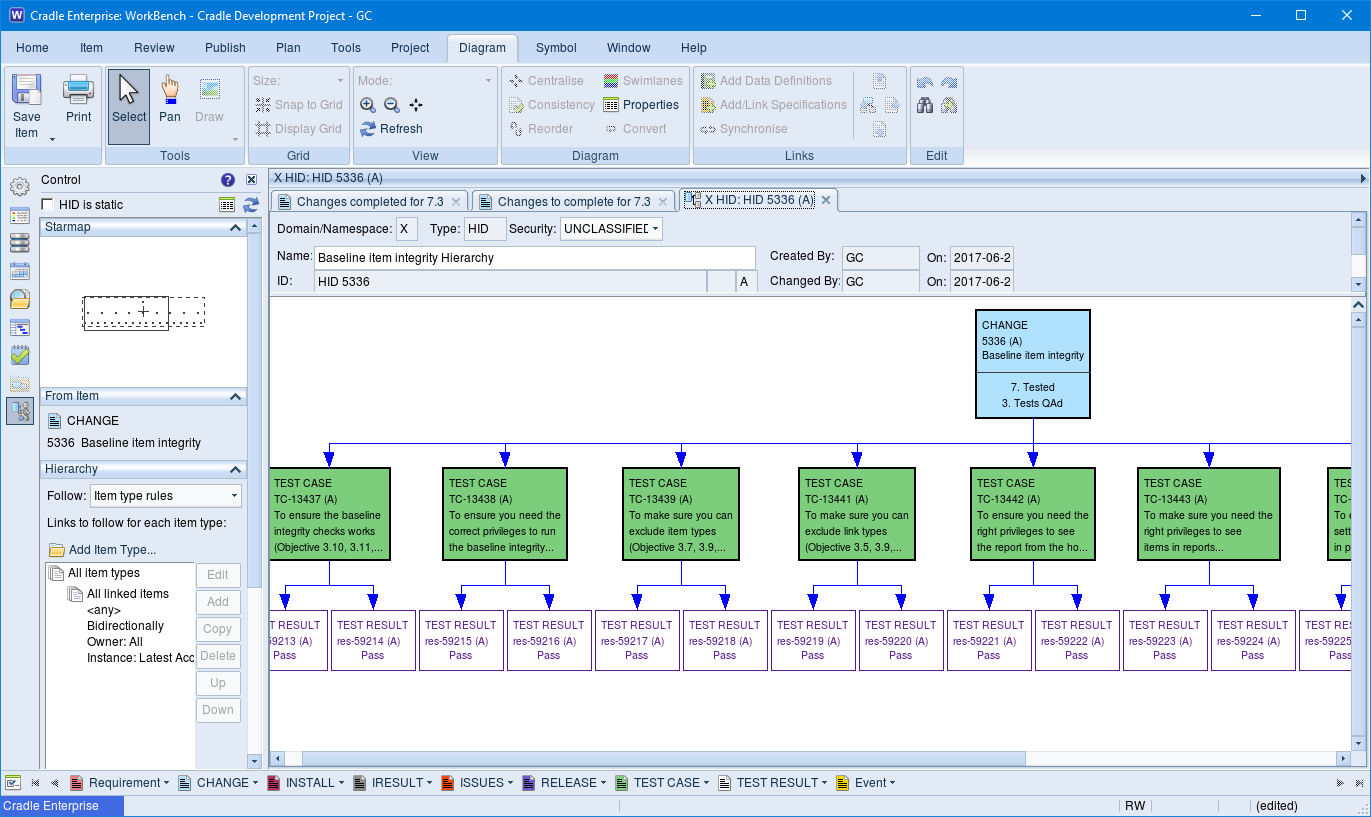
Change to Test Result HID
During development and testing it is useful to get a quick overview. The hierarchy diagram above shows a simple view tracing from the feature through the Test Case to the Test Result. (GC: Luckily they all show ‘pass’ which is a relief as it is a feature I coded!)
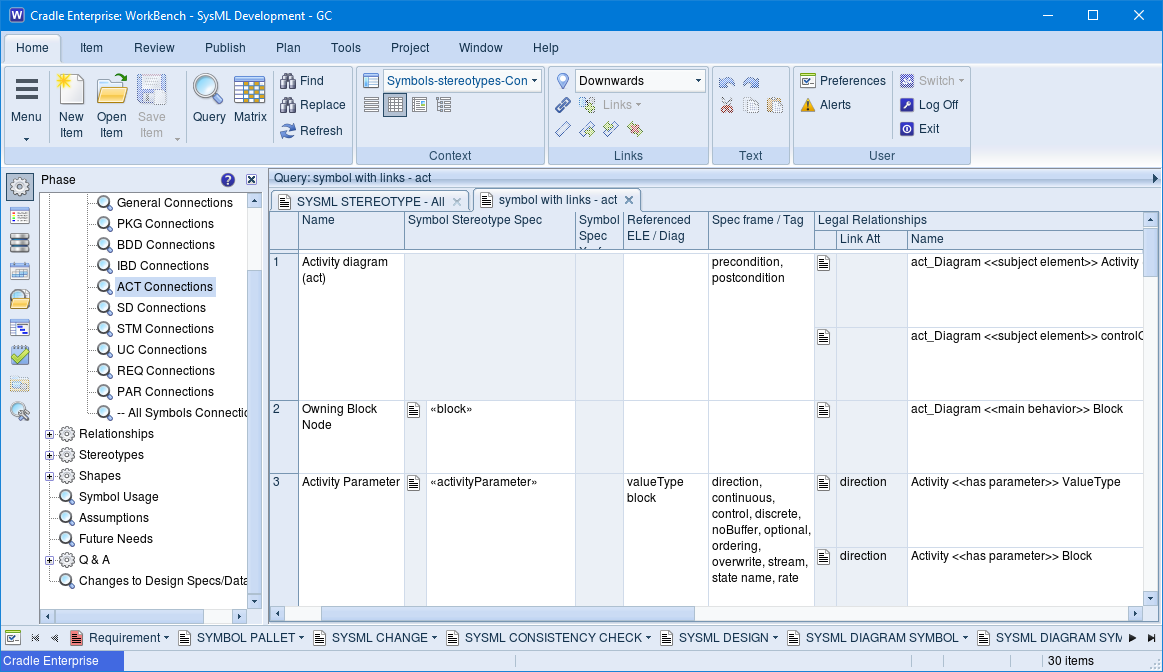
Larger features
Again it is a case of Cradle designed in Cradle. For example Cradle 7.1’s SysML functionality, a separate project was used, as there were more collaborators, and the design team was spread both sides of the Atlantic. The view below shows multiple item types linked together, the «relationships», linked to the symbols, reported for the ‘act’ diagram type.
Can I set Cradle so that I can receive alerts via email?
To be certain not to miss a modification or change to the project without even having to open Cradle to check, you can have alerts sent by email. This can be especially important when a user is ‘away from base’ or is in a role that doesn’t warrant them logging into Cradle daily.
Setting up alerts to be sent via email
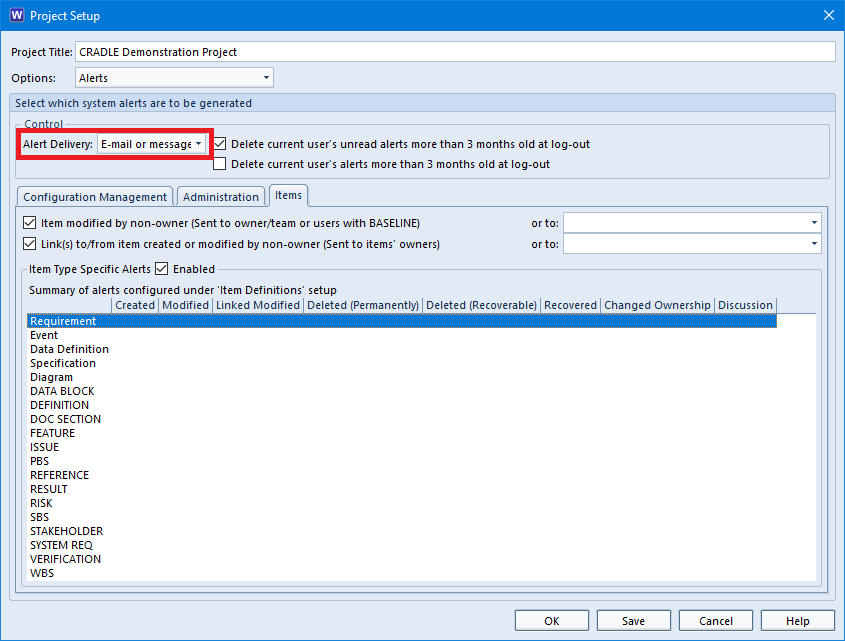
When setting up alerts in project setup you have three choices on how you and users will send/receive user and system alerts:
Cradle message – Alerts are dispatched as Cradle alerts and appear in users’ lists of alerts.
Email or message – Alerts are dispatched as emails (if available) to users, and as Cradle alerts if not.
Both – Each alert is dispatched both as a Cradle alert and an email.
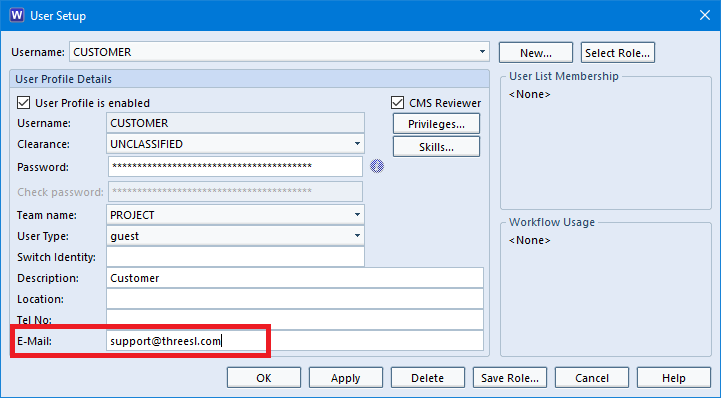
Email dispatch to a user is only possible if the user has an e-mail address in their User Profile.
On Linux emails are dispatched using the contents of the E-mail command attribute that is set in User Preferences
On Windows®, emails are despatched by calling an extended MAPI client. If an extended MAPI client doesn’t exist, e-mails will be despatched using a MAPI compliant e-mail client on the machine where the alert is being generated. If a MAPI compliant mail client doesn’t exist, or cannot be launched, then e-mail despatch will fail.
Follow these three simple steps to set this up
In Project Setup set alert delivery to be either “Email or message” or “Both”
Alert Delivery option on Project Setup
Ensure that users in your project have email addresses set in their User Profile so that Cradle knows where to send the email
Set mail address in Users Profile
Have a valid mail program and account setup on the client machine which is using Cradle.
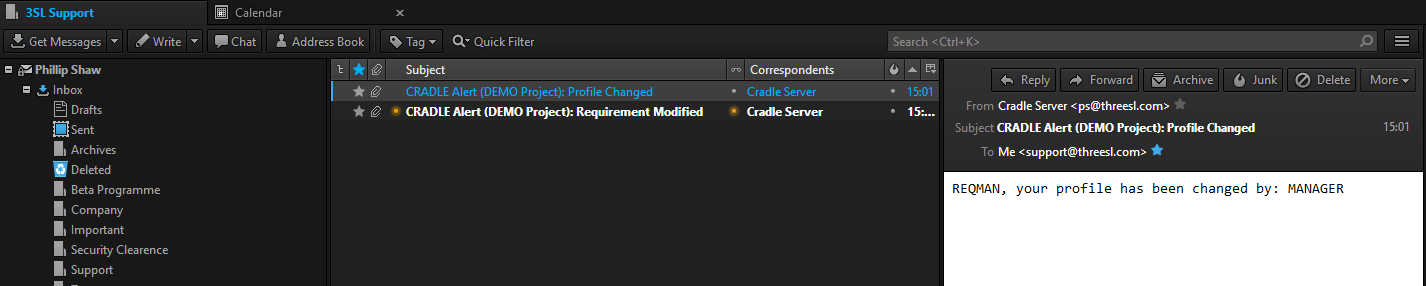
It’s as simple as that, your users will now receive Cradle alerts via email.
Alerts being received via email
To read more on alerts please refer to this previous post.
Cradle is shipped with an installable copy of the comprehensive online help system but sometimes we know paper printed manuals are easier to work through. You can scribble notes, you can take it to places where you are not allowed to use a confidential laptop, you can use it to prop up the wonky table* in the station café when waiting for the train and your soup is slopping around.
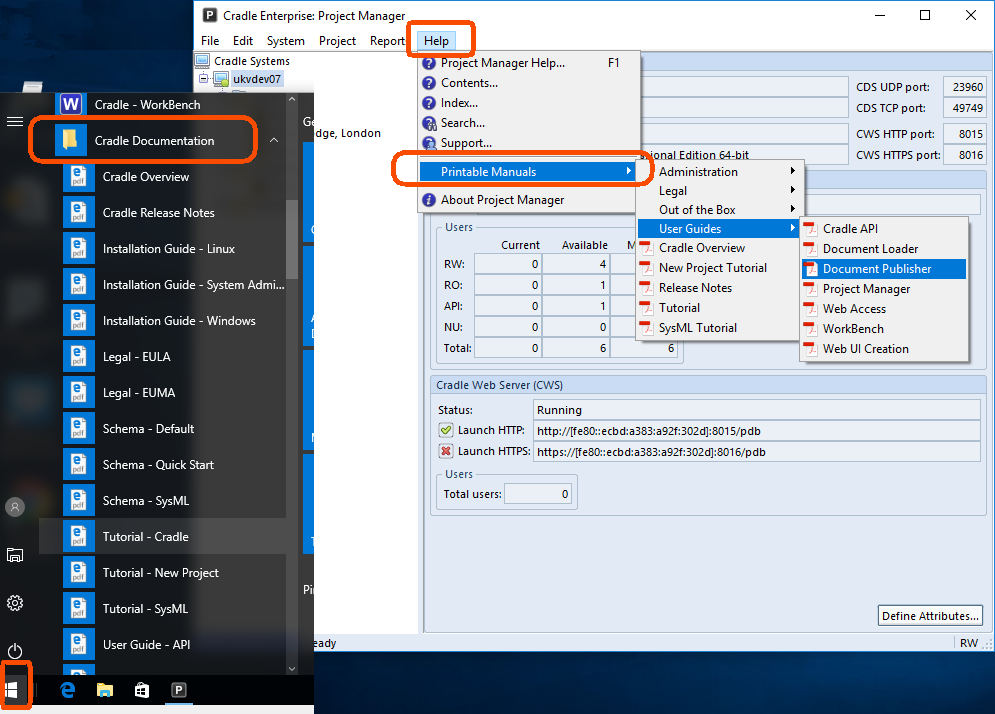
Cradle documentation on Windows
Cradle Documentation
On Windows® you can find the help on an installed system under the Cradle Documentation menu option. Under here you will find all the printable manuals. We don’t publish these documents and leave it up to you whether you use them as an e-book or kill a tree.
On Linux manuals are installed in $CRADLEHOME\help\manuals
You can also get access to the help documents from within our main application in the Cradle suite. Use the Help menu from the main tool bars.
Not Installed?
OK so there are some cases where using the installed help is not practical. The old “Your email failed to send. For further assistance please email I.T.” scenario. So if you want to read the “Installation guide” for example then you can download versions from the Documentation area on the website.
In Summary
No we don’t actually publish printed manuals. Unless customers tell us otherwise we think providing an electronic documentation in a number of formats is the most flexible option. If you need further assistance don’t hesitate to contact your local distributor, call 3SL Headquarters or email support@threesl.com
(* Please note using your e-book reader to stabilise a table is not recommend )
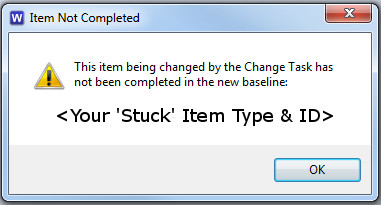
When using the Cradle Configuration Management System (CMS) you may come across the ‘Item Not Completed‘ message.
Item Not Completed Dialog
This happens when a Draft item associated with a Change Task gets deleted. As a result, the lack of the deleted Draft item, means the Change Task cannot be completed and the item cannot be added to a new baseline.
If you have an item stuck in a Change Task, fear not, there is a solution!
Resolving the ‘Item Not Completed’ Warning
To resolve the issue where an item is ‘stuck’ in a Change Task, perform the following steps:
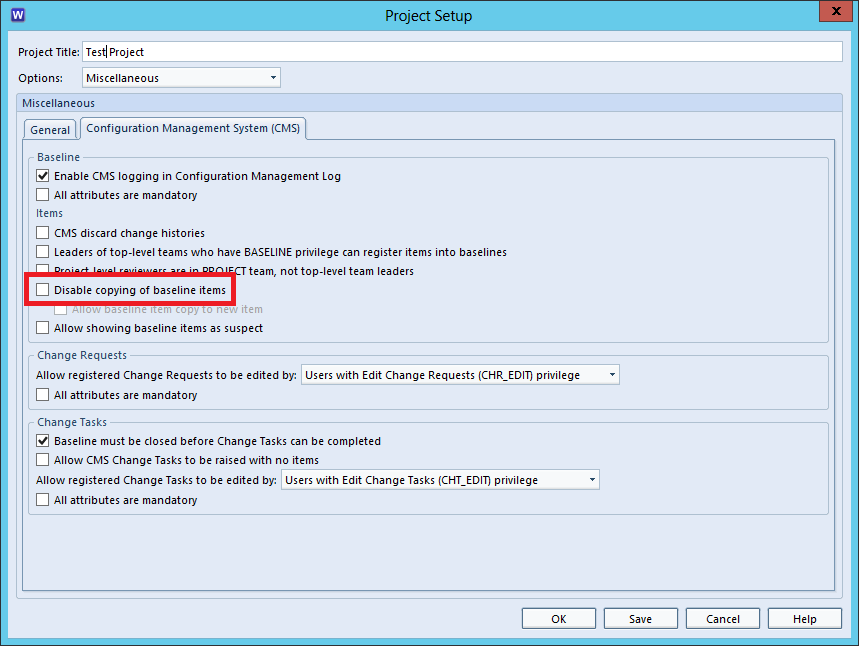
Open Project Setup and make sure the ‘Disable copying of baseline items‘ option is unchecked.
Disable Copying of Baselined Items in Project Setup
In a query select the item shown in the ‘Item Not Completed‘ dialog. From the right-click context menu select ‘Copy‘ and create a new Draft of the ‘stuck’ item.
Submit, Review, Register the newly created Draft item as necessary until it is in a Baseline, then close the Baseline.
The ‘Item Not Completed‘ message should no longer show and it should now be possible to Complete the Change Task.
If required, re-enable the ‘Disable copying of baseline items‘ option in Project Setup which was disabled in step 1.
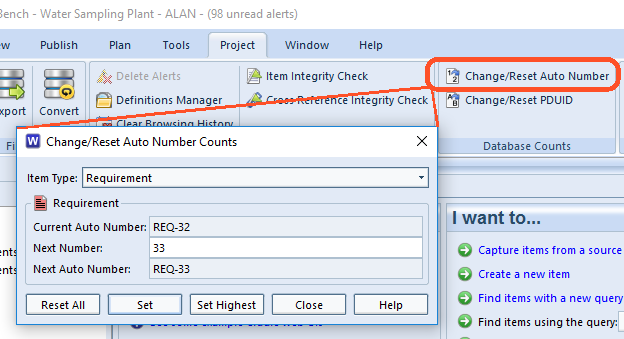
The short answer is yes you can reset an item’s auto numbering. The more complex answer is a word of caution. Firstly to reset the auto number for an item you need ACCESS_BYPASS, or PROJECT project privileges. This is to prevent any accidental operations by a user. Secondly you should ensure you understand the issue you are trying to resolve and the consequences of resetting in a live database.
Item Numbering
Every item in the database has a unique identity made from a combination of attributes. These usually include the Identity,Version and Draft. Model based information includes the Domain and MUID. The identity can be manually entered or automatically filled. There are benefits to both. For example; if your customer sent you a set of user requirements in a CSV file, you would want to retain whatever ID system they had used UF1.45 to UF6.78 having a Cradle Auto ID and then having to place their ID in the Name field would make little sense. On the other hand when raising a new Issue, you’d expect them to be sequentially numbered without having to find the previous item and mentally add ‘1’ and type into a field.
When Values Need Resetting
In the case where a batch of items have been imported or created, but whilst at draft a decision has been made that none of them are required, or are fundamentally wrong, they would normally be deleted. The next item to be created would then have an auto number of say “Res-103” which may not be appropriate. In this case resetting the count for the “Result” item type makes sense.
When Values Need Setting
It is possible that batches of requirements come in from various sources, it may be convenient to start each batch at a ‘nice’ number point “Reference-1 … Reference-560” and then “Reference-1000 … Reference-1304“. In this case setting the number by advancing the count would be appropriate. If new versions of the item were brought in by import expecting to overwrite the old ones, and the user forgot to mark “Ignore project’s current auto numbering” you would end up with two versions of the item. In that case 1..n and n+1..2n+1, deleting items n+1..2n+1 and choosing “Set Highest” would return the database to the point before the mistake.
When Caution Should be Exercised
Once the items are stored in the database, their Identities should remain fixed. Creating a new version of an item would normally involve the original version being baselined, a Change Requestbeing raised and a Change Task being issued to allow the work to create the next draft version of the item. In this case the identity remains the same but the two versions of the item are unique by their Version and Draft. Changing the auto number when there are items in the database and then creating new items of that type would cause conflict with items already stored. This is not a desirable effect. Therefore, the message is be careful, this feature is necessary and useful in some cases but incorrect use could have undesirable side-effects.