Capturing New Document Versions

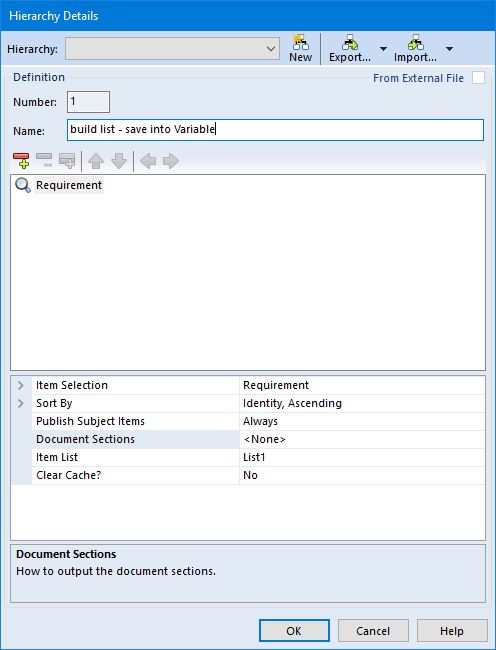
Capturing New Document Versions using Document Loader

You can capture new versions of source documents in the same way as regular documents. Document Loader compares the two versions of your document and identifies any new or modified source statements. You can select which of these revisions to load into your Cradle project database.

Adding a new version of document and Overwite/Merging

When you load the new version of your document, Document Loader adds or updates the appropriate items in your project database. A new set of bookmarks is created around each source statement and linked to the new version of your source document

Please note that Document Loader does not delete items in your project based on deleted paragraphs in your new version.

As long as you have all items baselined in the previous captured document. When making a new version of the document, Document loader will create a draft of the items.

Document Loader relies on an accurate correlation between the source statements in the current version and the new version of your source document. Before loading a new version it is necessary to consider the nature of the modifications in your document.

We advise taking a backup prior to loading a new version.

Your new version will contain minor revisions to requirement statements with new sections and subsections added. These modifications should have been made with Word’s Track Changes enabled.

If however, the new version contains strong modifications, such as restructured sections or entire sections deleted, then it may be necessary to load your document as a new source document instead. You may still update the existing items in your project, provided that your document contains the items’ identities. To do this you must set the Overwrite option to Merge.

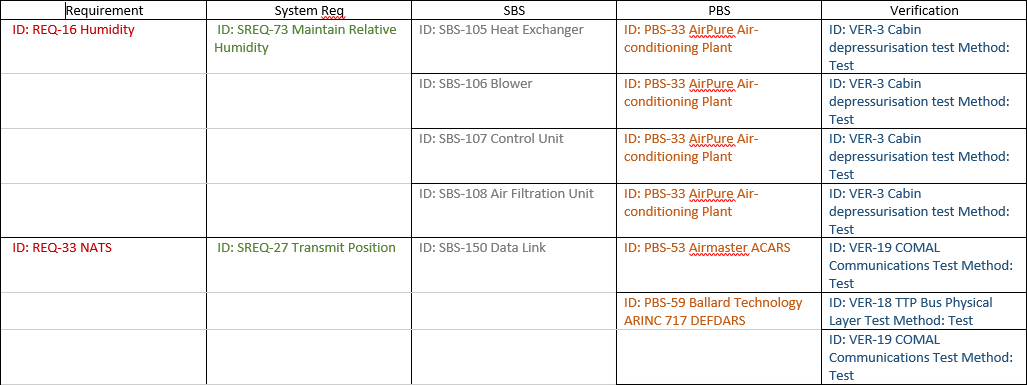
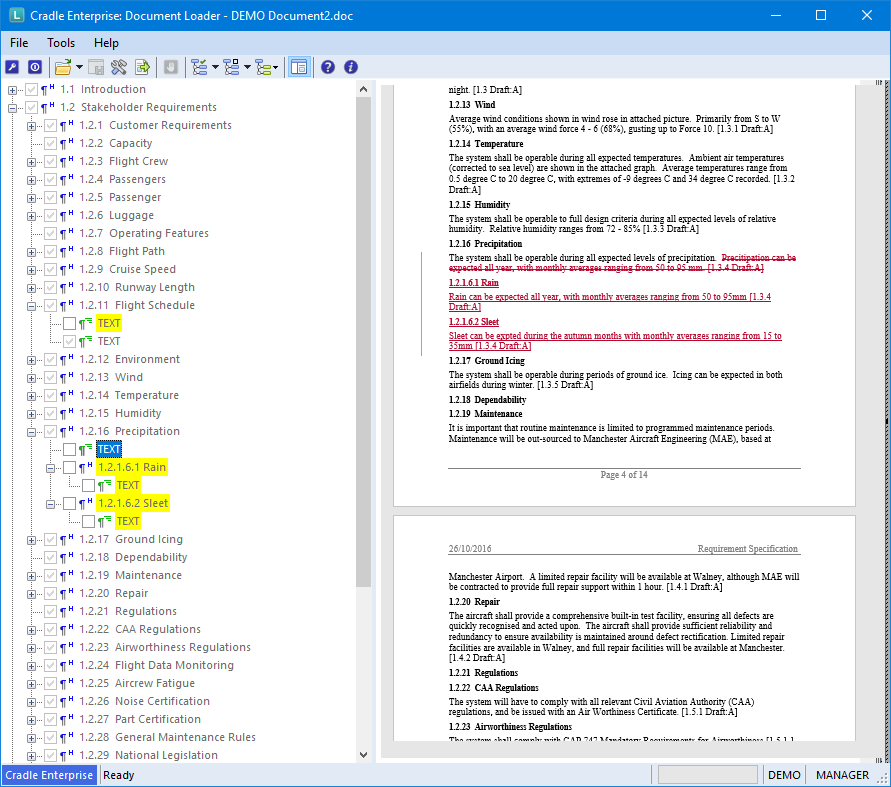
The Document Loader dialog is shown below showing a new document version ready to be captured. As you can see the changes are highlighted:

New document version to be captured using Document Loader
Document Loader Screen

Click here for step by step instructions on capturing new document versions using the Document Loader tool.

Article Updated 04/02/2019 – Updated to include new version with baselined items

Table Generation Method in Document Publisher

There are two ways to generate a Document Publisher table. The first table generation method is the Default, this outputs each item row by row. This generation is slower but allows for different styles and formatting in a cell.

The second table generation method is XML which is faster but does not allow for different styles and formatting within a cell. If the user is outputting a simple table then XML is the way to go, especially if it is a large table.

This article highlights some of the limitations and pitfalls with XML output.

A Simple Table Generation

Outputting a simple but large table is quicker by setting the Generation Method to XML.

Simple Table
A simple and none formatted, Document Publisher Table
Hierarchy Table
A hierarchy table I use for this example.

Outputting the above table using a hierarchy as above is much faster using the XML method rather than the Default method.

Differences in Styling Text in a Cell When Using the XML Generation Method

Taking the table above and formatting all the tags in different ways to make them stand out can cause some problems in the XML.  For instance the user may wish the Verification Method to be output in a different colour to the rest of the Verification information at present this would cause issues with an XML Table Generation Method.

Differently coloured tags

In the above screen-shot, I have made the Identity and Name of the Verification blue and the Method green. This currently limitation means when generated using the XML Generation method, none of the text is seen under the Verification column.

The output from differently coloured tags
The output from differently coloured tags within the same cell

Setting the Verification Method to the Automatic Font colour, the text is output but the Identity and Name will still not show.

Coloured and auto coloured atgs
The output if some tags are coloured and others are set to automatic in the same cell.

The only way to have the output show correctly is to put the Font Colour on the whole cell:

Coloured cell tags
All tags in the cell are the same colour.
Coloured cell output
The output from the colour placed on the cell not the text.

The user can even have all the different columns in different colours and this will output each item and column correctly.

All coloured cells Output
All cells are coloured differently in the table output

The same goes for making text bold, italic or underlined; unless it is on the whole cell it will cause issues with the output.

Differences in using Formatting Marks in a Cell

Placing formatting marks like between tags in the same cell is also subject to limitations. Placing a single carriage return (new line) between 2 tags can cause the second tag to not be output if placed incorrectly:

Using formatting incorrectly
Output when formatted badly.

When done correctly can still output as the user requires, make sure the cursor is before the bookmark and press Shift+Enter:

Using formatting correctly

Or just putting a full carriage return (paragraph end)  between the tags, making sure the cursor is between the 2 bookmarks and not inside one of them:

Using formatting correctly
Correct formatting output.
The output when formatting is used correctly.

The alignment of text within a cell must also be the same, the user cannot have one tag as left aligned and another right or center aligned unless there is a full carriage return between them.

You also cannot use Ctrl+Tab for a single tag in the cell as the data will not show in the output.

For more information on Tables in Document Publisher click here

Customise your Quick Access Bar to your needs

Quick Access Bar

The Quick Access Bar (QAB) is intended to provide quick and easy access to all of the types of information in your Cradle database that are relevant to you. It provides easy access to the Automatic scope queries for all item types as a scrollable list of controls, each of which provide access to an automatic menu for an item type.

Controllability

But what about if you only want the bar to display a specific set of item types or you want them in a specific order?

You can customise how the QAB will look for you in User Preferences. Choose which items are to be shown and in which order you wish them to be displayed you even have the option to set whether you want the Quick Access Bar to be shown when WorkBench starts.

Quick Acces Bar in User Preferences
Customising your Quick Access Bar

For further information on customising your UI see this previous blog post.

Related Article:

If you need to set these values for everyone in the project, it can be achieved with the Cradle initialisation file.


UPDATED: April 2020 – Related article

Column Sorting in WorkBench

Column Sorting

WorkBench can perform column sorting in Table and Document view styles. This can easily be performed by clicking on a column heading.

Sort Options

Selecting a column heading will display four sort options. When one of these options is chosen the items will be sorted and then displayed based on that selection.

The sort options available when a column heading is selected.
WorkBench Column Sorting

Sort ascending – Case insensitive

The first sort option will sort the items from A to Z, based on the item’s value for the selected column. This is done regardless of whether the characters are upper-case or lower-case.

Sort Ascending - Case Insensitive
Sort Ascending – Case Insensitive

Sort descending – Case insensitive

For the second sort option the items are returned from Z to A, based on the item’s value for the selected column. Again, as this option is case insensitive the returned items can be upper-case or lower-case.

Sort Descending - Case Insensitive
Sort Descending – Case Insensitive

Sort ascending – Case sensitive

The third sort option will sort the items from A to Z; but this time all upper-case items are returned first:

 Sort Ascending - Case Sensitive
Sort Ascending – Case Sensitive

Once there are no more upper-case items the remaining items are then displayed a to z:

Sort Ascending - Case Sensitive
Sort Ascending – Case Sensitive

Sort descending – Case sensitive

The final sort option will sort the items from z to a; meaning all lower-case items are shown first:

Sort Descending - Case Sensitive
Sort Descending – Case Sensitive

Once there are no more lower-case items the remaining items are displayed Z – A:

Sort Descending - Case Sensitive
Sort Descending – Case Sensitive

Note:

This sorting only re-arranges the current data brought back in the current query. It does not retrieve new data from the database. In order to retrieve data from the database in a particular order, then one of the database key fields must be selected in the Sort by: field of the query. However, because the sorting occurs on the data in the table it does have the advantage of being able to order the table by frame content or other non key fields.


Project Planning and Work Breakdown Structures

Overview

Most projects have a formal project plan by which their work can be planned and the progress of this work can be monitored. A project plan will typically divide the project’s work into activities which can be grouped into a hierarchy that is usually called a Work Breakdown Structure (WBS). At its simplest, the WBS is a hierarchical description of the work that is required to complete a project.

The use of, or interest in, a WBS may not be confined to the group that maintains the project plan. Often, a project will want to have a representation of the project plan that is accessible to the systems engineering data, so that:

  • Parts of the project plan can be assigned to people working in the systems engineering environment
  • Individuals can have task lists prepared for them from the project plan
  • Information used by, or generated by, the activities in the project plan can be linked to the activities in the plan
  • Updates to the project plan can be made from within the systems engineering environment

These needs are particularly apparent in those organisations that undertake a large number of small projects. It is particularly common in manufacturing companies, who will typically have many projects under-way concurrently.

Planning Tools

Tools that manipulate project plans are usually called project planning tools or project management tools. There are many such products, including Microsoft Project, Artemis and Oracle Primavera.

Cradle provides a bi-directional integration with Microsoft Project that allows a Cradle project to be associated with any number of Project plans (sometimes called programmes or schedules) whereby:

1.  The activities in each plan become a hierarchy of items in Cradle

2. Data can be bi-directionally exchanged between Cradle and Project, either:

  • From Cradle, pushing Cradle updates to Project or pulling updates into Cradle from Project
  • From Project, pushing Project updates to Cradle or pulling updates into Project from Cradle

3. The activities in Cradle can be assigned to users, creating task lists

4. Each user can see his/her task list, colour-coded by the progress of the task based on the current date and the date information in the task, showing the immediacy or delinquency or completion of the task

Image showing the project plans process
Project plans process

Planning within Cradle

Continue reading “Project Planning and Work Breakdown Structures”

Publish a Formal Document Using a Batch File

Running Document Publisher in the Background

Publishing a Draft or Formal Document can take time. If you need to use Microsoft® Word for other work, is a nuisance when having to wait.

Users can run a batch file to create the documents either as a Draft and/or as a Formal document. The batch file can be used in a task while the user is not using their computer; for example at night or a weekend if many documents are being generated.

The command line needs to have all the options set the same as they would  be through the UI (User Interface):

Publish Formal Document User Interface

Formal Document Command line Options

The normal batch file command line options for just a draft document are:

Draft Options for batch file
Command Line Draft Options

Each of the following shows what the command line options for each Formal option in the User Interface:

Formal Options for batch file
Formal Options needed in a batch file

All the above -fdoc options are requirements within the command line except -newversion. Only use the -newversion option, if a new version of the document is required.

The final command line to generate the DEMO Template will look like this: (NOTE: Options with more than a single word are required to be in quotes e.g. -fdoccomment “Published DEMO Template Using Batch File”)

"%CRADLEHOME%\bin\exe\windows\DocPub.exe" -login MANAGER,MANAGER,demo -file "DEMO Template" -location PROJECT -type DOCX -output "C:\Temp\DEMO Template.doc" -formal -fdocname "DEMO Template" -fdoctype REQUIREMENTS -fdoctitle "DEMO Template" -fdocissue 1 -fdocdate Jun -fdocref DEMO1 -fdocclass UNCLASSIFIED -fdoccomment "Published DEMO Template Using Batch File" –log

Any template that generates through Document Publisher can generate through a batch file.

As you can see in the command window below, 3 templates are being generated, a doc, a docx and a docm.

Command line window
Command Window showing 3 types of document being generated

Once the documents are generated, they can be seen in WorkBench in the Project sidebar under the Formal Document sections:

Project sidebar Formal Documents sections
Project sidebar – Formal Documents sections showing the 3 generated documents

Using parameters within a batch file

The great thing about using a command line batch file is that parameters can be set, as long as the template has parameters setup. This means you can run the same document many times but use different parameters for each run with a different document output name. For example if you used ?reqID within the Key or Identity you could output different Requirement Documents.

Supply Chain Management

How to use Cradle for Supply Chain Management

Managing the requirements to product of  any one supplier.

Any successful project must start by carefully managing its requirements. This follows for every link in the supply chain thus ensuring the full life cycle is efficiently and completely covered. Cradle abilities in Requirements Management and Systems Engineering supports that vital role, retaining the crucial links in managing the product’s development.

Needs, Roles, Requirements, Wants, Restrictions, Drawings.

Whatever you call the pieces of information you handle, you can create an item type to hold this information. You can categorise and add attributes and details to match your business definitions. You can add frames to hold pictures, drawings, or URLs. No need to bend your process to meet the tool, configure the tool to match your working practice.

Managing the links between suppliers

Cradle can also be used to manage contractual compliance at each level in the supply chain. That is, a customer uses Cradle to define their commercial, technical, environmental, health & safety requirements and publishes them as contractual documents.
A supplier can load these documents into Cradle, automatically parse them into their component pieces. They can then develop responses and then generate the completed response document from Cradle.
The customer receives the response documents from candidate suppliers and loads them into Cradle, automatically splitting them into their component pieces – e.g. paragraphs – and linking each supplier ‘answer’ to each of their requirements (the questions). See Document Loader. Then Cradle can help to score the suppliers’ responses.

Once a supplier has been chosen, acceptance criteria, validation methods and validations can be added to the requirements and used to manage the supplier’s fulfilment of the contract.  A formal response is then produced using Document Publisher.

Whatever the level

The handy thing is that the above applies at every level in the supply chain. A company that is a ‘supplier’ in the above can use the Cradle database that they have produced to be a ‘customer’ to their suppliers, one level down the supply chain.

Do you publish printed manuals?

Need to read Documentation Away from the Office?

Cradle is shipped with an installable copy of the comprehensive online help system but sometimes we know paper printed manuals are easier to work through. You can scribble notes, you can take it to places where you are not allowed to use a confidential laptop, you can use it to prop up the wonky table* in the station café when waiting for the train and your soup is slopping around.


details of how to find cradle documentation
Cradle documentation on Windows

Cradle Documentation

On Windows® you can find the help on an installed system under the Cradle Documentation menu option. Under here you will find all the printable manuals. We don’t publish these documents and leave it up to you whether you use them as an e-book or kill a tree.

On Linux manuals are installed in $CRADLEHOME\help\manuals

You can also get access to the help documents from within our main application in the Cradle suite. Use the Help menu from the main tool bars.

Not Installed?

OK so there are some cases where using the installed help is not practical. The old “Your email failed to send. For further assistance please email I.T.” scenario. So if you want to read the “Installation guide” for example then you can download versions from the Documentation area on the website.

In Summary

No we don’t actually publish printed manuals. Unless customers tell us otherwise we think providing an electronic documentation in a number of formats is the most flexible option. If you need further assistance don’t hesitate to contact your local distributor, call 3SL Headquarters or email support@threesl.com


(* Please note using your e-book reader to stabilise a table is not recommend )


Item Lists in Document Publisher

Named Item Lists in Document Publisher

When working with large datasets it is sometimes convenient to cache the returned items for re-use in multiple tags. Document Publisher makes this possible using named items lists. These are created from the User Variables dialog.

User Variables Dialog Showing Item List Variable
User Variables Dialog

Creating an Item List

To create an item list you need to:

  1. From an open template select Tools > User Variables
  2. This produces the Variables dialog. Locate the predefined $ItemList entry
  3. Add a new entry in the Value column. This is a comma separated list of all the named item lists in your template
  4. Press OK to save the variable and your item list is now ready to use in a tag

Populating an Item List

Once you have generated a suitably named list you must create a Paragraph Group tag to populate the list.  For further information on how to create a Paragraph Group tag please click here. No output is to be generated from this tag, its sole purpose is to fill the item list for subsequent tags to use.

  1. Create the Paragraph Group tag at an appropriate place in the document, this must appear before the tags which are to use the item list
  2. Within Tag Properties find the Hierarchy property and click … to create a new hierarchy
  3. Edit the hierarchy and set the appropriate item selection(s)
  4. For each node set the Document Section property to <None> so that no output will be generated
  5. Select your newly created item list in the Item List property
  6. If the same list is being filled multiple times then set the Clear Cache property depending on if you want to refill the list from scratch or append to the existing list
  7. Press OK to save the hierarchy
Hierarchy Dialog showing Item List
Hierarchy Dialog

Please note that duplicate items are automatically removed from item lists as they are filled.

Using an Item List

Once a Paragraph Group tag has been setup to fill your item list, it can be used by any tag appearing after it in the template document.

  1. Create a Paragraph Group or Table tag at an appropriate location in your template
  2. Set the tag‘s item selection to match what information is stored in the item list
  3. Optionally, create a hierarchy to follow from the items stored in the list
  4. Optionally, override the Sort By property if it needs to be different from the item list sorting order
  5. Expand the item selection and set the Identity property as shown below, using the special value $ItemList followed by a colon and then the name of the list to use it
Tag properties showing $ItemList
Tag Properties

Referencing an Item List in a Filter

There are two special filter properties that can be used to check for the existence of items stored in an item list. These are available in the Filter dialog as Link Attributes:

  • Exists in Item List – where the filter expression will evaluate to true if the item exists in the named item list
  • Is Linked to Item in Item List – where the filter expression will evaluate to true if the item is linked via a specified link type to an item that exists in a named item list
Database Access Filter Dialog showing $ItemList
Database Access Filter Dialog
Article Updated 04/02/2019 – Incresed image sizes

Item Attributes

Item Attributes

Items have attributes that describe the item and store its data. Item attributes are used to sort, categorise and group items. They also hold the unique data forming the main purpose of the item. There are three main kinds of attribute:

    •  Predefined – used to manage items, and include attributes such as name, number, version, owner, security classification and last modification date.
    •  Categories – small amounts of data as free text, single value picklists or multiple value picklists, or abstract data types such as dates or reals. These are also primary database indexes.
    • Frames – attributes for storing large amounts of data, as text or binary. These can be queried but are not primary indexes.


  • The predefined attributes are always present. You can inspect their values, query the database to retrieve items based on the values of these attributes, and in some cases, directly set the values of the attributes. for example The key, group, comment or description. Other predefined attributes are central to Cradle’s access control mechanisms and the Cradle configuration management system (CMS). These are set by Cradle, for example modified date or status, they cannot be directly modified. You cannot remove predefined attributes from an item.To change the item’s user definable attributes, you will need to go to Project Setup and in Options select Item Definitions as shown below
    Attributes
    Project Setup – Item Definitions


  • Here you will be able to add, modify and remove an item type’s attributes. For example if you wanted to add a picture to an item type, you could pick the JPEG frame type. If you needed to add CAD drawing file, you would define a frame type to hold the data and then add an instance of this to each of the item types needing to store this information.

Hierarchical Numbering

The hierarchical number describes an item’s position in the hierarchy. It is usually stored in the Key attribute but it can be stored in a category if you wish. Hierarchical numbers are not fixed. They can be changed and reorganised.

  1. A prefix (this is optional)
  2. A separator
  3. A number

The hierarchical separator can be:

  • A dot or period (this is the default), e.g. fred.1.2.3
  • A hyphen, e.g. fred-1-2-3
  • A slash, e.g. fred/1/2/3
  • For further information regarding attributes please click here
Article Updated 04/02/2019 – Expaned on how the key attribute is special to control hierarchies