Named user licences are a simple way of working in a small team. Cradle’s variants support single user,named user and enterprise editions. Additionally there are facilities for SaaS and subscription options. A single user licence is just what it says, it is for one person on one machine. When there are multiple users of a system, it is usual for the server to reside on one machine and the clients on user’s desktops. In a full enterprise version you can install as many clients as you need and simultaneously use the number of clients purchased in your licence.
Named user licensing is a way of having a team of engineers, working on a project, but (now don’t tell our boss this, but tell yours) at a lower cost.
The restriction being that each of the users is named and locked to the licence. So whilst you could install numerous clients only those login names would be allowed to connect to the server.
We realise that staff can change, and with each maintenance renewal you can make any changes you like. If you purchase extra licences you can also change the users for free. 3SL reserve the right to charge for more frequent alterations.
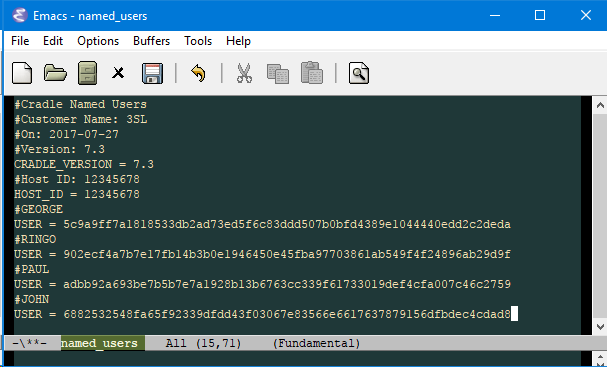
It’s all in a file (and the security code)
The named users are contained in a file. If you have system level access to the Cradle installation all you need to do is drop the new file in. If you change the number of users you would also have to configure a new security code.
Exporting either a whole project or just a query can take a long time if the database is huge. The quickest and easiest way to do this is use c_io.exe in a batch file during down time e.g. night
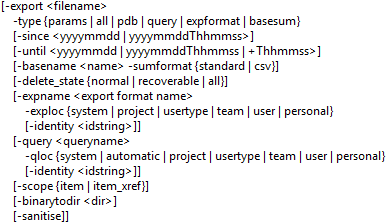
The options available are:
Export Options for c_io.exe
Required Export Options
So the first option is, of course, the export option that needs the user to specify a location and a name for the exporting file:
-export “C:\Temp\export1.exp”
The Type Options
The -type option is required for the export option and allows users to define the type of export they require:
params will export only this projects parameters (Project Schema) all will export all items and definition files the user has access to pdb will export all items the user has access to but not definition files query export items matching a named query.
Options used with query
-query will specify the query to be used. This is required if the type is set to query -qloc will specify the location of the query. This is required if the -query option is used.
expformat is for exporting all files set in a saved format.
Options used with expformat
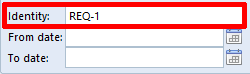
-expname is the Export Formats name. -exploc is used in conjunction with -expname to state the location of the export format -identity can be used with -expname and will override the Identity set in a query.
Export UI IdentityQuery UI Identity
basesum requires the user to use -basename with the Baseline Name and -sumformat which allows the user to specify how the data is output either as CSV or standard (Note: the user must have the PROJECT_RO privilege for this option)
Options used with basesum
-basename needs to have a Baseline name currently either open or closed. – sumformat allows the user to state they format -basesum is output as CSV or standard.
The standard output is <BASEHIST> records in the normal format:
The CSV output will set the fields from left to right and output the items below this line:
Elective Export Options
Other export options are not required but can be used with –type all and -type pdb: – since can be used to state a date or date and time since which items were created or modified. The format for this is yyyymmdd or yyyymmddThhmmss so 20170119 (19/01/2017). For example 20170119T183030 (19/01/2017 18:30:30)
-until will only export items that have been modified up to a certain date or date and time or a time after the -since was set. The format for this is the same as -since.
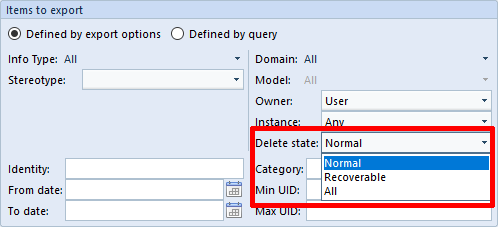
-delete_state allows the user to specify if they want the items being exported to be (Same as in the Export UI):
normal – Not marked as delete recoverable – Items marked as deleted but can be recovered all – All items not matter what they are marked as will be exportedThe Delete state in the Export UI in WorkBench.
-scope controls how an item is output either on its own or with all the items cross referencs. Using item will make sure only the item on its own is output. Using item_xref will output the item and any items cross referenced to it.
-binarytodir sets a folder for the binary data. So a user would use -binary “C:\Temp\binary” and all binary data would be output to unique files and the path to this file would be output in the export file next to the binary frame:
-sanitise will output items but without any binary frames. It will also change all text including item names, comments descriptions, text frames, change history, diagram symbols, discussions and user defined cross reference attributes.
A few of the options not used in a batch file but are in a command prompt. These are pop ups with information on them which why they are not in a batch file.
-verbose lets the user know that c_io.exe has finished -ver lets the user see what the version number, date and time of the build they are using. -help is used to see all the command line options.
Unlike other software tools the licences in Cradle are concurrent usage licences. It is, therefore, quite possible to have fewer licences than you have people and still be able to do everything you need.
If some of your engineers are involved in writing requirements and others writing tests, there may be no need for them to open the systems engineering diagrams. Why pay for a licence they are not going to use? That’s not to say they may not need to at some point, and as long as there is a licence free at that instance in time, they will be able to open the diagram too. Of course if you want to prevent a particular user ever consuming a licence then you can set module access rights to prevent them acquiring one.
Generally reporting using metrics and dashboards is an infrequent activity. Why have umpteen licences hanging around not being used? Exactly what we say. Don’t buy it if you don’t need it! (hint: It’s a Flexible Licence Model in Cradle)
Are you seriously telling me to spend less money?
Yep! We want you to be clear why Cradle is a better more cost effective choice for your business.
If the project focus changes and more people need metrics do I have to reinstall?
Nope! Just have a word with our sales team and they’ll have a new code prepared. Install this on the server, restart the Cradle Database Server and you have your new compliment of licences. That applies to any of the available modules.
I’m too big for a single user system, but not big enough to afford a full enterprise system, are there only the two options?
No! Falling into this ‘in-between ground’ or having difficulty explaining the benefits of a fully integrated lifecycle management tool to your bosses can be a problem. “Named user licensing”, sorts this out, giving significant cost savings. Instead of being able to have a large pool of engineers, any of whom can seek a connection to the database and acquire a module licence, named user systems lock the connections to a set of named users.
I guess I then have to spend bucket loads of money on upgrades and a premium help line?
No again! With enterprise systems you get as much support as necessary for a fixed annual maintenance fee, based on the size of your system. You get all patch and version releases free during this period.
What do I need to spend money on?
Not much! We offer free and comprehensive help information with your installation and online. We provide demonstration databases so you can see how things work and get up and running. However, if you want to hit the ground running and ensure all users run up the learning curve, we will tailor training courses for your individual needs. Again not a fixed price for teaching you everything in Cradle, you only pay for the parts pertinent to your business. If you want help to set up a database and project to match your business specific work model, then we can offer consultancy at a competitive rate.
What should I do?
Don’t delay, contact 3SL today. You can have a free webinar, a free evaluation and a chance to improve your product lifecycle.
Cradle (Enterprise edition)
Visit www.threesl.com for Cradle, the simple, flexible and scalable solution for your entire project needs! Ask about the enterprise flexible licence model in Cradle.
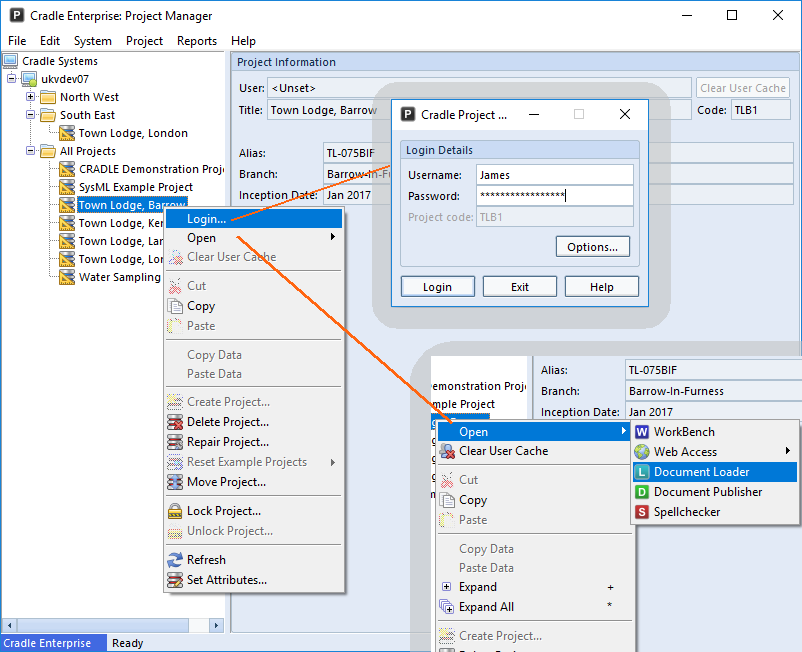
Using Project Manager with Multiple Projects and Passwords
In an environment where you have numerous projects that you switch between, using Project Manager to Login can save retyping your Cradle password.
If you have many projects that you need to switch between and don’t have a limitless desktop to open multiple copies of Cradle or don’t want to lock multiple licences, use Project Manager to look after switching.
Once you Login to a project through Project Manager your Cradle password is cached for that session. You can then access the project through WorkBench, Web Access, or the Toolsuite applications; Document Loader, Document Publisher or Spell Checker. When you exit a tool, you can open another project through Project Manager as you work through your day. When you need to re-enter any previous projects, you’ll only need to use the Open command as your login details will be cached.
If you need to clear the cache (for security reasons) then simply use the Clear User Cache option. Alternatively close Project Manager.
Another option to change to a different user is to use the “Switch Identity” option, this can be enabled in the “User Setup” A User Profile’s switch identity can only be set if you have read-write access to the User Profile. If you have no access to a User Profile, you cannot see any part of it, including the switch identity. If you have read-only access to a User Profile, the switch identity is disguised in the same manner as the User Profile’s password.
C_io.exe can be useful when importing large files or when a user has a lot of files. When c_io is in a batch file, it can import different files into different projects within one batch file. This file is then run when no one is in the database and so there should not be any issues.
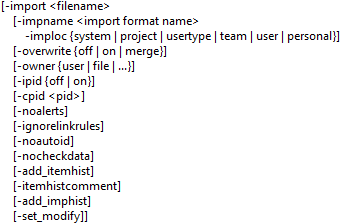
The options available are:
Import options for c_io.exe
Required Import Options
The first option for importing needs the user to specify a location and a name for the file: -import “C:\Temp\import1.exp”
All saved Import Formats in WorkBench can be used with -import
-impname is the Import Formats filename. When an Import Format is being used -overwrite, -owner, -ipid, -cpid and -noalerts are set from this file.
-imploc is the location of the Import Format file.
Elective Import Options
-overwrite is used when a user requires any items in the database to be overwritten, merged or not overwritten. If not in the command line the default of off is used.
off – no data will be overwritten and only new items added
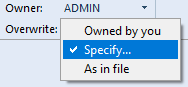
-owner sets by whom the items imported are going to be owned by. Depending on the option set depends on the owner of the items:
user option is owned by the user in the login option e.g. -login ADMIN the items will be owned by the ADMIN user.
File option is the owner as stated in the import file
A user can be specified and all items imports will be owned by that user e.g. -owner REQMAN
WorkBench Import UI showing Owner Options
Additional Options
-ipid is the option to let c_io know whether to use the PIDs in the file or in the project it is being imported into.
Off means the PIDs will be generated.
On means the PIDs in the file will be used.
-cpid allows a user to specify the PID to be used for the items being brought in.
-noalerts option stops alerts from being generated during the import
-ignorelinkrules allows any cross references to ignore projects link rules in the current project but only if the user has the correct privileges. The user must have either ACCESS_BYPASS or PROJECT for this to work.
-noautoid allows the original numbering for items rather than any auto numbering set in the Project Schema.
-nocheckdata option stops data being checked so it is all imported.
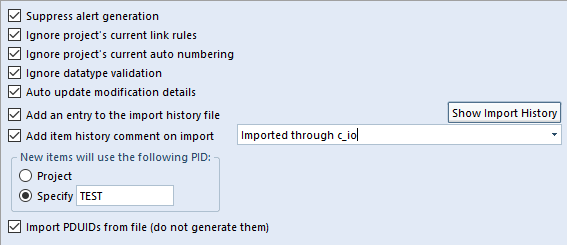
-add_itemhist is the same a Auto update modification details and sets the current user, date and time, not what is specified in the file.
-itemhistcomment will include a Change History comment which will include the last modifier, modification date and time
-add_imphist will create a log with the history of the import. It shows the options used, who performed it and the date and time of the import.
-set_modify uses the current date and time instead of the date and time specified in the imported file.
There are a couple of options that are not used in a batch file. The reason is that they are only useful in a command line, in a command prompt as they show pop ups with information on them.
-ver lets the user see what the version number, date and time of the build they are using. -help option allows a user to see the command line options.
Do you require more Item Types, maybe you just want a new Item Type with a different name. Cradle lets you create new item types to suit your working methods.
In Project Setup navigate to “Options – Item Definitions” and change the tab to “Item Types“. This dialog presents a list of
the predefined types of item available in any and all Cradle projects,
those that were in the chosen template schema when the project was created
those added by a user.
New user defined types are used to extend a Cradle Database, to encompass new types of information. To create a new item type you need PROJECT privilege to modify the schema.
Creating a New Item Type
Select the Project tab
Select Project Setup
Set Options to Item Definitions (if not already set)
Select the Items tab
Click New and enter a name for the new item type
Remember you can also add these newly created Item Type to the quick access bar, for more information see “Customise your Quick Access Bar”
For more information regarding item types and Project Setup please see help on Item Types or my article on configuring Item Attributes
Article Updated 04/02/2019 – Removed mentions of project schema
The structure of each Cradle database is defined in a schema. Cradle is supplied with four default schemas that you can use. You can create new default schemas. You can initialise your new Cradle database using any of your default schemas.
Default Schemas
A Cradle system can contain any number of databases. Each database can be used for one or more projects. Each database has a structure that is defined in a schema.
When you create a new database, you specify a default schema that will be used to initialise the schema in the new database Cradle is supplied with four default schemas, called: empty, default, quick-start and SysML. 3SL provides documents that explain the contents of these default schemas.
New Default Schemas
Cradle can support any process for any type of project. The schema defines the types of information that you will need to follow your process.
You can create new default schemas to support any type of process for any type of project. For example, look at the following types of projects and lists of the item types that will be included in their schemas:
Agile projects:
Sprint, iteration
Feature
Build and release
Test cases, test results
Business Analysis projects:
Needs, goals, objectives
Business functions, processes, tasks
Organisations, groups, teams
Deliverables, reports and other document types, artefacts, builds
Personnel types, skills, roles
Enterprise Architecture projects:
Needs, goals, objectives
Processes, functions, tasks
Resources, systems, buildings and other facilities, area breakdown structure, site breakdown structure
Delivery phases, releases and builds
Organisations, groups, teams
Deliverables, reports and other document types, artefacts, builds
Business requirements, user requirements, system requirements
Validations and verifications
Application lifecycle management projects:
Needs, goals, objectives
Business requirements, user requirements, system requirements
Validations and verifications
Analysis models, logical models, architecture models, design models – built using MBSE using one or more of functional analysis, SASD, IDEF, ADARTS, UML and/or SysML notations
System breakdown structure (SBS)
Test cases and test results
Project Management projects:
Needs, goals, objectives
Business requirements, user requirements, system requirements
Product requirements, managed in a library
Validations and verifications
System breakdown structure (SBS)
Product breakdown structure (PBS)
Part catalogue, suppliers, orders
Production schedules, production runs, batches, samples
Quality records, test cases, samples, test results
Location and Structure of Default Schemas
Each default schema is stored in the sub-directory:
admin/defaults
inside the Cradle installation on the server.
Inside this directory are:
A file called: prj_params that contains the schema
A directory tree containing the project-scope definitions, such as queries, views, forms and so on, called: definitions
Creating New Default Schemas
You can create your own default schemas by:
Decide on a name for your new default
Create a new directory with this name inside the admin/defaults directory in the Cradle installation on your server
Place the schema for the new default inside this directory in a file called: prj_params – you can copy the prj_params file from inside the database directory of an existing database, or use Cradle’s export to create it (see below)
Optionally copy some or all of the Project scope definitions from the definitions directory in an existing database
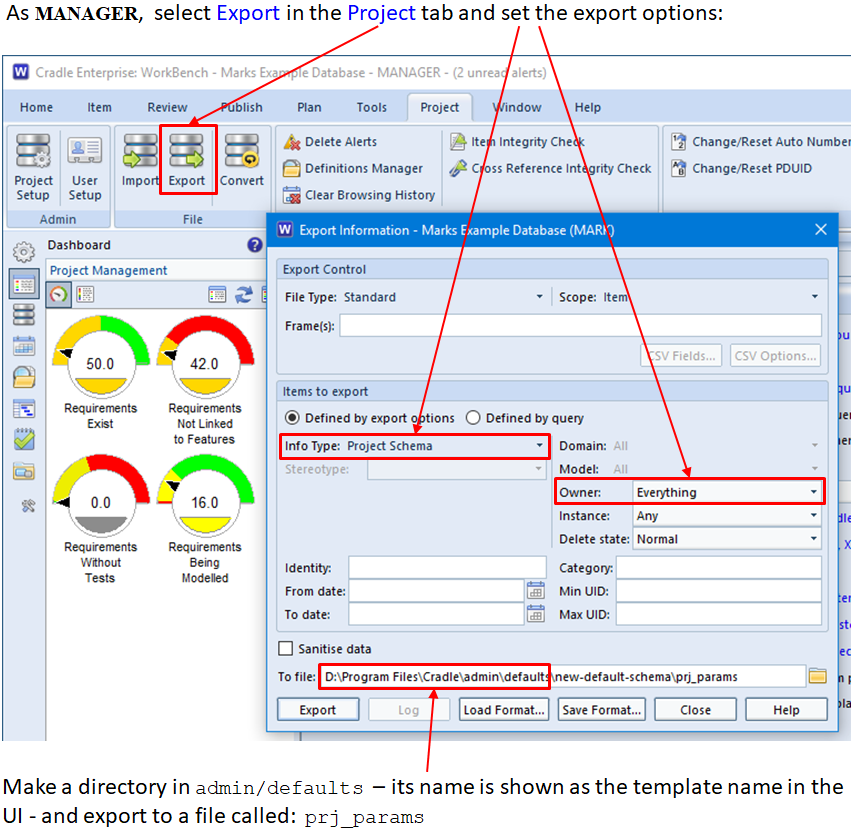
Export to Create a New Default Schema
You can export the schema using the Export Information dialog that is shon when you select Export from the Project tab in WorkBench.
If you can run WorkBench on the server, then you can export the schema directly into the new defaults directory:
How to to Create a New Default Schema
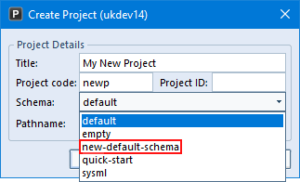
Using Your New Default Schemas
When you create a new database in Project Manager, select the Schema drop-down list. This will display the list of default schemas. Any new schemas that you have created will appear in this list, for example:
The project sidebar offers a ‘raw’ view of the data stored in the Cradle Database. When first opened a list of item types is displayed. If there is a [+] indicator, then you can expect to expand the tree to lower levels.
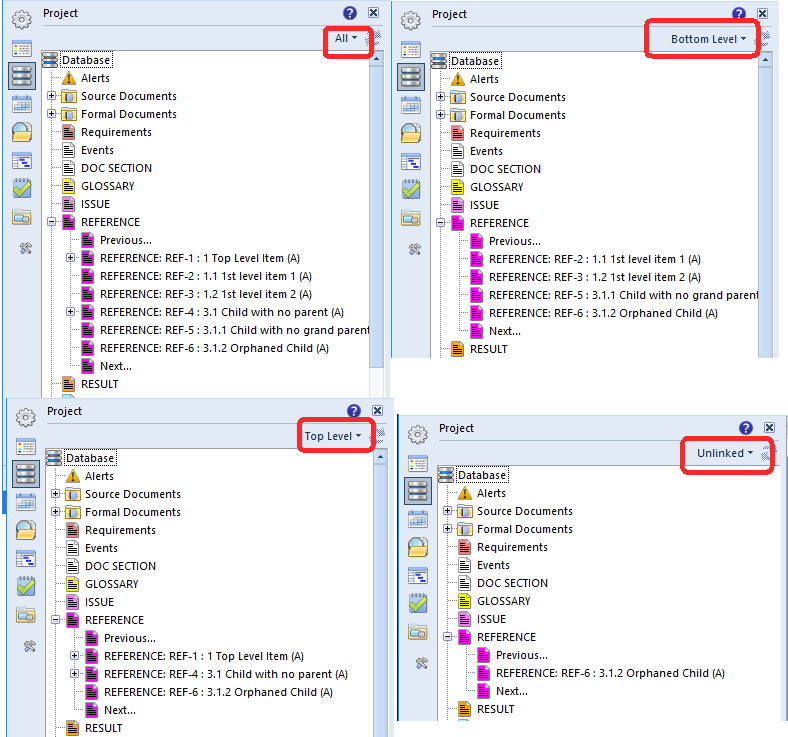
In the example below Reference item type has been set up with an auto numbered ID and the Key being the hierarchical attribute. A rule has been defined to allow the items to be linked to items of the same type with the “RELATED TO” link type.
All (All Items) This will show all the items of that type (subject to the user preference limits) when the node is expanded. Other than in very sparse databases this is not usually that a user wants to show.
Top (Top Level Items) This is more akin to looking at the level1 headings in a document. These are the items you have designated as having the most significance. They have no links down to them links. In the example you’ll see that item REF-4 (3.1) may appear to be a sub level item, but it has not been linked to a parent.
Bottom (Bottom Level Items) These are the leaves of the tree, the items that have no further downward links to children.
Disconnected (Not Linked to Anything) These items have no parents or children, REF-6 (3.1.2) is shown here. This indicated an item that has been unlinked or its parents have been removed and either needs re-linking or reordering below a new parent.
Tree Levels
The last Disconnected (Not Linked to Other Item Types) option in the menu looks at item of different types when deciding to list the item or not.
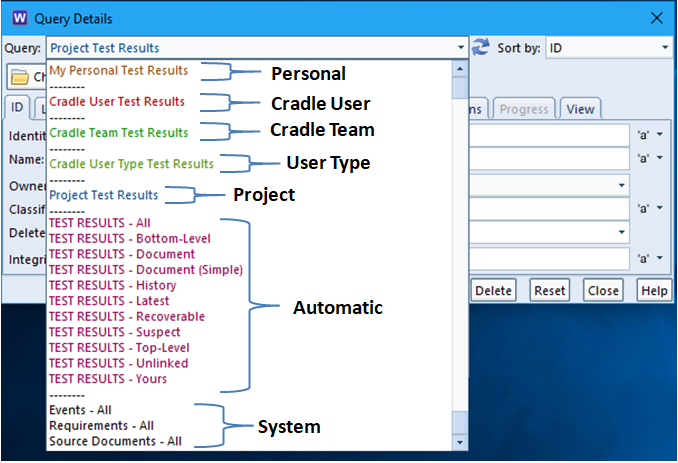
There are seven main groups into which Cradle definitions can be filed. These are common for each type of definition, say a view or a query.
Personal – These are available to the Operating System User whichever project they are logged into – ‘Peter’ may be the ‘admin‘ on one project and the ‘design manager‘ on another but will be able to see this definition whichever he logs into. This only makes sense if the item types are the same in both or the definition is very generic showing say ID and Status, common to all.
User – These are based on the Cradle User name and are available to that role name on every project. On three different projects the role QA manager may be held by three different people. Definitions here would be available to anyone logging in as QA manager.
Team – Definitions here are available to anyone in the same Cradle team on a particular project.
User Type – Users can be grouped by type within a project and this allows definitions to be shown to users of a matching type.
Project – These are queries available to anyone on that particular project
Automatic – Each time a new item type is added, Cradle generates a set of useful definitions to help you get started. These are idea to open tweak and ‘Save As’ to match your personal preferences. They are also useful if you want to write a phase or reference a view in a query as these standard definitions will exist without you having to create them.
System – Some hard wired definitions covering the minimum shipped functionality in Cradle.
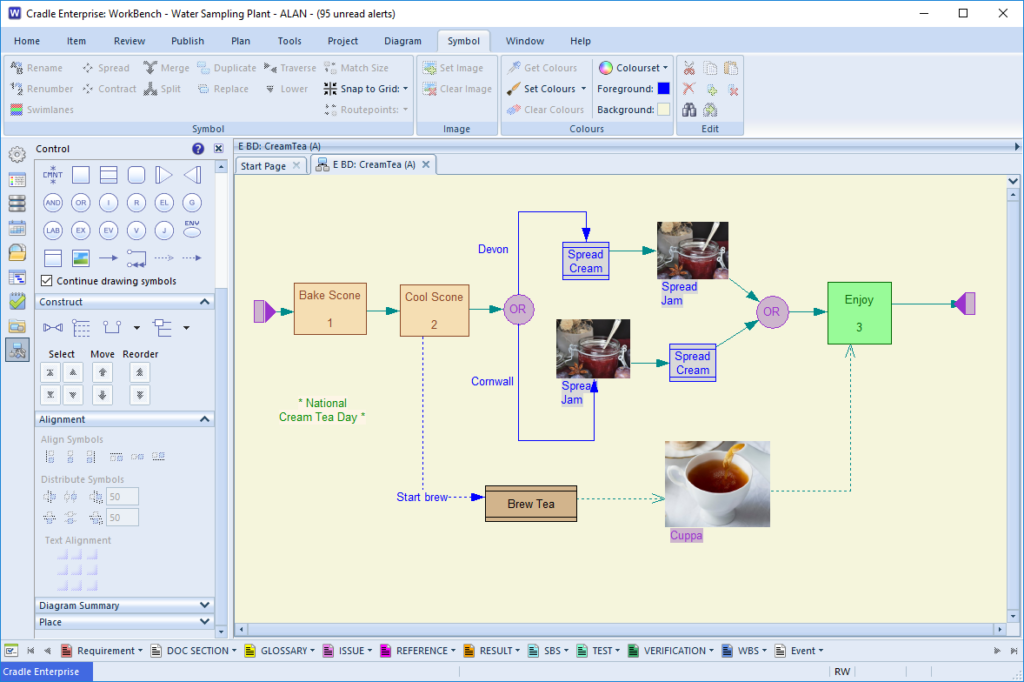
Last month saw the start of the Summer and also National Sunglasses day. We still hear the odd story that engineers are using ‘Spreadsheets‘ and ‘Word-processor documents‘ to manage their requirements. We can only sympathise with their misguided ways and revel in the fact that we (and you our dear newsletter readers) have seen the light. So the only thing you should need your rose tinted spectacles for is to eat your Cream tea while watching Wimbledon!
National Cream Tea day – eFFBD
Non Graphic Interfaces
This month (July 2017 Newsletter) we’re highlighting c_io and how it can be used to complement the functionality we’re more used to in WorkBench and Web Access.
c_io
Using c_io.exe in a batch file means you can do many things whilst you are away from your desk or in the background while you continue to work. You can then add this batch file to be run by a task application during times you are away from your desk or work. This can be handy when needing to do backups of a single or many large databases.
The executable can import and export everything in a project from single items to the whole project. It can use queries or different options to whittle down the required export. So a user can export all items of a specific type or just one to several items based on a query and or other set options.
We continue to welcome new followers each month and would encourage any Cradle users who would like regular ‘Hints & Tips’ to follow us @threesl
Reviews
Thanks to those who responded adding reviews of Cradle to Capterra. If you have not yet and are able to add a few words, please reply using Yes I’m happy to consider writing a review
Hints of the Month
Here are some links to helpful topics since our last newsletter, they should improve your Cradle experience: