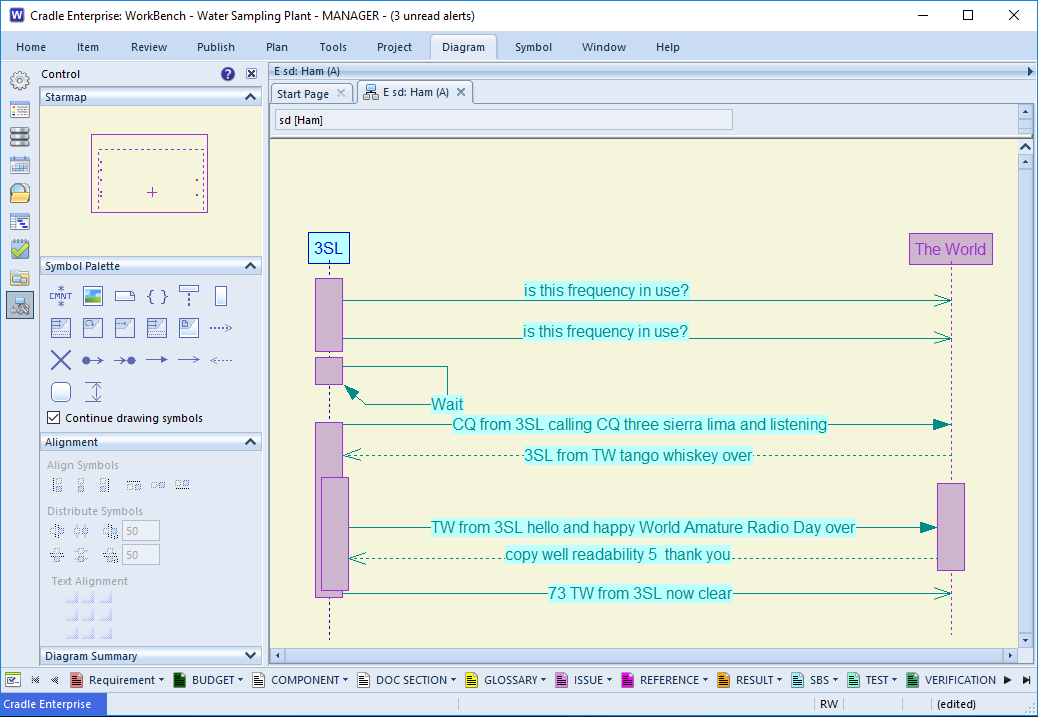
Celebrating world amateur radio day, we look at the way pre internet, radio shrunk the world. Using a variety of frequencies to transmit locally, or over long distances, radio ‘hams’ passed messages round the world long before there was Twitter, SMS or even phone calls. Relays passed on messages acting as go-betweens in the same way our major backbone carriers pass our messages today. However, it was all a little more civilised and ‘human’ rather than a hub of computers and machine readable protocol.
In the case of a standard hierarchy in a book, it is unlikely you’d see duplicates. Chapter 1 may contain paragraph 1 and sub paragraph 1.1. (A complete reference of 1.1.1). Paragraph 1 in chapter 2 would be 2.1 and therefore, even though paragraph 1 is a duplicate number the full identity is unique. However, in an engineering context, it is much more likely that information will be referenced in more than one place. Hierarchy duplicates are not unusual for referenced information. After all, it is much better to store the information once and use it many times. This is one of the major benefits of a Requirements Management tool. Imagine each component that has to meet a certain design standard. It makes complete sense to relate each part to the standard, rather than copying the standard numerous times. In this regard the hierarchy contains duplicates. For each part that is drilled down many components will end up with the same standard at a lower level of the hierarchy.
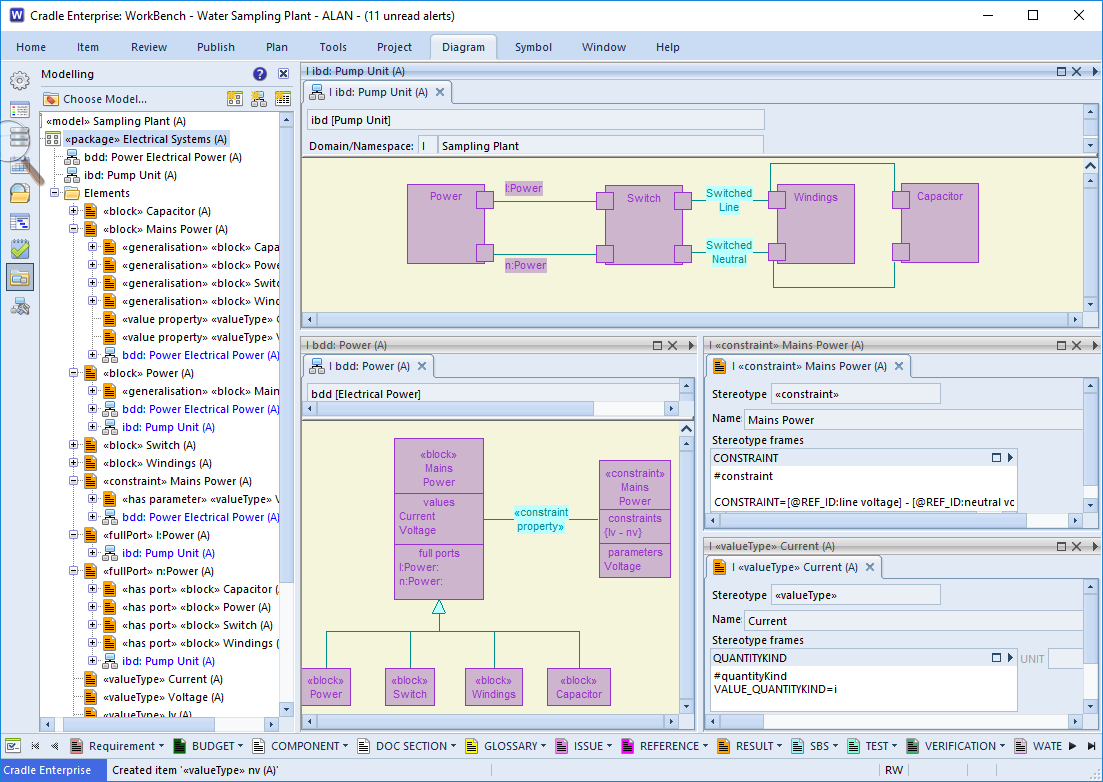
Linked Hierarchical Information
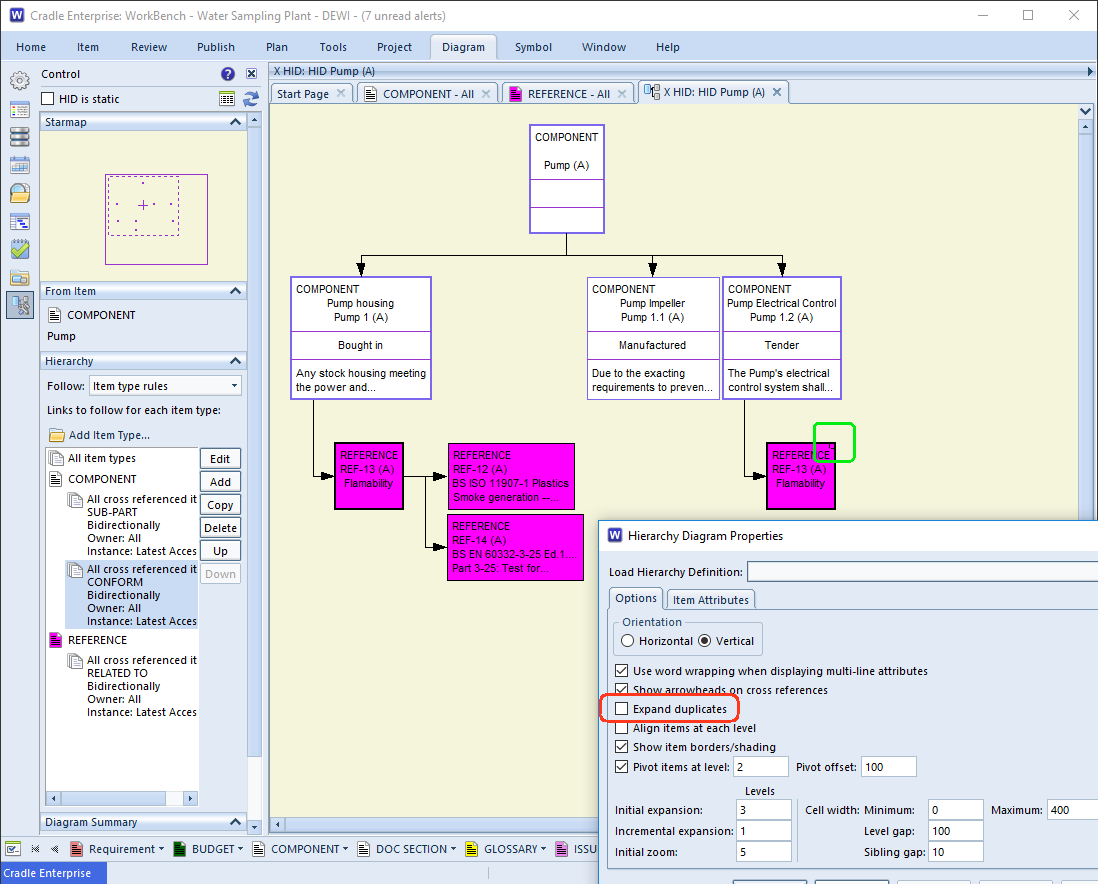
The following example shows the expansion of a component (Pump) into the sub components (we’ve followed a link type of SUB-PART). The diagram shows that two of the components have to comply with specific flammability requirements. Both Pump Housing and Pump Electrical Control are linked to REF-13 for Flammability. In turn this has lower elements of Smoke generation for plastics and flammability of Cables.
The diagram illustrates that REF-1.3 is a duplicate by the small square in it’s NE corner.
HID Expansions
Controlling Expansion of Hierarchy Duplicates
The Hierarchy Diagram Properties dialog has an option to control whether items seen as duplicates are expanded to further levels. Here the Expand Duplicates option is unticked which is why the user does not see REF-12 and REF-14 expanded below it.
Yes, I know it’s the April 2018 Newsletter. The Gregorian calendar was introduced in 1582. The switch by countries was gradual, with the UK changing in 1752. During the switch the UK lost 11 days in September, and the start of the year was moved to January the 1st. We covered some of the strange naming conventions in our October newsletter. Originally the first day of a ‘new year’ was 25th March, this sudden jump would have messed up financial institutions accounts. So they kept the start of the fiscal year more or less where it was, shifting by those same 11 days to 5th April. Or it could have been that the accountants were so drunk at Christmas they just couldn’t face doing the accounts when they returned to work. Take your pick.
Budget
So if you are lucky enough to be dealing with a new budget for the “new year” now’s the time to check you are getting value for money across all your projects. Are you still dealing with several different tools to manage your Requirements and model your Systems? Could you consolidate these tools and methods by adding extra licences to your Cradle installation and then on-boarding(yuck -Sorry read that one in a trendy blog post somewhere) the less enlightened? On the other hand if you’ve been Spring cleaning and found your project a little out of kilter, you may realise that the management view you have over it, is not as clear as it ought to be. Then maybe adding aDashor Metric licence to Cradle could help with getting to grips on the health of your project. However we can help, don’t hesitate to call us here in the UK or your local distributor.
Metrics
Measurements and collation of the results are an important management tool.
Metrics
It is obviously important to manage and track the right thing. Using the ludicrous quote “The majority of people involved in accidents were wearing white underwear….”, you may jump to the conclusion that brightly coloured pants will keep you safe. Of course this statement is completely meaningless without context because if white pants are the most popular colour you could make that statement apply to any topic.
Provided you are measuring sensible information, percentage of Requirements that are Accepted, or Underway gives a really useful view about the maturity of your project.
In Cradle you can define any number of metrics, save and re-run them at a later date. A metric is made up of a set of elements, each element is a query to the database to retrieve item(s), and an analysis operation on these items. This could be a simple count, or a more comprehensive coverage analysis of attributes. Available functions include:
Item count
Minimum value, Maximum value
Averages/spread (mean, median, mode(s), variance (population-based), range, standard deviation (population-based) and semi-interquartile range)
Total / Weighted total of values
Range of values
Pivot table for category values
Coverage statistics
The returned values can also be further manipulated with Metric calculations, combining values with basic mathematical operations. Delve into the help section for more information or read the flyer.
Cradle Features Coming Soon….
As we mentioned in February Cradle 7.4 is on the way. Look out for; New colouring options in (HID) Hierarchy Diagrams, Additional Regex (regular expression) matches in queries, Unique attribute checks……..
Social Media
Twitter
Yey! Our followers still steadily climbing, but will you be the one that pushes us over the 400 mark?? What happens when we get to 404, do we get Follower Not Found? (Oh dear, sorry, bad engineering joke crept in. Ed.)
We highlighted types of storage in Cradle, last month. Think of this too as a way to get tighter control over some of those files that form part of your Requirements set. Adding them to a Cradle item and then adding meta data to describe how they fit into your project.
[sis-tuh m]noun: an assemblage or combination of things, parts, sub systems, members, operations or principles forming a complex or unitary whole.
Context
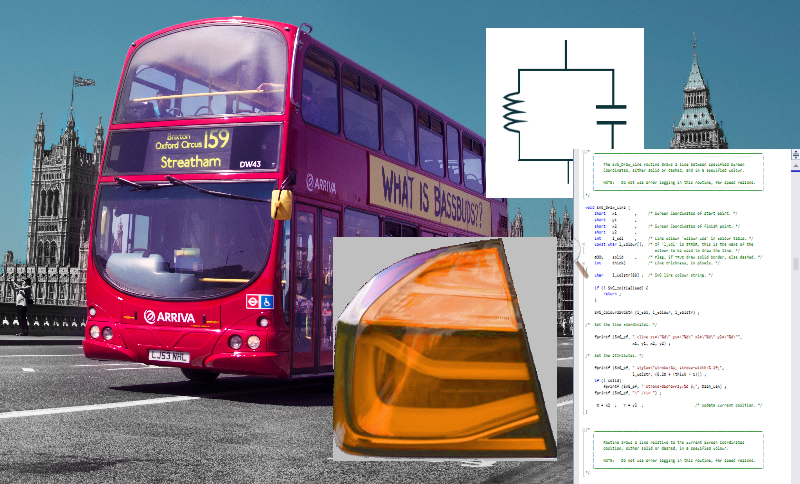
To answer the question ‘What is a System?’ you first need to understand your context. When you get down to the ‘atomic’ level for your component parts you’re unlikely to model them any further. A local authority may want to model their transport system. This may include vehicles, termini, and ticketing systems. Whilst their model may include the external specifications of a bus (in terms of weight and width) to plan a terminal, they are unlikely to care whether the bus electrical operates on 24v or 48v batteries. Unless they have to supply charging points at the depots. The tram’s external specification would again include width, height and mass, but it is very likely that the authority would need to know the electrical operation characteristics in their model if they are responsible for the track.
System Components
The bus manufacturer is not really interested in how the local authority terminal looks or operates. However, they may have design constraints for the width or length imposed by their customer. Being able to identify these parameters in their design will help them design any modifications needed to meet the requirements. Some times there is need for shared information. The ticketing system may be supplied by a third party, both the council and the bus vendor will be interested as part of that system will fall within their responsibility. Ticket sales at the terminal, ticket machines fitted on the bus. The bus manufacturer will undoubtedly model their vehicle, there will be detail plans of what connects to what and what operational parameters are needed for each. In this way if a new component is introduced, it is easier to see the impact. The new air conditioning unit needs 48v supply, the bus currently uses 24v how do we assess the impact and know what is dependent on the current voltage line?
Should I model X?
Whether a system, or sub-system is worth modelling heavily depends on your position in the project chain. Deciding whether this is ‘atomic’ level for you is very dependent on your industry. Assessment should be made as to the likelihood that parameters of the component may affect higher level systems. The likelihood of whether a subsystem is going to be re-used in a number of different high level systems, and whether stakeholder or external constraints need to be considered.
Circuit model
If you make capacitors, you’ll have specifications for the capacitor, it’s voltage, capacitance, temperature range and so on. However, there is not much you can model at this level. If you also make wire wound inductors, then it will have similar specifications. However, as soon as they are linked together forming an LC oscillator, you have a system. There are two components who’s characteristics interact. If the LC sub-system is being supplied then the voltage at which it is safe to operate will be dictated by the components within. In this case specifying the inductor and capacitor as blocks with characteristics that form the internals of the oscillator will have a benefit in future design or specifying the operation of the sub-assembly supplied to onward customers. As the vehicle parts designer wanting to make a turning indicator unit, whether the oscillator is LC, RC and Transistor or Op-Amp is of little concern as long as the voltage, current and timing are correct. The oscillator would therefore be the atomic level here. The bus designer is not worried about the indicator unit design as long as the brightness and timing meet regulations and the longevity and power consumption are within performance parameters. They would have no interest in modelling the oscillator.
Model Benefits
Linked Specification
The fact that your model contains detailed information of the interconnections, parameters and ranges of your atomic components makes querying your model to analyse change much easier. Being able to identify all components that are expecting the same power will aid a designer in assessing the impact or running a different voltage.
Can you model anything?
Pretty much any system can be modelled. Software was maybe the original stable from which many modelling techniques originated, there is a need to define at what point each module interacts with the other modules. The depth to which the functions are modelled will again depend on the context. There would be no point modelling the printer driver in the system beyond the interface, if that driver is purchased along with the printer hardware. Library functions may be modelled in their own right, but the higher level designer will reference them as white or black boxes.
No one model has to contain everything. The passenger movements, purchases modelled as use cases. The hardware components forming the bus. The sub components forming the indicators. The software controlling the ticket system are all separate systems working as a whole.
Odd to celebrate something that didn’t happen. However, a large asteroid missing the Earth by 500,000 miles in 1989 is probably something to be thankful for!
We celebrate every time we are able to deflect word processors and spreadsheets away from engineers and businesses trying to achieve requirements management.
Near Miss
Protect Yourself
Ensure you use the right tools for the job and don’t get tangled up in a bunch of uncontrolled, inadequately linked statements against which your project will be developed. Use the protection of a Requirements Management tool with a proven history, that can control, configure and provide full traceability. We’d obviously recommend Cradle! So take heed and ensure you don’t have a near miss day at work.
This article will highlight a set of housekeeping tips to keep Cradle running smoothly and provide a good user environment.
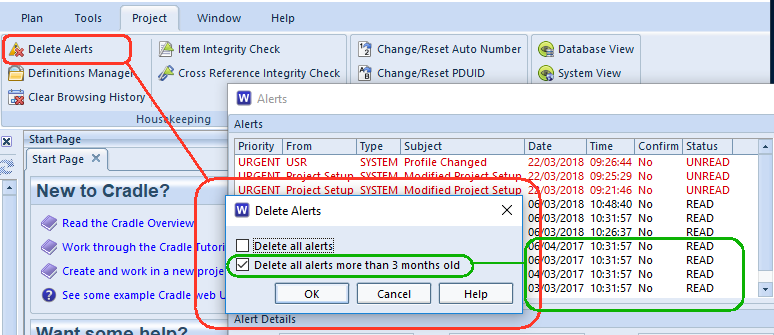
Alerts
Whilst alerts are a very useful feature telling users that an aspect or item of their project has changed, users sometimes forget to clear their alerts from their accounts. You could ask each user to select old read/unread alerts and delete them. However, an administrative user with both PROJECTand ACCESS_BYPASS privileges can tidy alerts for ALL users
Housekeeping Alerts
Selecting the Project tab, then Delete Alerts will show a dialog that lets the administrator choose a range of ALL users’ alerts to delete. This will remove read and unread alerts from the database.
Project Setup – Alert Management
Additionally Alerts can be tidied up by each user automatically each time they log out. This setting can be found in the Project Setup under Alerts.
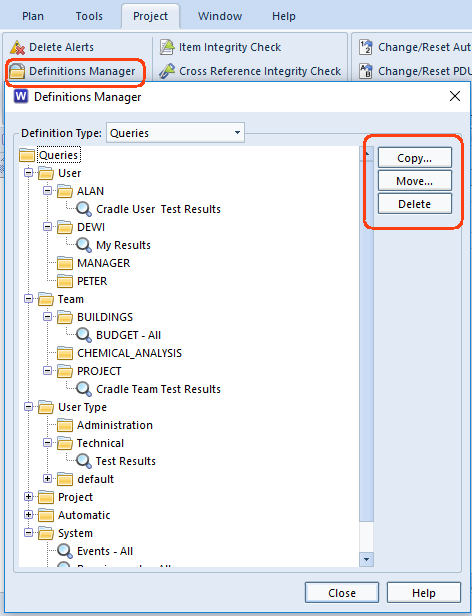
Definitions
These can include Queries, Views, Forms, Matrices, Metrics, Reports, Graphs, Dashboards, Navigations, Start Pages, Graphics Print Settings, Hierarchy Diagram Properties, Capture Setups, Report Styles, Graph Styles, Export / Import Formats.
They are stored in different groupings, Personal, Project, User, Team, User Type, System and Automatic. These groups allow the definitions to be shared according to their intended use. Project for example is available to everyone working on that project, whereas User Type definitions match someone’s role on that project and are available to users holding that role. Personal definitions however, will be available to that person, across projects.
Sometimes duplicates or old definitions can accumulate and need tidying up. The definitions managerallows users to manipulate.
From the Project toolbar selecting the Definitions Manager will show the following dialog.
Definitions Manager
Using the side buttons, definitions can be moved, copied and deleted. This would allow, say a team leader with creation privileges, to develop a number of queries or views and then move them into User Types for use by users who are not allowed to modify or create the definitions, themselves.
Depending on the location of the definition users may need one or more privileges from CREATE_DEFS, PROJECT, TEAM_LEADER or indeed ACCESS_BYPASS.
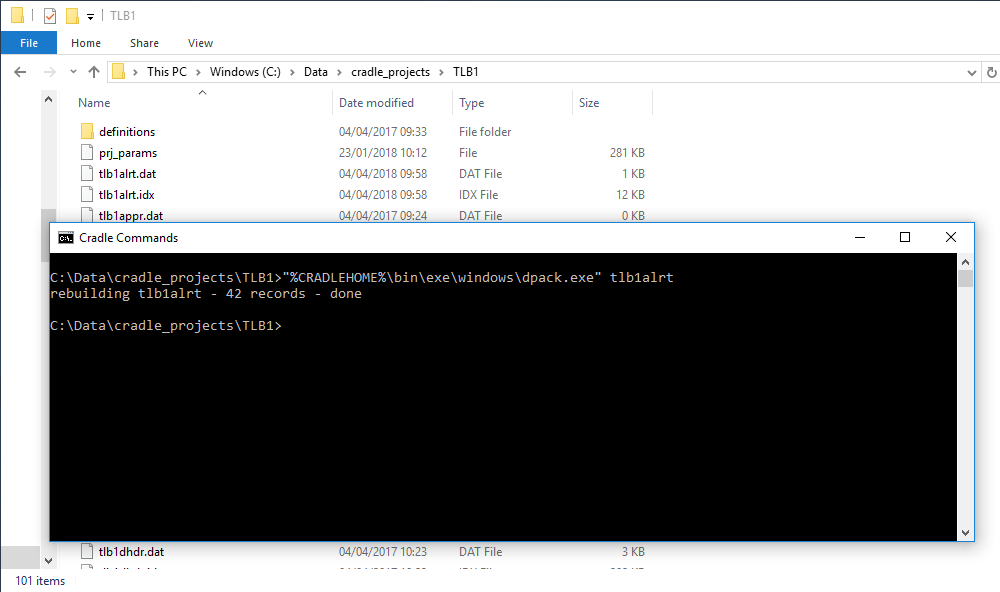
DPack
The DISAM database file system used by Cradle consists of file pairs of data and index files. After time, it is possible, that a number of blank areas will appear in the data file, as a result of large numbers of records having been deleted. Whilst this is perfectly normal operation, it can mean the data file is larger than it needs to be.
dpack Utility
The DPack utility can be used to re-write these files more compactly and rebuild the indexes. This is not considered an everyday operation and would normally only be performed by and IT administrator. This should only be performed when the CDS (Cradle Database Server) is not running.
Make sure you have a backup of the entire project directory – incase a power-cut or machine failure occurs during crucial operations
Move to the directory to be compacted
Run the following command (c_dpack on Linux, dpack.exe on Windows®) "%CRADLEHOME%\bin\exe\windows\dpack.exe" tlb1alrt Where tlb1 is the project code and alrt is the particular database file to re-pack.
To complete this for all files in the directory running a batch-file or script e.g. on Windows® @echo OFF for /F %%f in ('dir /B "C:\Data\cradle_projects\TLB1\*.dat"') do ( echo Processing file %%~nf "%CRADLEHOME%\bin\exe\windows\dpack.exe" %%~nf ) Where C:\Data\cradle_projects\TLB1\TLB1 is the directory for the project.
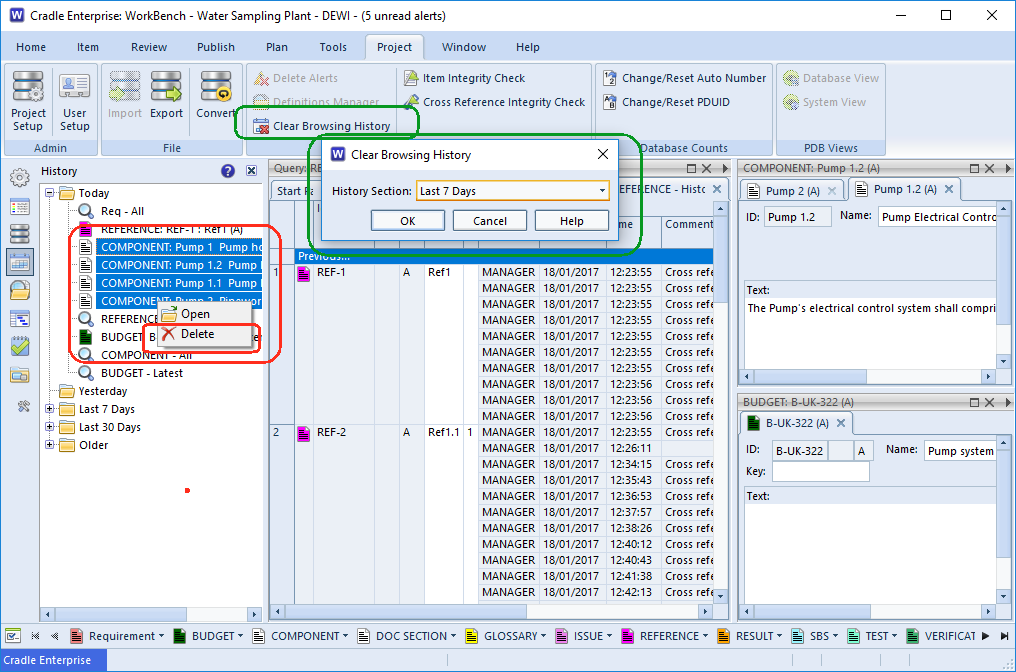
Cradle History
Keeping track of what you’ve been doing is really useful, the history sidebar shows the queries you have run and the items you have opened.
However, sometimes you may have a long list of entries from a particular day, you may then want to work on a different part of the project. In this instance it is sometimes useful to clear your history and start afresh. In the History Sidebar you can choose what to clear by selecting and right clicking items in the menu.
Clearing History
Larger amounts can be cleared through the Clear Browsing History option on the Project tab.
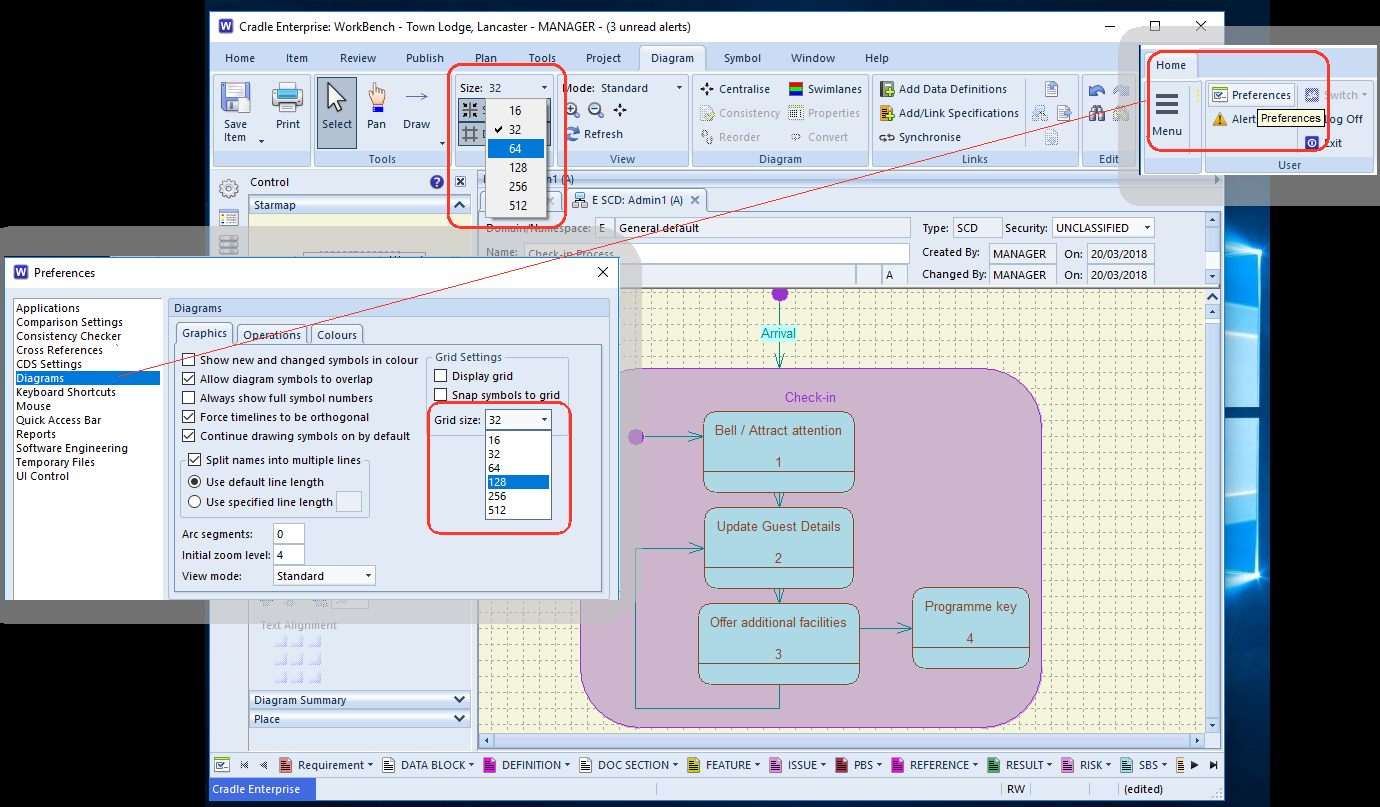
We all have our preferred way of doing things. Whether that’s a corporate or a personal view. 3SL don’t enforce a particular layout style, colour or size. These diagram preferences can be set by the user. As with any preferences, they can be set at an installation level in the cradle.ini file on Windows® or .cradlerc file on Linux® file as a default or overridden by the user.
Grid Preferences
In the diagram below it can be seen that the drawing grid is quite small (32). Which is great for finer detail. However, if you are mainly concerned with large blocks in your diagrams and want plenty of space, a layout guide of 128 may be more appropriate. Users have two options, firstly to set the size each time they use Cradle from the Grid section on the Diagram tool-bar or to set their drawing preferences.
Diagram Preferences
Preference Dialog
The dialog can be opened from the Preferences option on the Home tool-bar. Once the dialog is displayed, the diagram preferences are set using the the Diagrams section. There are a number of defaults that can now be set ranging from the initial grid size to whether specifications are automatically created when the diagram is saved. You can change the palette too, so a mute background rather than bright white can be chosen to be easier on the eye.
As we head into Spring, most of us are keen to leave behind the horrible weather that came with the Beast from the East. Some of the worst UK snow seen in years. We’re happy to say that Barrow-in-Furness saw
Snow Problem
little impact and the support team were able to maintain full levels of service. We hope your businesses were not too badly affected and that you are all heading back to normality. The question this raises is why are we so bad at coping with a bit of snow here in the UK? The main problem seems to be that we’re not used to it. It is not a ‘steady state‘ in parts of the world where winter = snowand ice for a set period, the infrastructure is set up to cope. Cars have winter tyres or snow chains, heated highways or rails keep cars and trains running, or there is value return on investing in ploughs and gritters. The changing requirements of British weather conditions would need you to put the snow chains on and take them off on a daily or even town by town basis. These changing requirements make managing the situation really difficult. The same logic applies to projects, stable requirements make for a simpler solution. If your requirements are more like British weather, there is even more need to have a formalised approach to managing them. Making sure you can track the changes and your reactions to them becomes imperative. Don’t end up wearing wellies in the summer and flip-flops in the snow, get you requirements under control in Cradle and encourage your suppliers to do the same.
GDPR
GDPR
We can assure you that we don’t randomly buy email addresses and send spam adverts. We collate our communication list from curated information from you, our customers and prospects. People and companies who have contacted us about RM / MBSE / Cradle or 3SL. We maintain these dialogues as a legitimate business interest. We have made, and will continue to make, it easy for individuals to ask for their contact details preferences to be changed. We look forward to staying in touch with you all. If you have any GDPR comments you’d like to feature contact us at social-GDPR@threesl.com
The mix of staff that make #3SL tick is quite diverse. Every team member is important to the success of the company. Today we recognise the women on the team that include our financial controller, one of the software developers, one of the support engineers and our domestic operative.
A bit of #MondayMotivation, this light heated day is celebrated on the first Monday of March. Have a ponder to think where you came from, what lineage came before you. Despite #FunFactsAboutNamesDay sounding like something Sheldon Cooper(Nerd Alert: Big Bang reference) may present it is a real ‘day’. So while you’re having your first cuppa (Good British drink of the day) or at the ‘water cooler’ (Is that really a thing??). Challenge a colleague to a Fun Facts About Names!
Meanings
Some are fairly obvious “Smith” and “Cartwright” working in a smithy or making carts. Some a little more tricky “Chalker” one who applies white wash. Then there are the more obscure, lost meanings in time, “Lister”, a dyer of cloth. (Maybe someone should tell DaveNerd Alert: Red Dwarf reference)
3SL
So where did we come from? Structured Software Systems Limited ⇒ SSSL ⇒ 3SL that simple really!