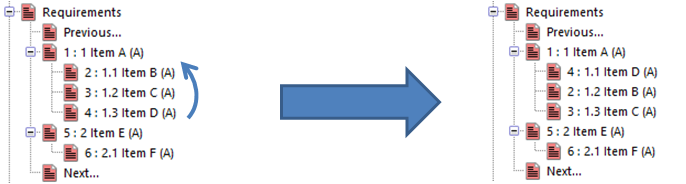
10 Engs, 1 Mgr, 6 Requirements, 2 SE, 1 Metric and 1 Dashboard

How Does That Work ?

The Flexible Licence Model in Cradle Means it Does

Unlike other software tools the licences in Cradle are concurrent usage licences. It is, therefore, quite possible to have fewer licences than you have people and still be able to do everything you need.

If some of your engineers are involved in writing requirements and others writing tests, there may be no need for them to open the systems engineering diagrams. Why pay for a licence they are not going to use? That’s not to say they may not need to at some point, and as long as there is a licence free at that instance in time, they will be able to open the diagram too. Of course if you want to prevent a particular user ever consuming a licence then you can set module access rights to prevent them acquiring one.

Generally reporting using metrics and dashboards is an infrequent activity. Why have umpteen licences hanging around not being used? Exactly what we say. Don’t buy it if you don’t need it! (hint: It’s a Flexible Licence Model in Cradle)

Are you seriously telling me to spend less money?

Yep! We want you to be clear why Cradle is a better more cost effective choice for your business.

If the project focus changes and more people need metrics do I have to reinstall?

Nope! Just have a word with our sales team and they’ll have a new code prepared. Install this on the server, restart the Cradle Database Server and you have your new compliment of licences. That applies to any of the available modules.

I’m too big for a single user system, but not big enough to afford a full enterprise system, are there only the two options?

No! Falling into this ‘in-between ground’ or having difficulty explaining the benefits of a fully integrated lifecycle management tool to your bosses can be a problem. “Named user licensing”, sorts this out, giving significant cost savings. Instead of being able to have a large pool of engineers, any of whom can seek a connection to the database and acquire a module licence, named user systems lock the connections to a set of named users.

I guess I then have to spend bucket loads of money on upgrades and a premium help line?

No again! With enterprise systems you get as much support as necessary for a fixed annual maintenance fee, based on the size of your system. You get all patch and version releases free during this period.

What do I need to spend money on?

Not much! We offer free and comprehensive help information with your installation and online. We provide demonstration databases so you can see how things work and get up and running. However, if you want to hit the ground running and ensure all users run up the learning curve, we will tailor training courses for your individual needs. Again not a fixed price for teaching you everything in Cradle, you only pay for the parts pertinent to your business. If you want help to set up a database and project to match your business specific work model, then we can offer consultancy at a competitive rate.

What should I do?

Don’t delay, contact 3SL today. You can have a free webinar, a free evaluation and a chance to improve your product lifecycle.

Cradle Enterprise
Cradle (Enterprise edition)

Visit www.threesl.com for Cradle, the simple, flexible and scalable solution for your entire project needs! Ask about the enterprise flexible licence model in Cradle.

From concept to creation, you, Cradle and 3SL!

Do I have to retype my password if I have many projects?

Using Project Manager with Multiple Projects and Passwords

In an environment where you have numerous projects that you switch between, using Project Manager to Login can save retyping your Cradle password.

If you have many projects that you need to switch between and don’t have a limitless desktop to open multiple copies of Cradle or don’t want to lock multiple licences, use Project Manager to look after switching.

Once you Login  to a project through Project Manager your Cradle password is cached for that session. You can then access the project through WorkBench, Web Access, or the Toolsuite applications; Document Loader, Document Publisher or Spell Checker. When you exit a tool, you can open another project through Project Manager as you work through your day. When  you need to re-enter any previous projects, you’ll only need to use the Open command as your login details will be cached.

If you need to clear the cache (for security reasons) then simply use the Clear User Cache option. Alternatively close Project Manager.

Using Project Manager to login
Project Manager Login

LDAP Lightweight Directory Access Protocol

For an alternative way to manage your logins and passwords, see Cradle help LDAP Authentication.

Switch User

Another option to change to a different user is to use the “Switch Identity” option, this can be enabled in the “User Setup” A User Profile’s switch identity can only be set if you have read-write access to the User Profile. If you have no access to a User Profile, you cannot see any part of it, including the switch identity. If you have read-only access to a User Profile, the switch identity is disguised in the same manner as the User Profile’s password.

Article Updated 04/02/2019 – Added swith user

Importing using c_io.exe in a Batch File

Importing

C_io.exe can be useful when importing large files or when a user has a lot of files. When c_io is in a batch file, it can import different files into different projects within one batch file. This file is then run when no one is in the database and so there should not be any issues.

The options available are:

c_io import options
Import options for c_io.exe

Required Import Options

The  first option for importing needs the user to specify a location and a name for the file:
-import “C:\Temp\import1.exp”

All saved Import Formats in WorkBench can be used with -import

-impname is the Import Formats filename. When an Import Format is being used -overwrite, -owner, -ipid, -cpid and -noalerts are set from this file.

-imploc is the location of the Import Format file.

Elective Import Options

-overwrite is used when a user requires any items in the database to be overwritten, merged or not overwritten. If not in the command line the default of off is used.

  • on – all data will be overwritten
  • merge – all items will be merged
  • off – no data will be overwritten and only new items added

-owner sets by whom the items imported are going to be owned by. Depending on the option set depends on the owner of the items:

  • user option is owned by the user in the login option e.g. -login ADMIN the items will be owned by the ADMIN user.
  • File option is the owner as stated in the import file
  • A user can be specified and all items imports will be owned by that user e.g. -owner REQMAN
 Import UI
WorkBench Import UI showing Owner Options

Additional Options

-ipid is the option to let c_io know whether to use the PIDs in the file or in the project it is being imported into.

  • Off means the PIDs will be generated.
  • On means the PIDs in the file will be used.

-cpid allows a user to specify the PID to be used for the items being brought in.

-noalerts option stops alerts from being generated during the import

-ignorelinkrules allows any cross references to ignore projects link rules in the current project but only if the user has the correct privileges. The user must have either ACCESS_BYPASS or PROJECT for this to work.

-noautoid allows the original numbering for items rather than any auto numbering set in the Project Schema.

-nocheckdata option stops data being checked so it is all imported.

-add_itemhist is the same a Auto update modification details and sets the current user, date and time, not what is specified in the file.

-itemhistcomment will include a Change History comment which will include the last modifier, modification date and time

-add_imphist will create a log with the history of the import. It shows the options used, who performed it and the date and time of the import.

-set_modify uses the current date and time instead of the date and time specified in the imported file.

All the above options are from the Import UI:

Import Options
Import Options from the WorkBench UI

c_io.exe Batch File Importing Examples

Using Basic Options

“%CRADLEHOME%\bin\exe\windows\c_io.exe” -login admin,ADMIN,demo -import “C:\Temp\import1.exp” -overwrite merge -owner file -noalerts -ignorerules -noautoid -nocheckdata

Using Import Formats

“%CRADLEHOME%\bin\exe\windows\c_io.exe” -login admin,ADMIN,demo -impname TestImport -imploc project

Using Elective Options

“%CRADLEHOME%\bin\exe\windows\c_io.exe” -login admin,ADMIN,demo -import “C:\Temp\import3.exp” -overwrite on -owner REQMAN -ipid off -noalerts -ignorerules -noautoid -nocheckdata -add_itemhist -itemhistcomment “Imported through c_io” -add_imphist

Helpful other c_io options

There are several helpful options especially when using in a batch file.

-log allows a user to specify a name for a log. This is the log that will have the details of the actions performed during the  import.

-noldap allows users to bypass using LDAP when running a command line or batch file.
-errorstack option is for logging any issues with the import

“%CRADLEHOME%\bin\exe\windows\c_io.exe” -login admin,ADMIN,demo -export “C:\Temp\all3.exp” -type all -noldap -errorstack -log “C:\Temp\all3_log.log
“%CRADLEHOME%\bin\exe\windows\c_io.exe” -login admin,ADMIN,demo -export “C:\Temp\pdb3.exp” -type pdb -noldap -errorstack -log “C:\Temp\pdb3_log.log

Options not used within a batch file

There are a couple of options that are not used in a batch file. The reason is that they are only useful in a command line, in a command prompt as they show pop ups with information on them.

-ver lets the user see what the version number, date and time of the build they are using.
-help option allows a user to see the command line options.

Related Posts

Read the article  Batch File Reporting  for advice on producing reports with c_io.
Exporting using a batch file.
Exporting a single frame from an item allows just one frame of data to be extracted.


Creating New Item Types

Do you require more Item Types, maybe you just want a new Item Type with a different name. Cradle lets you create new item types to suit your working methods.

In Project Setup navigate to “Options – Item Definitions” and change the tab to “Item Types“. This dialog presents a list of

  • the predefined types of item available in any and all Cradle projects,
  • those that were in the chosen template schema when the project was created
  • those added by a user.

New user defined types are used to extend a Cradle Database, to encompass new types of information. To create a new item type you need PROJECT privilege to modify the schema.

3SL Cradle New Item Type
Creating a New Item Type
  1. Select the Project tab
  2. Select Project Setup
  3. Set Options to Item Definitions (if not already set)
  4. Select the Items tab
  5. Click New and enter a name for the new item type

Remember you can also add these newly created Item Type to the quick access bar, for more information see “Customise your Quick Access Bar”

For more information regarding item types and Project Setup please see help on Item Types or my article on configuring Item Attributes

Article Updated 04/02/2019 – Removed mentions of project schema

New Default Schemas

The structure of each Cradle database is defined in a schema. Cradle is supplied with four default schemas that you can use. You can create new default schemas. You can initialise your new Cradle database using any of your default schemas.

Default Schemas

A Cradle system can contain any number of databases. Each database can be used for one or more projects. Each database has a structure that is defined in a schema.

When you create a new database, you specify a default schema that will be used to initialise the schema in the new database  Cradle is supplied with four default schemas, called: empty, default, quick-start and SysML. 3SL provides documents that explain the contents of these default schemas.

New Default Schemas

Cradle can support any process for any type of project. The schema defines the types of information that you will need to follow your process.

You can create new default schemas to support any type of process for any type of project. For example, look at the following types of projects and lists of the item types that will be included in their schemas:

  1. Agile projects:
    • Sprint, iteration
    • Feature
    • Build and release
    • Test cases, test results
  2. Business Analysis projects:
    • Needs, goals, objectives
    • Business functions, processes, tasks
    • Organisations, groups, teams
    • Deliverables, reports  and other document types, artefacts, builds
    • Personnel types, skills, roles
  3. Enterprise Architecture projects:
    • Needs, goals, objectives
    • Processes, functions, tasks
    • Resources, systems, buildings and other facilities, area breakdown structure, site breakdown structure
    • Delivery phases, releases and builds
    • Organisations, groups, teams
    • Deliverables, reports  and other document types, artefacts, builds
    • Personnel types, skills, roles, organisation breakdown structure
  4. Requirements Management projects:
    • Needs, goals, objectives
    • Business requirements, user requirements, system requirements
    • Validations and verifications
  5. Application lifecycle management projects:
    • Needs, goals, objectives
    • Business requirements, user requirements, system requirements
    • Validations and verifications
    • Analysis models, logical models, architecture models, design models – built using MBSE using one or more of functional analysis, SASD, IDEF, ADARTS, UML and/or SysML notations
    • System breakdown structure (SBS)
    • Test cases and test results
  6. Project Management projects:
    • Needs, goals, objectives
    • Business requirements, user requirements, system requirements
    • Product requirements, managed in a library
    • Validations and verifications
    • System breakdown structure (SBS)
    • Product breakdown structure (PBS)
    • Part catalogue, suppliers, orders
    • Production schedules, production runs, batches, samples
    • Quality records, test cases, samples, test results

Location and Structure of Default Schemas

Each default schema is stored in the sub-directory:

admin/defaults

inside the Cradle installation on the server.

Inside this directory are:

  • A file called: prj_params that contains the schema
  • A directory tree containing the project-scope definitions, such as queries, views, forms and so on, called: definitions

Creating New Default Schemas

You can create your own default schemas by:

  • Decide on a name for your new default
  • Create a new directory with this name inside the admin/defaults directory in the Cradle installation on your server
  • Place the schema for the new default inside this directory in a file called: prj_params – you can copy the prj_params file from inside the database directory of an existing database, or use Cradle’s export to create it (see below)
  • Optionally copy some or all of the Project scope definitions from the definitions directory in an existing database

Export to Create a New Default Schema

You can export the schema using the Export Information dialog that is shon when you select Export from the Project tab in WorkBench.

If you can run WorkBench on the server, then you can export the schema directly into the new defaults directory:

Export to Create New Default Schemas
How to to Create a New Default Schema

Using Your New Default Schemas

When you create a new database in Project Manager, select the Schema drop-down list. This will display the list of default schemas. Any new schemas that you have created will appear in this list, for example:

Create Project dialog showing available schemas
Create Project dialog

Initial Expansions in Project Sidebar

Sidebar Expansion

The project sidebar offers a ‘raw’ view of the data stored in the Cradle Database. When first opened a list of item types is displayed. If there is a [+] indicator, then you can expect to expand the tree to lower levels.

In the example below Reference item type has been set up with an auto numbered ID and the Key being the  hierarchical attribute. A rule has been defined to allow the items to be linked to items of the same type with the “RELATED TO” link type.

  • All (All Items) This will show all the items of that type (subject to the user preference limits) when the node is expanded. Other than in very sparse databases this is not usually that a user wants to show.
  • Top (Top Level Items) This is more akin to looking at the level1 headings in a document. These are the items you have designated as having the most significance. They have no links down to them links. In the example you’ll see that item REF-4 (3.1) may appear to be a sub level item, but it has not been linked to a parent.
  • Bottom (Bottom Level Items) These are the leaves of the tree, the items that have no further downward links to children.
  • Disconnected (Not Linked to Anything) These items have no parents or children,  REF-6 (3.1.2) is shown here. This indicated an item that has been unlinked or its parents have been removed and either needs re-linking or reordering below a new parent.
Expansions of the main Project tree
Tree Levels

The last Disconnected  (Not Linked to Other Item Types) option in the menu looks at item of different types when deciding to list the item or not.

Why are there different groups of queries?

Cradle Definitions are Grouped

There are seven main groups into which Cradle definitions can be filed. These are common for each type of definition, say a view or a query.

  1. Personal – These are available to the Operating System User whichever project they are logged into – ‘Peter’ may be the ‘admin‘ on one project and the ‘design manager‘ on another but will be able to see this definition whichever he logs into. This only makes sense if the item types are the same in both or the definition is very generic showing say ID and Status, common to all.
  2. User – These are based on the Cradle User name and are available to that role name on every project. On three different projects the role QA manager may be held by three different people.  Definitions here would be available to anyone logging in as QA manager.
  3. Team – Definitions here are available to anyone in the same Cradle team on a particular project.
  4. User Type  – Users can be grouped by type within a project and this allows definitions to be shown to users of a matching type.
  5. Project – These are queries available to anyone on that particular project
  6. Automatic – Each time a new item type is added, Cradle generates a set of useful definitions to help you get started. These are idea to open tweak and ‘Save As’ to match your personal preferences. They are also useful if you want to write a phase or reference a view in a query as these standard definitions will exist without you having to create them.
  7. System – Some hard wired definitions covering the minimum shipped functionality in Cradle.
Query Definition Groups

To read more about definitions, see Help on Definition Files

Article updated 05/12/2018 – Cleaned up image

July 2017 Newsletter

July is Here

Last month saw the start of the Summer and also National Sunglasses day. We still hear the odd story that engineers are using ‘Spreadsheets‘ and ‘Word-processor documents‘ to manage their requirements. We can only sympathise with their misguided ways and revel in the fact that we (and you our dear newsletter readers) have seen the light.
So the only thing you should need your rose tinted spectacles for is to eat your Cream tea while watching Wimbledon!

an eFFBD showing Cream tea making
National Cream Tea day – eFFBD

Non Graphic Interfaces

This month (July 2017 Newsletter) we’re highlighting c_io and how it can be used to complement the functionality we’re more used to in WorkBench and Web Access.

c_io

Using c_io.exe in a batch file means you can do many things whilst you are away from your desk or in the background while you continue to work. You can then add this batch file to be run by a task application during times you are away from your desk or work. This can be handy when needing to do backups of a single or many large databases.

The executable can import and export everything in a project from single items to the whole project. It can use queries or different options to whittle down the required export. So a user can export all items of a specific type or just one to several items based on a query and or other set options.

Export Options for c_io.exe

For the full article set please see Mikki’s guide How to Use c_io.exe in a Batch File

Social Media

Twitter

We continue to welcome new followers each month and would encourage any Cradle users who would like regular ‘Hints & Tips’ to follow us @threesl

Reviews

Thanks to those who responded adding reviews of Cradle to Capterra. If you have not yet and are able to add a few words, please reply using  Yes I’m happy to consider writing a review

Hints of the Month

Here are some links to helpful topics since our last newsletter, they should improve your Cradle experience:

Controlling what can link to what is covered in Getting Started with Link Rules

Getting down to the nitty-gritty in Document Publisher with How to Make Use of User Variables in Document Publisher

Just upgraded the number or type of modules you have in Cradle, installing the new code is simple Installing a New Security Code

An FAQ about alerts is covered here How do I receive alerts via email?

You can read Hints & Tips in the 3SL Blog.

How to Use c_io.exe in a Batch File

Why use c_io.exe?

Using c_io.exe allows a user to do many things within a project without using the interface and is usually faster.

Using c_io.exe in a batch file means you can do many things while you are actually away from your desk or in the background. You can then add this batch file to be run by a task application during times you are away from you desk or work. This can be handy when needing to do backups of a single or many large databases.

The executable can import and export everything in a project from single items to the whole project. It can use queries or different options to whittle down the required export. So a user can export all items of a specific type or just one to several items based on a query and or other set options.

The user can use also use the import to update or create a new Project schema, items, cross references and definitions.

Import and Export can use the Format Types already saved into the database.

It can also export just a single frame from a single item into a file of the right type and print diagrams to specific print types.

How to use c_io.exe

The only real difference between using a command prompt and a batch file is the user will need to have a path for the executable. At the beginning of each command line the user will need “%CRADLEHOME%\bin\exe\windows\c_io.exe”

As in commandline code, a user will require the correct login information and the project being logged into.
-login <username>,<password>,<projectcode>

For example:

-login admin.ADMIN.demo

As long as the -login user has the correct privileges, they can use c_io.

Different Options in c_io.exe

Required options are:

-export

Export Options for c_io.exe

-import

c_io import options
Import options for c_io.exe

-getframe

Options for getframe in c_io.exe
The options for getframe in c_io.exe

-printdiag

printdiag options in c_io.exe
The printdiag options in c_io.exe

Without any of the previous options, c_io.exe will put up the Information page or an error.

Helpful other c_io options

There are several helpful options especially when using in a batch file.

-log allows a user to specify a name for a log. This is the log that will have the details of the actions performed during the  import.

-noldap allows users to bypass using LDAP when running a command line or batch file.
-errorstack option is for logging any issues with the import


“%CRADLEHOME%\bin\exe\windows\c_io.exe” -login admin,ADMIN,demo -export “C:\Temp\all3.exp” -type all -noldap -errorstack -log “C:\Temp\all4_log.log”
“%CRADLEHOME%\bin\exe\windows\c_io.exe” -login admin,ADMIN,demo -export “C:\Temp\pdb3.exp” -type pdb -noldap -errorstack -log “C:\Temp\pdb3_log.log”

Options not used within a batch file

A few of the options are not used in a batch file but are in a command prompt. The reason is that they are only used in a command prompt is that they show pop ups with information on them.

-verbose lets the user know that c_io.exe has finished
-ver lets the user see what the version number, date and time of the build they are using.
-help is used to see all the command line options.

Batch Files from Project Phase

Batch files can be added into the Project Phases, this is done by going to “Project Setup”, and in Options selecting “Project Phases”. Inside here if you create a new Process and change the type to command, in Command navigate to your .bat file.

A screenshot showing how to setup a phase node to run a batch file
Command phase node to run batch filesArticle Updated 04/02/2019 – Added infor on running batch file from phase sidebar

Reverse and Rewind Item Edits

What is Reverse and Rewind?

You can rewind edit histories so you can restore an item back to a state before a particular change or you can reverse a single edit in an item’s change history. This doesnt mean the feature will delete a previous change that has been made but it does mean it will add a further entry returning the the value to a previous state.

Reverse and Rewind edit history dialog
Reverse/Rewind edit histories

Reverse

Reversing an edit is an exact undo operation. It reverses the change to every attribute that was modified by the selected edit. Note that creation/deletions of xrefs cant be reversed.

For further information on reversing an edit please refer to the Reverse

Change History section of our online help.

Rewind

The Rewind operation essentially reverses all edits working backwards from the most recent back to (and including) the selected edit. Its end result is to restore the item to the state that it was in before the selected edit occurred.

For further information on rewinding edit histories please refer to the Rewind Change History section of our online help.

Results

Further Change History will be generated to show what changes were either reversed or rewound. The example below has seven change history entries. For simplicity each only modified one attribute of the item. Selecting the third entry and then either reverse or rewind will produce the two illustrated results.

Showing the different results for reversing or rewinding
Reverse or Rewind

We hope we have covered all the information that is needed to help you on your way to understanding reverse/rewind. Any more help can be found on our help page.

Article Updated 04/02/2019 –  Updated to say data will not be lost just changed to a state they were previously