You may have reason to make sure some users don’t see a particular sidebar or sidebars. For example, a customer seeing the Plans sidebar is not necessary if they are not involved in planning.
Setup
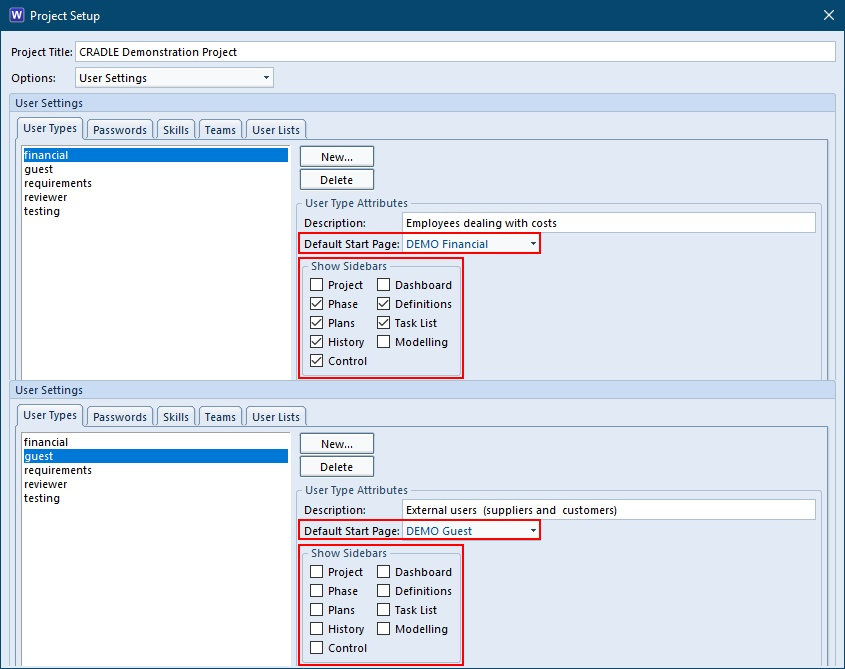
Within Project Setup there is a section for User Settings. This section is used to set many different options for Users. Under the User Types tab, different Sidebars and Default Start Pages can be set for each different User Type. A user must have the PROJECT privilege to be able to set these options.
Different User Types Settings for Sidebars and Start Pages
A User Type can have all, some or none of the sidebars selected. If none of the sidebars are selected then a user would use the options set for them on a Start Page only.
These settings can then be used in conjunction with a Users Preferences in which they can set a Default Sidebar to show on logging into a Project.
User Choice
The sidebars a user can see in the User Preferences are only the ones assigned to their User Type. They can then set which of those assigned to them will show when they first log in. This option may also be set to ‘None’ so no sidebar shows when a user firsts logs in.
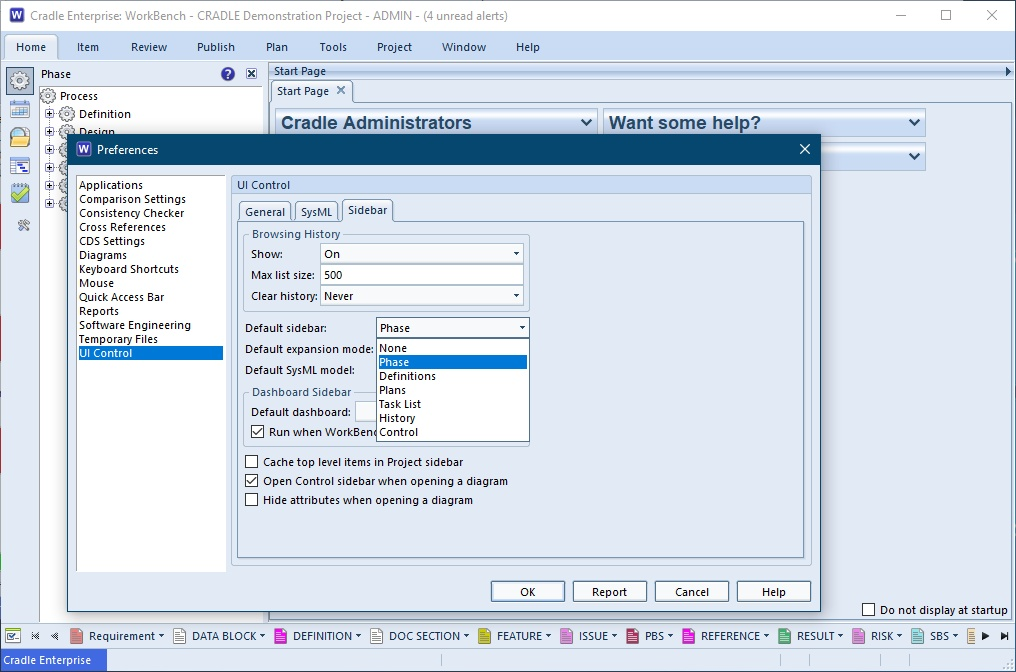
Sidebar options under the UI Control section
The settings are honoured no matter how a user logs in either through the UI, Project Manager, or through a command prompt. The only time this can change, is if a different sidebar is set when a user saves a Session. If they login using the saved Session then the sidebar showing at the time of the save will be opened instead.
The half way month in the Gregorian calendar and here is the June 2019 Newsletter. June is derived from the Anglo-French Juin, from Latin Junius.
The 1st of June is a call for us all to recognise the importance of Reefs in the world’s eco system. The complex interaction of many individual organisms linked by a rock/bone like skeleton, is home to many an animal and plant (It’s a bit like many requirements linked together defining your system in Cradle!) Sorry for the contrived comparison.
On the 14th June it is international bathday, we can hear some of our engineers asking us to clarify if it is REALLY six months since their Christmas dip! On the 21st, here in the North, we’ll be celebrating the longest day of the year with the summer solstice.
In addition, for many potential engineers it’s a celebration of the end of their exams with the prospect of moving on to college, university or finding a job, good luck all.
Cradle 7.5
Cradle 7.5
3SL are pleased to announce the arrival of Cradle 7.5.
This release is available as a new product, or an upgrade for users with maintenance. You can download it here, and after that you will require a new security code to use it.
Features include:
ReqIF Support
Support for ReqIF (Requirements Interchange Format).
This allows Cradle to exchange information with other requirements management and systems engineering tools that also support ReqIF. Please note that you need to carefully define a mapping between the information in your Cradle schema and the schema used in the other tool.
Web Services Interface
Support for Web Services, a new REST-based HTTP API. This provides both session-based and ‘single-shot’ interaction with Cradle through a WSI (Web Services Interface) that provides a range of facilities to query the schema, query the items and links in the database, and to create or modify items and links. The WSI uses an API connection licence.
ODBC Support
Support for users who wish to store their data in a third-party RDBMS (Relational Database Management System) Oracle or MySQL) as opposed to the file-based ISAM database supplied free with Cradle. This new capability allows you to store each Cradle database in any of ISAM, Oracle and MySQL. The Cradle Database Server (CDS) can interact with ISAM and/or Oracle and/or MySQL all at the same time if necessary. Note that you need to provide the ODBC driver for the RDBMS and you need to perform some initial configuration of the RDBMS before Cradle can interact with it. We provide full details of the steps needed in the Cradle documentation. This gives Cradle another unique capability. Cradle is the only tool which provides a choice of database back-ends to store your information.
Matrices/Navigations
Enhanced Matrix Details dialog, variable substitutions within navigation attribute values.
Queries on Frame Content
Support sequential testing for frames in queries.
Systems Modelling
Integration between model-based (specifications, data definitions, diagrams) and your project’s requirements and notes (which are not sub divided into models, non-model information). shown in all types of diagram in the FAD (functional, architecture, data) group of notations. This is a major extension to Cradle’s modelling capabilities. It allows you to show, in any diagram, how the elements of the model (functions, processes, equipments, interfaces and so on) are linked to: – Information earlier in the lifecycle, such as requirements – The system structure, such as a SBS – Information later in the lifecycle, such as test cases Some SysML notations allow requirements to be shown in a model. This is helpful. However, the new non-model information symbols provided by this enhancement offer far more capability than is offered in SysML.
Project Setup
Firstly, a new DateTime category and frames to help support ReqIF. Enhanced option for selecting/entering link attributes for cross references. Additionally, the ability to disable/enable sidebars for a particular user type.
User Setup
New options (skills) when applying a role to a User Profile.
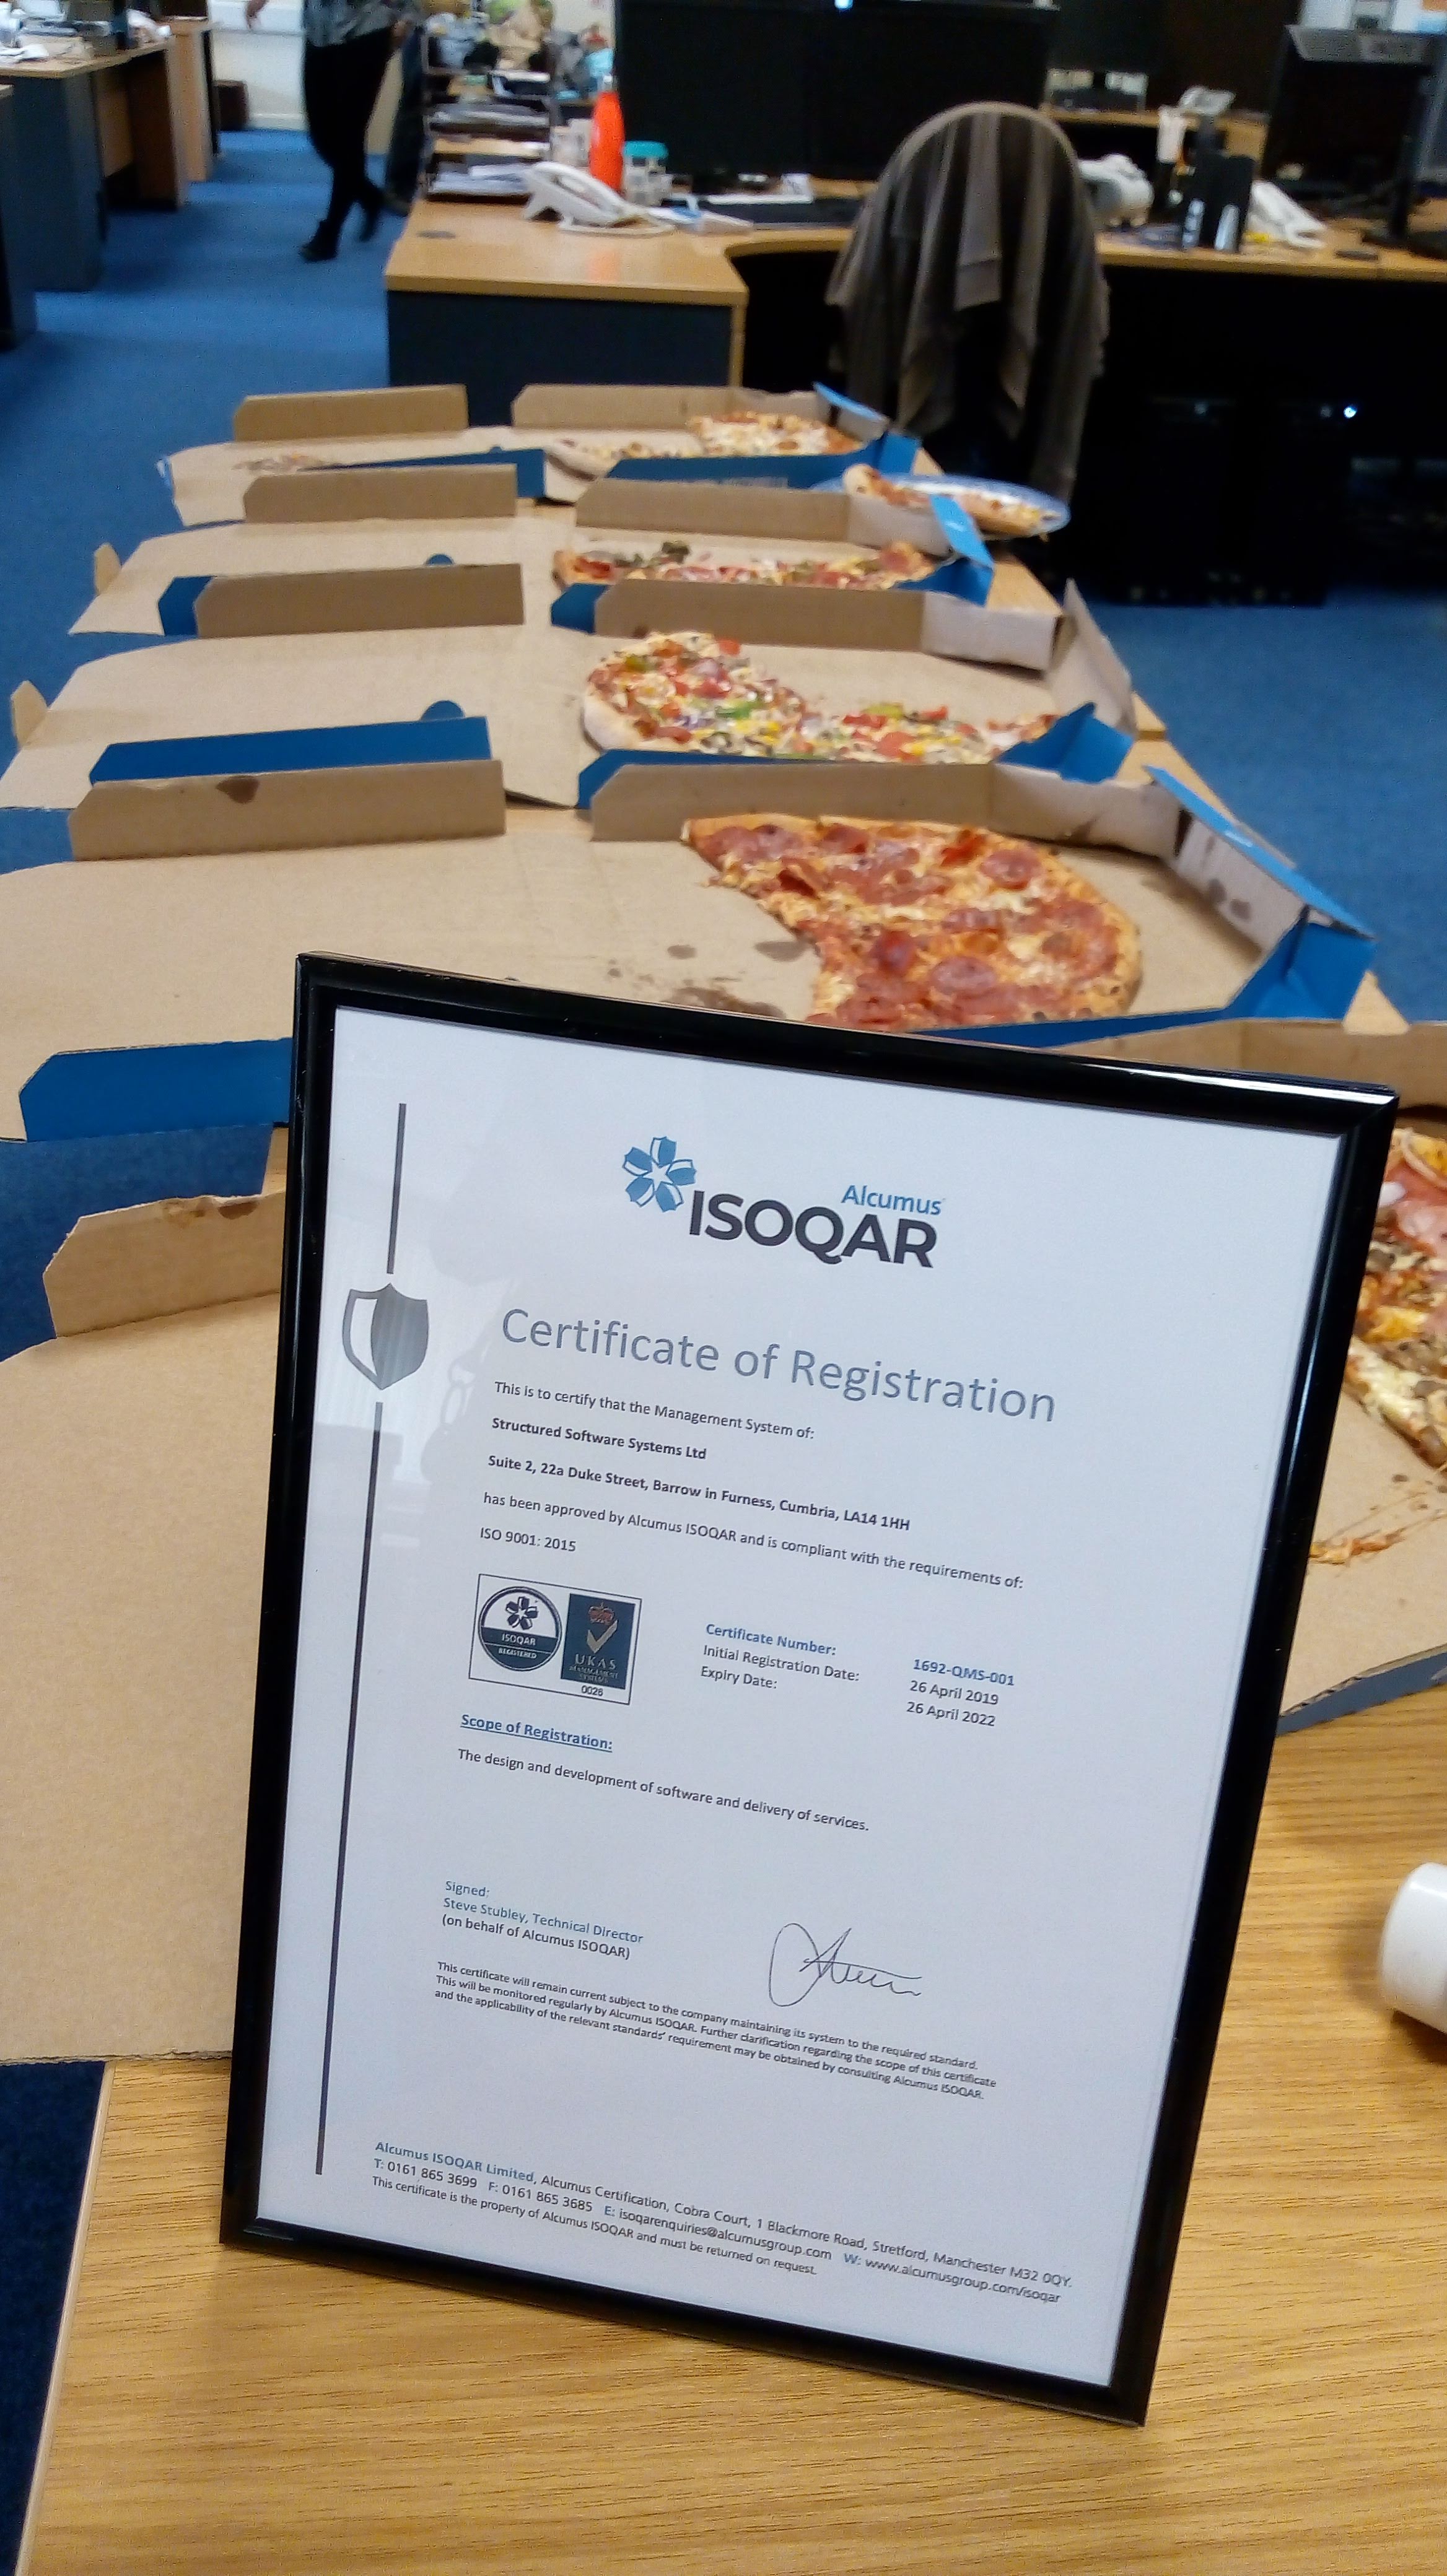
We were proud to announce our ISO 9001 :2015 certification last month. If you want to confirm our certification, enter our certificate number 16926 into the checker here.
The Cradle Application Programming Interface (API) is a set of routines that can be used to create applications that use the database and supporting features in 3SL’s Cradle Requirements Management and Systems and Software Engineering environment.
You can use the API to extend the facilities of your Cradle system, or to create a bridge between Cradle and another piece of software by connecting the APIs of Cradle and the other tool.
The Cradle API provides a full range of facilities, including:
Connection to, and disconnection from, a Cradle Database Server (CDS)
Login with a specified username, password and project code (or use LDAP authentication)
Access to the project schema of the project to which your application has logged-in
Reading items, cross references, and cross referenced information in the project’s database
Creating, deleting and update items and cross references in the project’s database
Updating items and cross references in the project’s database
Deleting items and cross references in the project’s database
If you would like any more further information regarding API please click here
Many of us use Microsoft Office to do our document-related work. There are now many versions of Office and many ways to get access to it. For example, you can buy, download and install it. Or, you can do this as part of a subscription service. You can also use simplified Office tools as pure web applications. Or you can use Office as a set of apps from the Microsoft Store. Cradle supports Office, but not the Office apps in the Microsoft Store.
Cradle’s Use of Office
Cradle uses Office tools in several ways:
Cradle’s Document Loader tool uses Word to split documents into items in the database
Cradle’s Document Publisher tool uses Word to assemble output documents from items in the database
Cradle has a plug-in for Excel. You can use this plug-in to load data from Excel into a Cradle database, either as new items or to merge into existing items
When you publish reports to HTML and CSV, you can view them in Excel
You can publish reports to RTF and view them in Word
Print your MBSE models’ diagrams directly to PowerPoint
You can link symbols in Visio diagrams to items in a Cradle database
Link a Work Breakdown Structure (WBS) in Cradle, bi-directionally, to the activities in a schedule in Project
Items in a Cradle database can contain rich textattributes that can be edited with Word
Items in a Cradle database can have attributes that can contain, or reference, any type of Office document
So your use of Cradle can be quite closely linked to Office. Hence it is a good idea to have a set of Office tools available when you use Cradle!
Supported Versions of Office
Cradle supports several versions of Office:
2007 (SP3, 32-bit)
2010 (SP2, 32-bit and 64-bit)
2013 (SP1, 32-bit and 64-bit)
2016 (32-bit and 64-bit)
You can install one of these versions of Office on your computer, either by buying it, or as part of an Office 365 subscription. Then, you install Cradle which will connect itself into Office to provide the facilities listed above.
Please do not install parts of different versions of Office. For example, do not install Project from Office 2016 with Office 2013 tools. If you do this, the Cradle installer will not install any of Cradle’s tools for Office.
Office 365
Office 365 is essentially a subscription service through which you can download the latest version of Office and install it onto one or more computers. So Office 365 produces the same result on your computer, you have an installation of Office. Hence Cradle supports Office 365.
UWP
The Universal Windows Platform (UWP) apps (previously called Windows Store apps and Metro-style apps) are apps that can be used across all compatible Microsoft Windows devices, including personal computers (PCs), tablets, smartphones, Xbox One, Microsoft HoloLens, and Internet of Things.
UWP apps are primarily purchased and downloaded via the Microsoft Store.
Microsoft Store
The Microsoft Store started as a means to distribute apps created for the Universal Windows Platform (UWP). Now, the Microsoft Store is the name for the consolidation of all of Microsoft’s previous distribution channels, including the Windows Marketplace, Windows Phone Store, Xbox Video, Xbox Music and the Xbox Games Store.
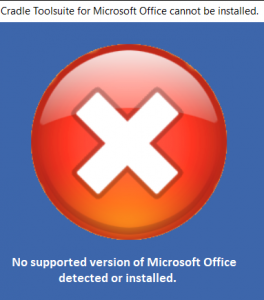
No supported Office version
Please note that Cradle does NOT support Office products downloaded from the Microsoft Store.
External Articles
Here are a couple of articles on the differences between Microsoft’s Desktop apps and Microsoft Store apps:
Chetwynde School gave us the opportunity to go on a week’s work experience 3rd to the 7th June. One such placement was at 3SL giving a chance for students to gain knowledge of work life and improve their skills in the field or area of work they would like to go into. Work experience is an opportunity for a change in environment, from classroom to work life.
Monday 3rd June
On Monday we started the task of going through the tutorial of Cradle which is 3SL’s product. Cradle software was something very different to what had been done in school. This also meant we had to learn something new. We also had read through an employee handbook, you would have to do this if you were a real employee.
Tuesday 4th June
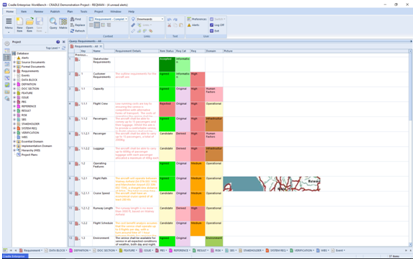
Tuesday’s tasks were to finish the tutorial (image below) but after finishing the tutorial we moved onto some task’s which required our knowledge of the software Cradle, of which we had to run some tests on. These tests are what the support team deals with.
Cradle
Wednesday 5th June
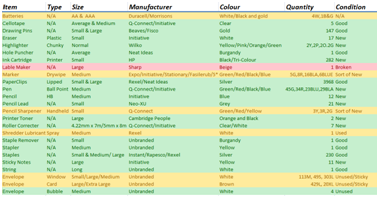
Wednesday consisted of the tasks of counting each individual stationary object and recording it. This task was difficult and had to sort it into the requirements e.g. colour. (Image below) This also took a reasonable amount of time, but we were able to get it done in the end.
Data Attribute Task
Thursday 6th June
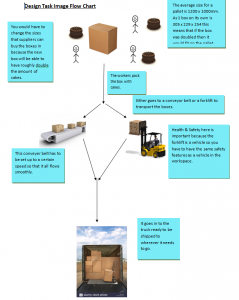
We had to make a CV and cover letter for a mock interview that we were going to have that afternoon. The interview had many different questions. Such as ‘How would you describe yourself’. We were also given a design task. This task made us think of a solution to a problem, and also the health and safety behind it.
Design Task
Friday 7th June
On Friday we had finished our data tasks. Also we had started a new task which was to create a blog or social media entry which was on behalf of the company. This is a good way to spread new information about the company so people are able to know what they offer.
Overall, it was a interesting experience and we would recommend it to anyone who wants to work in this field.
We are pleased to announce the release of Cradle-7.5!
This is available for download from the 3SL website.
3SL customers with active maintenance have been sent an e-mail notification, and details of which enhancement requests and bug reports are in it. You will be issued with a new security code free of charge.
Cradle 7.5
New Capabilities
Cradle-7.5 contains a range of new capabilities, some of the highlights are:
ReqIF support – Our current import and export functionality has been extended to support Requirements Interchange Format (ReqIF).
Web Service Interface – Support for Web Services.
ODBC support – In addition to the shipped ISAM Database, it is now possible to store your Cradle data in a different database via ODBC (Open Database Connectivity).
Matrices/Navigations – The contents tab of the Matrix Details dialog has been enhanced regarding navigations.
Queries – Regular expressions on frames has now been extended to support sequential testing.
Systems Modelling – Increased integration between models and non-model information in system notes/requirements.
You need a new Security Code for Cradle-7.5, as other Security Codes cannot be used.
Cradle clients (WorkBench, Web Access, Document Publisher for instance.) and server (Cradle CDS) versions can not be mixed. Therefore, you must upgrade all Cradle installations to 7.5.
However, because there are not fundamental changes to the data attributes there is no converter to run for a 7.4 to 7.5 upgrade. Full details are available in the release notes, and updated manuals in addition you can always contact support@threesl.com .
We hope that you will welcome the new capabilities in Cradle-7.5
It been great news for the Barrow HQ of 3SL (Structured Software Systems Limited) we’ve received our ISO9001:2015 certificate in the post.
We celebrated in true engineering style by ordering pizzas for everyone in the office, and reporting it in the May 2019 newsletter.
Will dealing with 3SL change?
For over 30 years we’ve been providing a great product and in depth support and training. This will not change, we will continue to serve you and your business as before.
Will the prices go up?
We believe Cradle has always been good value for money, we won’t be using our certification as an excuse to charge more.
Will contacting 3SL be a more lengthy process?
No, our quality systems are part of our daily operation. We may have tweaked the odd process, but we will still log and deal with your information and requests in the professional manner to which you are accustomed.
Does this mean that Cradle will change?
No the product will remain the same until the next update and the release of Cradle 7.5
Certificate Number 16926 ISO 9001:2015
So why did you apply for a certificate?
We asked Mark Walker our Managing Director, he replied “ISO9001 is an external recognition that the processes and quality at 3SL and its Cradle products are measurable, traceable and of a consistent standard. This will give our customers an added assurance that when they deal with 3SL they can do so with confidence in our software development and service delivery”
IADT
Quality assurance for the business is very closely related to the quality assurance of your products. We have covered, a number of times in various articles, the fact that we need to know what our goals are, measure where we currently are, and then ensure we head in the right direction. When we finally have a set of clear requirements, we need a way to measure whether what we have achieved meets the original stakeholders’ expectations. This is where requirement confirmation is employed.
Verification and Validation in the Systems Lifecycle
Inspection
Analysis
Demonstration
Test
Are methods by which we can measure our solutions and compare them with the original requirement. Read more in this article, The 4 Types of Requirement Confirmation
Social Media
Twitter
Sandia labs Spectrometer Tweet
Could your mobile phone camera detect rancid food? It’s an amazing possibility for a miniature spectrometer.
We shouted about a new review site in our tweet @AlternativeTo
We re-visited a discussion on whether a baseline is the end of the road or a stepping stone in Configuration Management.
…and Finally.
St George was a Dragon slayer, Dragons were slayed by George, If you’ve never seen a Dragon to-date……….. Can that be used as conclusive proof that he was a 100% effective solution??? Your thoughts on this and any other blog topics you would like to raise send to social-customer@threesl.com
With Easter upon us, its a time of renewal and new life. We love that just outside our offices we can see the signs of new leaves on the trees, beautifully planted Barrow Borough Council roundabouts and hanging baskets, and playful businesses selling their wares on the street.
For those of you used to reading the 3SL newsletter, you’ll see that there is a new broom sweeps clean, spring is the time to start afresh parable style link coming, so here goes….
Spring Leaves
“Spring, the cycle will goes on new shoots will grow from the old and the plant will expand. However, as any gardener knows, pruning an old herbaceous plant, will result in more vigorous new life.”
Here it comes…..
“Whilst you may have systems in place, that sprout an odd shoot, really vigorous process improvement will not occur on old gnarled wood.
Spring Fun
Look hard at your processes give them a good hard prune, and reap the rewards. As a gardener needs sharp secateurs, good software tools help you manage your business, design and implementation processes. #Cradle from 3SL”
Beta Testing
We’re implementing the last tweaks to Cradle 7.5. Thanks for those who provided feedback. Look out for ReqIF import, Cradle Web Services, and alternative database storage.
G Cloud
G-Cloud
We’re busy in the process of ensuring Cradle is available on the forthcoming G-Cloud 11
Social Media
Twitter
Skyways drone
We trust no one fell for the April Fool, but we did like the thought of superfast fibre installation!
We wondered if #Airbus’ Skyways drone could be a way to ensure the martini is delivered shaken and not stirred to our luxury yacht. (mmmmm, we’ll have to buy one of those first).
And we revisited our functional / non-functional requirements post.
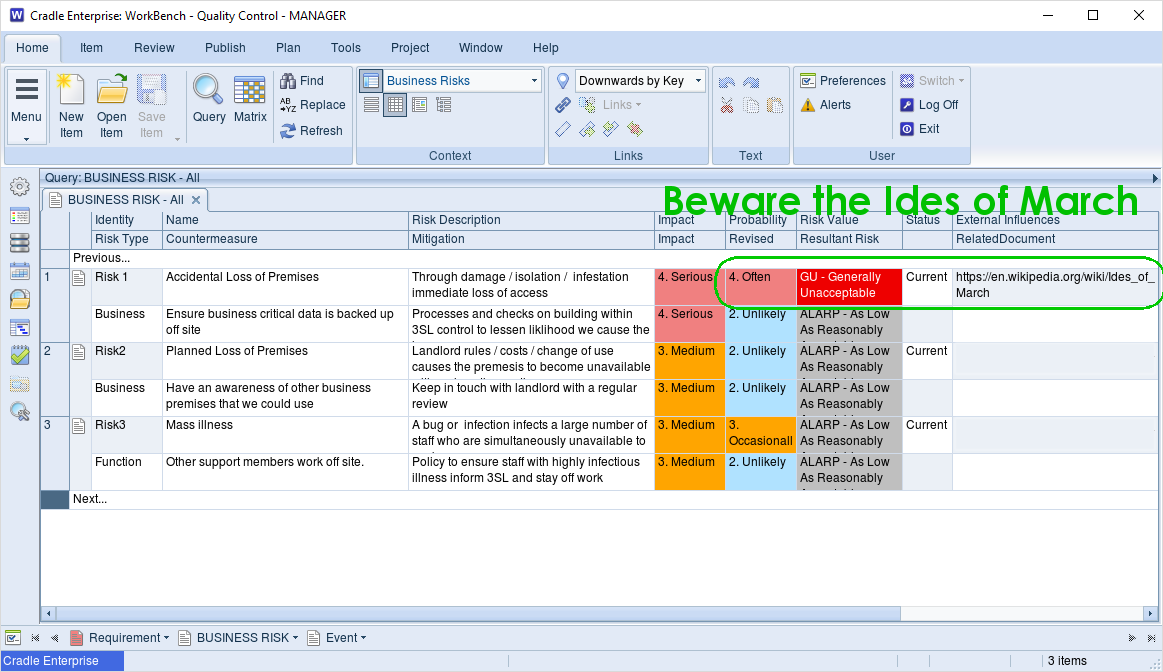
We made it through the Ides of March without any problems. However, it’s never good news if you leave your project to visions of a ‘Seer’. Whilst it would be nice to be able to have certainty over the outcome of a project, the truth is all we can do is be as prepared as we can and plan for those things we know. We also have to plan for the things that ‘might’ happen.
Risk
The things that we can’t predict for certainty are risks to the project or the business. Using a ‘Risk’ item type in Cradle is one way of recording the thoughts likelihood and severity of a risk. These risks could be cross-referenced to any of your project items. You could then add a ‘Mitigation’ item type and cross reference it to the risk. Add a few categories to hold risk re-evaluation dates and your more or less done. A query showing these linked items gives you a printable risk register.
Risk Register – “Beware the Ides of March”Risk Rule Set
With your choice of category values for the severity and likelihood and your choice of overall result, it is possible to set up a Cradle Ruleset to calculate the ‘result’ for your risk. We suggest you also add a further severity and likelihood column with values you perceive post mitigation in place. This will ensure you always believe the risk has been reduced following the application of your risk plan.
Beta Testing
Thank you to all the distributors and advanced customer currently testing the Cradle 7.5 software. Your feedback is greatly appreciated.
We were amazed at a direct brain injection method for drugs to possibly reverse Parkinson’s disease.
Don’t forget you can always @ include @threesl on any of your engineering tweets, and we may re-tweet them.
…and Finally.
Circus
Last month 3SL again donated to Circus Starr “The Circus with a Purpose” ‘A touring circus boasting world-class, professional artists from across the globe. It was first founded in 1987 and provides free seats for thousands of disadvantaged, disabled or vulnerable children, whilst helping to raise much needed funds for local charities.’
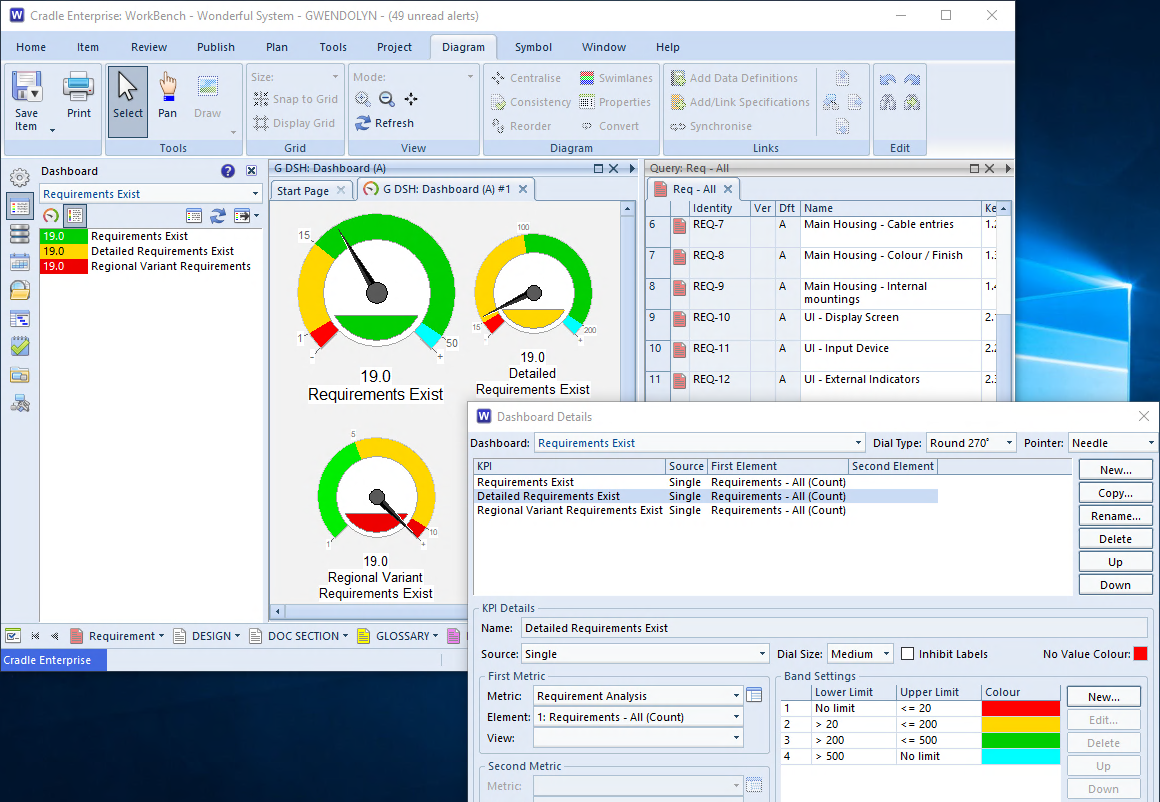
It’s a number cardinally one more than 18, and one less than 20. It is a prime number, which some may class as mysterious . It can be prefixed with twenty, to start a long count down, or denote ‘this’ year (’20’-’19’). Physics considers it one short of being magic in the sequence of nucleons in atomic shells (2, 8, 20, 50). In middle English nynetene derived from the concatenation of nigon + -tīene, but that does not make it magic. It was a political statement in a song by Paul Hardcastle, but it didn’t change the world. It can be represented as XIX, 0x13, 10011 or |||||||||||| |||| but that does not make it magic. In the local shepherd countingdialect Cumbric, a Brittonic Celtic language, it is Medder-a-Mimph (4 & 15), which may sound magical, but casts no spell. It is a rather dark grey html color:rgb(19, 19, 19)▉ . Overall, there appears to be little significance to the number 19.
Too Few or Too Many?
However, in terms of Requirements, it could be a magic number. It does depend on your view point.
19 A magic number?
Our example dashboard shows the same 19 Requirements could be considered Good, Insufficient or Over the top! If our example manufacturer is measuring the number of requirements for their Information Display Unit, they could conceivably be happy with anything over 15 top level user requirements. Nineteen in this case would be considered in the happy zone and for this project a magic number. However, if these were the internal system requirements, experience tells them anything less than 200 is a bit short on detail 19 is certainly not magic. If these are specific regional variations to the product anything more than 10 may mean this is a different product, is suffering requirements creep and not just a variant, a little too much magic.
Conclusion
It is important to know what you are measuring and why. You can’t just say a number of requirements is good, bad or insufficient, until you know the context. Setting the parameter limits correctly, for the data you are trying to capture and analyse, is as important as capturing the data itself.
Sometimes these values have to be based on gut feeling. It’s better if they can be based on experience and foundationally more sound if they can be based on measured past experience. So it’s important to remember, you could have a dashboard show you all green, and your project could still be in a rather brown mire.
We would like you to share your thoughts or experiences on choosing limits, or why nineteen is a magic number. We may include your comments in future updates, so please email social-customer@threesl.com