Does your company use different types of Microsoft® Word template for different types of document? Did you know that you can use those company templates inside Document Publisher?
Document Publisher has different locations you can save the files to but it can also open files from outside these locations as well. These files will then be shown as ‘local’ and can then be edited in Document Publisher. Once you are happy with the company template it can be saved to any one of the locations the user has access to within Cradle.
Loading an External Template
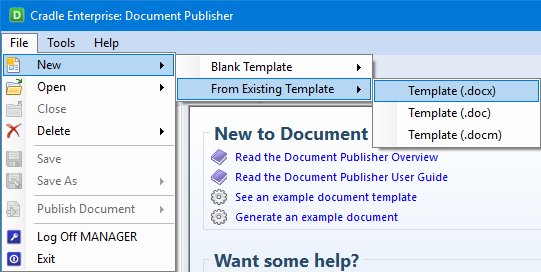
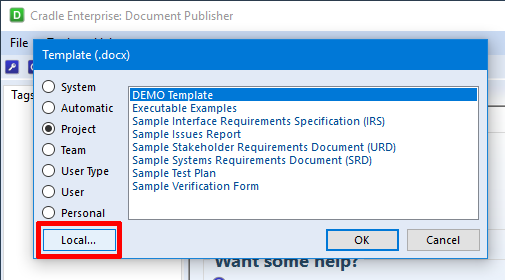
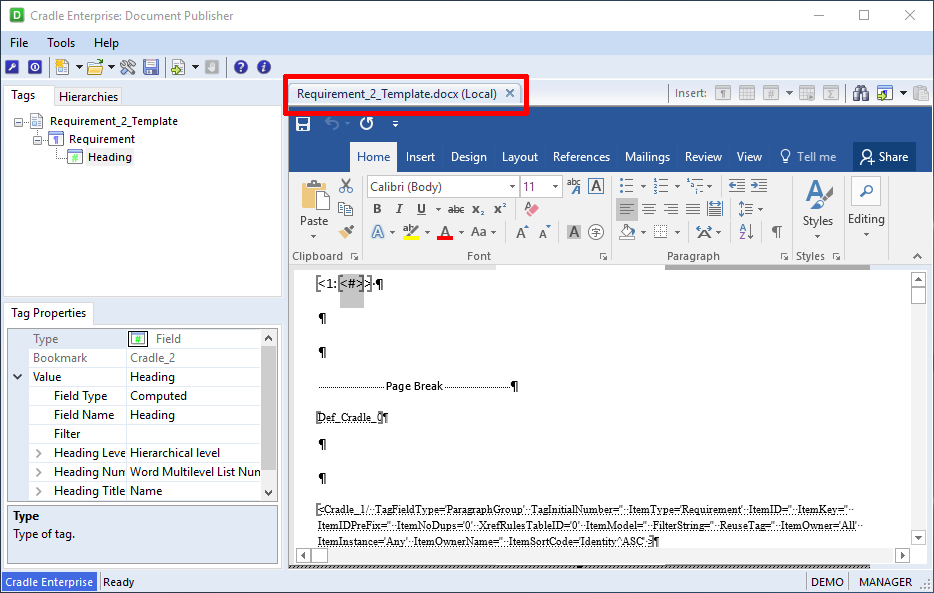
Select the File menu and then New, then From Existing Template and select the template type the user wishes to open. Once the Template dialog opens, click the Local... button.
Opening New From Existing TemplateDocument Publisher Open Template dialog
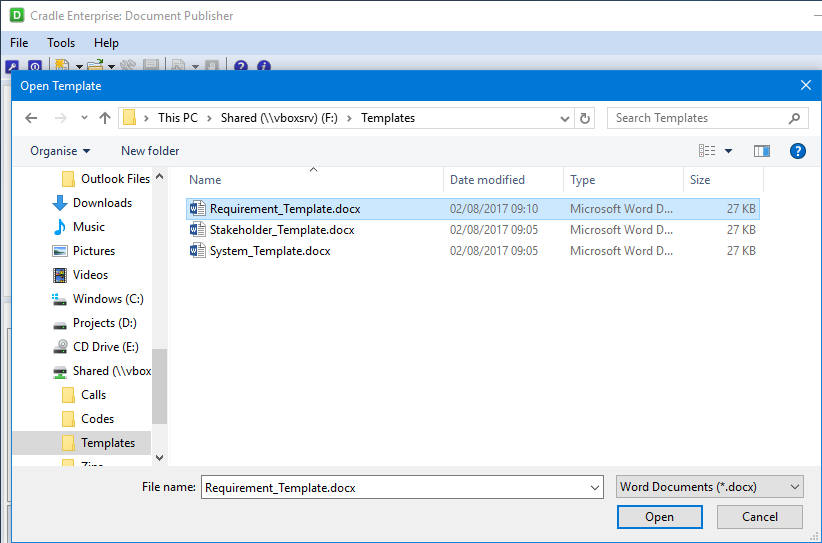
This will then open explorer in which the user can then locate and open the file they require.
Explorer through Document Publisher
This will then open the file named as NewTemplate and not as the name of the file you have opened from. Once you have added at least one tag, Document Publisher will allow you to save the template.
Saving a File
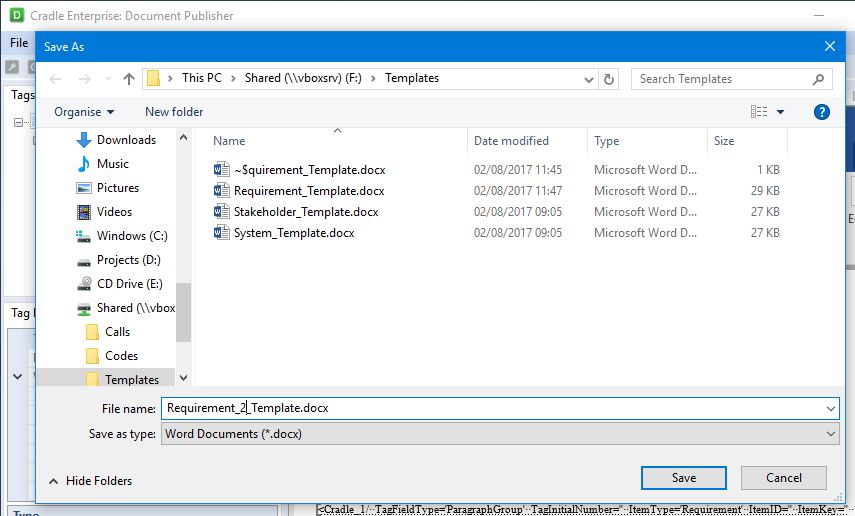
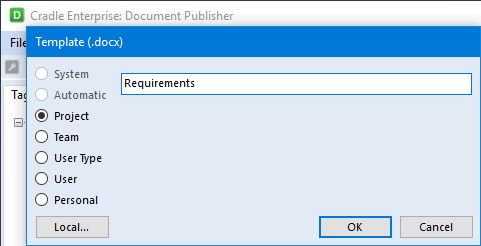
The first is to select the File menu and Save, then the Template dialog opens, the user can either save it to one of the locations they can access or as below, select the Local… button and rename and save it through Explorer.
Saving templates through Explorer for Document Publisher
This will then save the file to that location and show in Document Publisher as (Local).
Showing the file is saved as Local and not in a Cradle Location.
This file when finished can then be saved into a Cradle location e.g. Project so it can then be published through WorkBench. To do this the user will click the File menu and then Save and when the Template dialog opens, select the Location the user requires and change the name they want the file to have.
Saving in the Project location and new name for the file.
This will now show it is saved in the project location. This can be done to any location the user has access to.
Template is now saved in the Project Location
To see how to Publish through WorkBench, click here
In the rare occasion that something has gone terribly wrong with you database, here are some things that you may find helpful:
Retrieving Licence Statistics
If you are finding that you are running out of licenses or you just want to have an overview of license usage over a period of time you can use c_usage which can be run to output the information from Cradle into an excel file. You then copy this date from the excel file into a spreadsheet we supply called c_usage.xls which once the data has been pasted into the spreadsheet will then update it’s other worksheets which will display the corresponding information in graphs.
All components of the Cradle software distribution include crash resistance such that, in the event of an internal error occurring within the software component, internal recovery action is taken, and the software component remains running.
In all cases, the recovery action includes adding an entry to an error log file that provides a complete description of the internal environment of the software component when the problem arose.
This log could potentially become quite large over time and you may only want retrieve one or more entries from this log, c_errlog can be used to retrieve one or more entries from the error log files produced by Cradle.
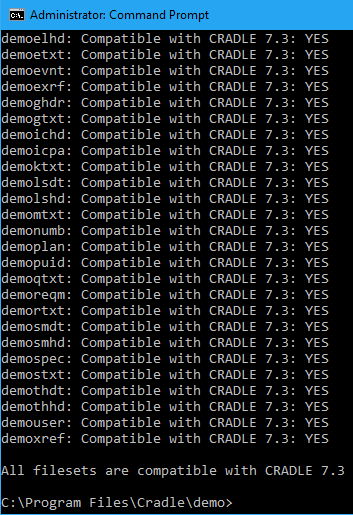
Check the version of your database files The c_pdbver utility allows you to determine the version of your database files, it check the filesets are compatible with a version number you specify and confirms whether or not each fileset is in the specified version.
If you have had a machine crash or hardware failure when Cradle was writing to the database files you may want to check and repair the database file to ensure you don’t see any further corruption to your database. We supply a utility for this called dcheck that checks and repairs damage to the ISAM files within a Cradle PDB.
Quite often you may find that the server machine you install the CDS and CWS on may not have a graphic user interface, in this case you can manage your Cradle server via a command line
How to Install a Security Code
The c_config command allows you to update a Cradle Security Code
Format
c_config -i code
Example
c-config -i BWEr-DSWe...
How to Start/Stop/Restart the Cradle Database Servers
The c_start command allows you to start, stop, restart or test the Cradle Database Server (CDS) and/or Cradle Web Server (CWS).
Will create a project with a project code of TEST, a title of Test Project in the /home/apps/temp/projects location with a PID of TEST01 using the empty schema.
c_prj.exe -delete -code TEST -password MANAGER PASSWORD -method all
Will delete the TEST project along with the registry entry, database files and directories.
A user can export a single item’s text or binary frame and place it in a file using getframe. A batch file is great for this as a user can use copy and paste the same command line numerous times, replacing the identity for each line. Then when run, all the frames will be quickly exported.
The start of this command line is the same as for all main options, using the path and login details.
The -getframe options are as follows:
The options for getframe in c_io.exe
-getframe option sets the frame name to be output for the first item that matches the query or identity (if used).
-file sets the name and location of the file to be output
-query option sets the query to be used
-qloc sets the location of the -query option
-identity over rides any set within the used query
There are a couple of options that are not used in a batch file. The reason is that they are only useful in a command line, in a command prompt as they show pop ups with information on them.
-ver lets the user see what the version number, date and time of the build they are using. -help option allows a user to see the command line options.
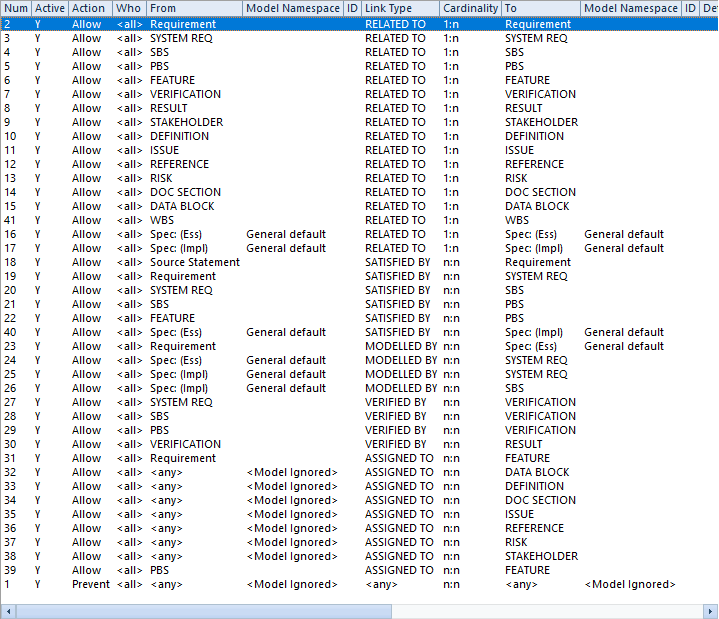
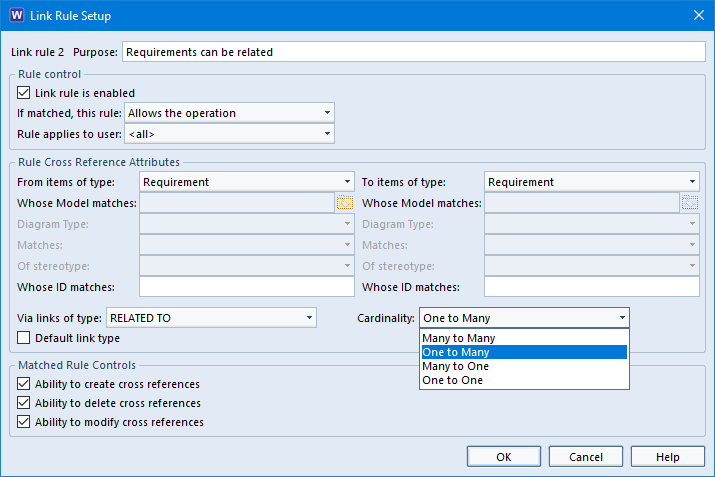
In the latest release of Cradle using Cardinality in a cross reference has been introduced. This extends the capability of controlling cross references to the point of how many relationships an item can have.
The Many-to-Many Relationship
This is the default option for a rule when it is first set. This is also the default option when a rule is imported from an older version which does not have this option. This cardinality relationship is applied to:
Most of the link rules in the as-supplied Cradle demonstration databases DEMO and SYSM
Most of the link rules in the as-supplied default schema and quick-start
Showing One to Many and Many to Many Cardinalities
The One-to-Many Relationship
This cardinality is used for parent-child relationships between items of the same type. Furthermore this option is applied to:
Parent-child link rules in the as-supplied Cradle demonstration databases DEMO and SYSM
Parent-child link rules in the as-supplied default schema default and quick-start
The Many-to-One Relationship
This option will allow many items linked down to a single item. Many users can be assinged to one Requirement.
The One-to-One relationship
This is mainly for links like a single result file to a single test file.
Showing the Cardinality option within the Link Rule Setup
The new cardinality option is for all item types which includes all the modelling types as well.
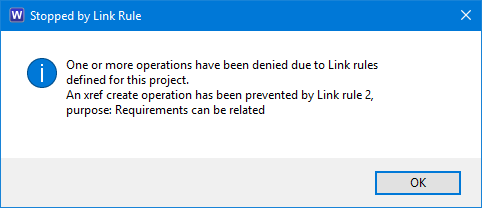
Hence if a user tries to set linked items which are against the rule they will see an error which will deny the links and the links will not be created.
Error Message
Restrictions on use
Finally there are restrictions in how this option is accessed. For instance a Link Group cannot be used in conjunction with the Cardinality. Also the options to create or modify cross references must be checked or the Cardinality option will be disabled.
For information on getting started in Link Rules click here
Wow what a busy month July has been here at 3SL. The last weeks before a release are always complex. So many things to do checking off the release checklist.
Cradle 7.3 is Here
Cradle 7.3
Cradle 7.3
3SL are pleased to announce the new features of Cradle 7.3
Cross reference cardinalities in link rules – One to Many, Many to Many, or Many to One, you decide.
Categories – Control read-write access by a user’s skills.
Frames – Those containing a category picklist can have a default value.
Frames – Colour usage defaults for picklist frames.
Frames – Extend Find/Replace to also work with RTF frames.
Dashboard dials – Support for a ‘Line’ pointer style added.
Metrics – Support for element calculations.
InstallShield – Improved and simplified
Configuration Management – Submission of related items, and integrity checks for baselines
Items – Deleting/recovering items will record in the modification date.
Items – Set owner can including related items.
Cradle URL – Support to optionally specify a view.
Views -New Generic Configuration Management system view.
Social Media
Twitter
Welcome new followers. The Lake District became a UNESCO World Heritage Site which caused quite a bit of chatter on Twitter
View of the Lake District from Barrow
Hints of the Month
Need to create a default schema for your new projects? This article New Default Schema tells you how.
Got one of those oops moments or changes of mind? Reverse or rewind the item’s changes.
Let’s chat about this requirement/feature/risk. Why not add a discussion?
If you have lots of projects you need to keep logging in and out of, let Project Manager take the strain.
We are pleased to announce the latest Cradle release!
3SL customers with active maintenance have been sent an e-mail notification of this release, and details of which enhancement requests and bug reports are in it.
Cradle 7.3
New Capabilities
This release contains a range of new capabilities that are described in its release notes: https://www.threesl.com/downloads/download.php?version=v7.3§ion=software&filename=rm00777-V73ReleaseNotes.pdf
Some of the highlights are:
Metrics – Calculations on metric results
Configuration Management – Related item submissions
Categories – Skill based control
Link rules – Cardinality control
Item Ownership – Set item ownership of item’s related items
You need a new Security Code for 7.3, other Security Codes cannot be used. There is a database conversion from 7.2 to 7.3. The converter will run automatically if you install Cradle-7.3 over the top of, in the same directory as, the earlier version of Cradle from which you are upgrading.
You must upgrade all Cradle installations to 7.3. Cradle-7.2 clients cannot connect to a 7.3 server, and a 7.3 server cannot serve Cradle-7.2 clients.
We hope that you will welcome the new capabilities in this new version!
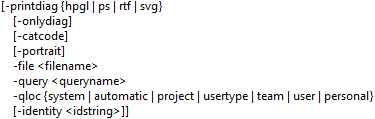
Printing many individual diagrams through WorkBench can be slow and time consuming. Using the option -printdiag in c_io.exe, a user can then print many diagrams at once. Once the first command line has been set up, it can be copied, pasted. The file name and the identity can be altered for each diagram that the user requires printing.
The options to do this are:
The printdiag options in c_io.exe
Required Options
-printdiag allows a user to set the type of output for the diagram. The types currently used for this are:
hpgl – Hewlett-Packard Graphics Language
ps – PostScript
rtf – Rich Text Format
svg – Scalable Vector Graphics
Elective Options
-onlydiag will output the diagram without a surrounding frame and the details which the frame contains.
-catcode will print the category value in the diagrams border.
-portrait will cause the diagrams to be output into a portrait orientation rather than the default of landscape. This option is only used in conjunction with -printdiag, it will not work with any other c_io.exe options.
-file sets the name and location of the file to be output.
-query set the query to being used and as before -qloc sets the location
-identity overrides any identity set within the used query
There are a couple of options that are not used in a batch file. The reason is that they are only useful in a command line, in a command prompt as they show pop ups with information on them.
-ver lets the user see what the version number, date and time of the build they are using. -help option allows a user to see the command line options.
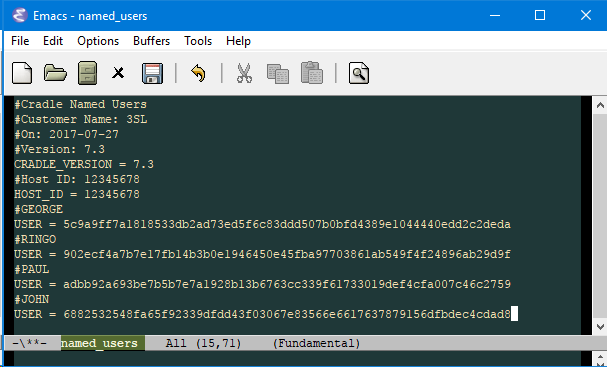
Named user licences are a simple way of working in a small team. Cradle’s variants support single user,named user and enterprise editions. Additionally there are facilities for SaaS and subscription options. A single user licence is just what it says, it is for one person on one machine. When there are multiple users of a system, it is usual for the server to reside on one machine and the clients on user’s desktops. In a full enterprise version you can install as many clients as you need and simultaneously use the number of clients purchased in your licence.
Named user licensing is a way of having a team of engineers, working on a project, but (now don’t tell our boss this, but tell yours) at a lower cost.
The restriction being that each of the users is named and locked to the licence. So whilst you could install numerous clients only those login names would be allowed to connect to the server.
We realise that staff can change, and with each maintenance renewal you can make any changes you like. If you purchase extra licences you can also change the users for free. 3SL reserve the right to charge for more frequent alterations.
It’s all in a file (and the security code)
The named users are contained in a file. If you have system level access to the Cradle installation all you need to do is drop the new file in. If you change the number of users you would also have to configure a new security code.
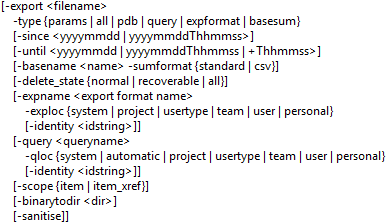
Exporting either a whole project or just a query can take a long time if the database is huge. The quickest and easiest way to do this is use c_io.exe in a batch file during down time e.g. night
The options available are:
Export Options for c_io.exe
Required Export Options
So the first option is, of course, the export option that needs the user to specify a location and a name for the exporting file:
-export “C:\Temp\export1.exp”
The Type Options
The -type option is required for the export option and allows users to define the type of export they require:
params will export only this projects parameters (Project Schema) all will export all items and definition files the user has access to pdb will export all items the user has access to but not definition files query export items matching a named query.
Options used with query
-query will specify the query to be used. This is required if the type is set to query -qloc will specify the location of the query. This is required if the -query option is used.
expformat is for exporting all files set in a saved format.
Options used with expformat
-expname is the Export Formats name. -exploc is used in conjunction with -expname to state the location of the export format -identity can be used with -expname and will override the Identity set in a query.
Export UI IdentityQuery UI Identity
basesum requires the user to use -basename with the Baseline Name and -sumformat which allows the user to specify how the data is output either as CSV or standard (Note: the user must have the PROJECT_RO privilege for this option)
Options used with basesum
-basename needs to have a Baseline name currently either open or closed. – sumformat allows the user to state they format -basesum is output as CSV or standard.
The standard output is <BASEHIST> records in the normal format:
The CSV output will set the fields from left to right and output the items below this line:
Elective Export Options
Other export options are not required but can be used with –type all and -type pdb: – since can be used to state a date or date and time since which items were created or modified. The format for this is yyyymmdd or yyyymmddThhmmss so 20170119 (19/01/2017). For example 20170119T183030 (19/01/2017 18:30:30)
-until will only export items that have been modified up to a certain date or date and time or a time after the -since was set. The format for this is the same as -since.
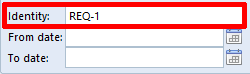
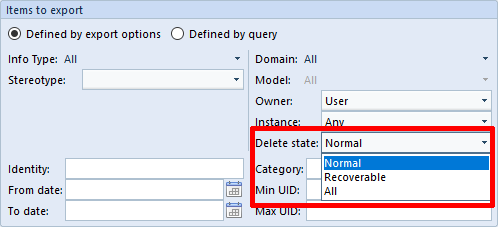
-delete_state allows the user to specify if they want the items being exported to be (Same as in the Export UI):
normal – Not marked as delete recoverable – Items marked as deleted but can be recovered all – All items not matter what they are marked as will be exportedThe Delete state in the Export UI in WorkBench.
-scope controls how an item is output either on its own or with all the items cross referencs. Using item will make sure only the item on its own is output. Using item_xref will output the item and any items cross referenced to it.
-binarytodir sets a folder for the binary data. So a user would use -binary “C:\Temp\binary” and all binary data would be output to unique files and the path to this file would be output in the export file next to the binary frame:
-sanitise will output items but without any binary frames. It will also change all text including item names, comments descriptions, text frames, change history, diagram symbols, discussions and user defined cross reference attributes.
A few of the options not used in a batch file but are in a command prompt. These are pop ups with information on them which why they are not in a batch file.
-verbose lets the user know that c_io.exe has finished -ver lets the user see what the version number, date and time of the build they are using. -help is used to see all the command line options.