How to Delete Source/Formal Documents

Deleting Source Document Versions

Source document versions can be deleted from the Project sidebar, the same way as regular items. When you delete a source document version, all cross references (source statements) to the captured items are also deleted. Previous versions of the source document and their cross references (source statements) are NOT removed.

Dialog shown when deleting source document versions
Delete Items Dialog

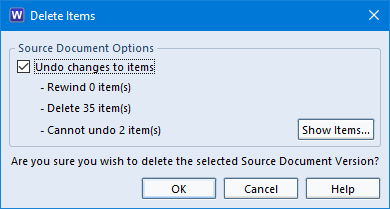
WorkBench only shows the most recent version of a source document. So for example, if you were to delete version 4 of a source document, then version 3 will now be the latest version and will be shown in the Project sidebar.

If you delete version 1 of a source document, then the source document is unregistered and deleted from the PDB altogether.

For further information on how to delete source document versions please click here.

Deleting Formal Documents

Deleting formal documents is similar to deleting standard Cradle items.

When a version of a formal document is deleted, Cradle will:

  • Delete the Word document stored inside the formal document
  • Remove the formal document
  • Delete the records that associate specific item instances with that version of that formal document

For further information on how to delete formal documents read the Cradle help.

Calculations in Cradle

Calculations

It’s possible to calculate values for display, query upon or to set a category within a Cradle item. Calculations can perform basic addition, subtraction, multiplication and division.

Setup

  • Open Project Setup and navigate to the Item Definitions section.
  • Ensure you have categories set up to contain any inputs you require. In this example Width and Length of type Real have been added and also an additional category of Area also of type Real.
  • Select the Item Types tab
  • Add these categories to your item type, here it is to the Bedroom item
  • Choose Calculations and add a New one, here called Floor Area
  • Create the calculation, in this case multiplying [@CAT:Length] * [@CAT:Width] and set the output type to Real.
  • Optionally set a category with the resultant value, in the example this is Area
  • Save the schema and return to the main interface.

Run

  • Edit the item to include values for the categories that are inputs to the calculation.
  • Save the item and the calculation will be updated and in this case also set the associated category.
Related Articles

Rule Sets can be used to set values based on categories and calculations where the value is based on logic matching rather than on simply the mathematical result.

A quick way to see calculation values without changing the View or Form

How to Delete Items

How to Delete Items from your Project

When deleting items you are presented with options that relate to the scope of the operation. The scope determines whether just a single item is deleted, or an item together with its supporting definitions, or an item and the hierarchy of items linked to it by cross references.

Available scopes when deleting items
Delete Items dialog
Delete button on the item menu
Delete

You can delete any number of items at the same time (in WorkBench, items can be deleted one at a time through Web Access). You must have read-write access to an item to be able to delete it is available through the context menu (right-click) or on the Item menu.

When you delete the last instance of an item, that is, if there are no more versions or drafts of the item after it has been deleted, and the item isn’t in a recoverable state, Cradle then automatically removes all cross references to and from the item. This ensures that there are never any dangling cross references in the database, that is cross references to or from items that do not exist.

The Delete operation has the same scope option as the Copy operation, with the same possible values and meanings. These are:

  • Item – delete the item only
  • With Definitions – delete the item and it’s definitions
  • Hierarchy – delete the item and it’s hierarchy

Please note the DELETE_ITEM privilege is required to delete items in the database.

If you are worried about a user being able to delete an item, it is possible to restict this user from this privilege, this is done via the “User Setup Privileges and Rights”

Cradle Help covers more on the steps on how to delete your items .

Configuration Management

It is usual to delete items when they are in a draft state. This is where the item is still in a fluid state and alterations are occurring frequently. When applying formal control (Configuration Management*) to a project, it’s normal to superseded or retire items when they are updated or no longer required. This maintains the full traceability through the project’s development. An overview of this formal control is detailed in the Cradle Help.

*Available in Cradle Enterprise

Related Articles

There is a recoverable facility which allows you to recover deleted items:

https://www.threesl.com/blog/how-to-recover-deleted-items/

Article Updated 04/02/2019 – Included how to stop users deleting items

How to Recover Deleted Items

Recovering Deleted Items

The recoverable status means that when you delete items, they are not removed from the database, but is placed into a recoverable state from where you can restore the item if you need to. The ability to recover deleted items in this way is similar to the Trash folder you may find on a mail program or Bin on an operating system home screen. When an item is restored all cross references to/from the item are also restored.

To set the recoverable option you need to set the Enable recovery of deleted items option within the Miscellaneous section in Project Setup:

Project Setup dialog showing settings to recover deleted items
Project Setup dialog

You will notice when you select this option the Deleting/recovering items …. option becomes enabled. This controls whether deleting a draft item (making it recoverable) should also modify the item’s last modifier/last modified date/time attributes. If set, this also affects those attributes when recovering an item, i.e. the date/time will reflect when the item was recovered.

Full Deletion

To really delete items from the database you can either:

  1. View the recoverable items and delete them, or
  2. Overwrite with a new item with the same identity as an item that is recoverable (you will receive a warning message so that you do not do this unintentionally)

You can view the recoverable items by using the Delete State element in queries:

Delete states available within queries
Query Details Dialog

Tip: You can stop users from deleting items by disabling the delete item privilege in user setup. We feel that deleting an item is more of a project admin task and not for general users.

Viewing Deletions

As you can see there are three values:

  • Normal (the default) – selects items that are not recoverable
  • Recoverable – selects items that are recoverable, that is, the items that have been deleted and which can be restored
  • All – selects items irrespective of their recoverable status

Read the Cradle Help for information on how to recover deleted items.

When items are deleted (i.e. placed into a recoverable state) and change history is enabled for that item type, a comment of Item deleted is added to the change history of the recoverable item. Also, if the item is recovered a comment of Item recovered is added to the change history.

Article updated 05/12/2018 – Added tip

How do I change an item’s owner?

Did you know you can change the owner of an item?

Changing an item’s owner is really easy.  Simply select the item you want to reassign to  different owner and from the context menu (right click) select -> More -> Set Owner…   The following dialog will then open:

.
Set New Owner

There are obviously some restrictions, you can’t set the owner to PROJECT and bypass configuration management, you need the right privileges within your team. This is explained in the Cradle help

You can also Set Owner Including Related Items, by navigating to the same place as Set Owner and the option below that one is for Related Items.

If you would like further information regarding Owner of an Item click here.

Creating a RTF Frame

Displaying and Editing RTF Inside Cradle

This blog will help explain what RTF frames are and how they are used within Cradle.

Rich Text Format can be used to enhance the data shown in Cradle. This is displayed in a Rich Text Frame. Whether this is to allow BOLD, Underline or a different Font. Generally requirements and specifications should be broken down into atomic components. The ‘detail’ should be expressed in a short and concise  statement or paragraph. However, higher level requirement or tables are often useful and in these cases the emphasis / layout provided by RTF is desired.

demonstration of RTF in Cradle
RTF Frame Display

To create the RTF Frame, open WorkBench and navigate to Project Setup. Inside Project Setup from the Options dropdown menu select “Item Definitions” and open the tab Frame Types.

In most cases using the shipped schemas, you’ll see a frame of type RTF, however, the steps to create a frame are: Select New… this will open the “New Frame Type”  dialog in which you can give your frame any name, for this I have named mine the “Blog RTF“, You will now see the Frame you have created in the list, select Edit… in this dialog you now have several settings, the “Base Type” will allow you to change the Frame Type, you will want to change this to “RTF“. Other options are available such as being able to restrict the RTF Frame by choosing a Required Skill, provided that you have a set of predefined skills in your project schema.

Now to assign this frame to an Item Type, first you will want to open “Item Types“. Select your item of choice, for this I have selected System Note – Feature. Select “Frames…” and give this a sensible name such as “RTF“.

Frame Setup dialog showing RTF frame assigned to FEATURE item type
RTF assigned to FEATURE

For more information regarding Frames select here

Article Updated 04/02/2019 – Added intro

How do I see multiple queries at the same time?

Run and Display Multiple Queries Simultaneously

In Cradle it is very simple to see multiple queries!

First of all run your selected Query and this will open in a pane as usual such as shown below:

Query feature
Pane 1 – Query Feature

Now in the Top Right of the Pane you will see a little Arrow pointing right, if you select this you will be able to “Split Top/Bottom” or Split Left/Right” Creating a new pane. In that pane right click and you will have the option to “New Query…” This can be done multiple times. Showing multiple queries in views, multiple items in forms or multiple diagrams As you can see by my example below I have 3 Queries open all with different views and styles.

WorkBench showing multiple queries
Multiple Queries

For further information on Multiple Queries click here

Do I have to retype my password if I have many projects?

Using Project Manager with Multiple Projects and Passwords

In an environment where you have numerous projects that you switch between, using Project Manager to Login can save retyping your Cradle password.

If you have many projects that you need to switch between and don’t have a limitless desktop to open multiple copies of Cradle or don’t want to lock multiple licences, use Project Manager to look after switching.

Once you Login  to a project through Project Manager your Cradle password is cached for that session. You can then access the project through WorkBench, Web Access, or the Toolsuite applications; Document Loader, Document Publisher or Spell Checker. When you exit a tool, you can open another project through Project Manager as you work through your day. When  you need to re-enter any previous projects, you’ll only need to use the Open command as your login details will be cached.

If you need to clear the cache (for security reasons) then simply use the Clear User Cache option. Alternatively close Project Manager.

Using Project Manager to login
Project Manager Login

LDAP Lightweight Directory Access Protocol

For an alternative way to manage your logins and passwords, see Cradle help LDAP Authentication.

Switch User

Another option to change to a different user is to use the “Switch Identity” option, this can be enabled in the “User Setup” A User Profile’s switch identity can only be set if you have read-write access to the User Profile. If you have no access to a User Profile, you cannot see any part of it, including the switch identity. If you have read-only access to a User Profile, the switch identity is disguised in the same manner as the User Profile’s password.

Article Updated 04/02/2019 – Added swith user

Initial Expansions in Project Sidebar

Sidebar Expansion

The project sidebar offers a ‘raw’ view of the data stored in the Cradle Database. When first opened a list of item types is displayed. If there is a [+] indicator, then you can expect to expand the tree to lower levels.

In the example below Reference item type has been set up with an auto numbered ID and the Key being the  hierarchical attribute. A rule has been defined to allow the items to be linked to items of the same type with the “RELATED TO” link type.

  • All (All Items) This will show all the items of that type (subject to the user preference limits) when the node is expanded. Other than in very sparse databases this is not usually that a user wants to show.
  • Top (Top Level Items) This is more akin to looking at the level1 headings in a document. These are the items you have designated as having the most significance. They have no links down to them links. In the example you’ll see that item REF-4 (3.1) may appear to be a sub level item, but it has not been linked to a parent.
  • Bottom (Bottom Level Items) These are the leaves of the tree, the items that have no further downward links to children.
  • Disconnected (Not Linked to Anything) These items have no parents or children,  REF-6 (3.1.2) is shown here. This indicated an item that has been unlinked or its parents have been removed and either needs re-linking or reordering below a new parent.
Expansions of the main Project tree
Tree Levels

The last Disconnected  (Not Linked to Other Item Types) option in the menu looks at item of different types when deciding to list the item or not.

Reverse and Rewind Item Edits

What is Reverse and Rewind?

You can rewind edit histories so you can restore an item back to a state before a particular change or you can reverse a single edit in an item’s change history. This doesnt mean the feature will delete a previous change that has been made but it does mean it will add a further entry returning the the value to a previous state.

Reverse and Rewind edit history dialog
Reverse/Rewind edit histories

Reverse

Reversing an edit is an exact undo operation. It reverses the change to every attribute that was modified by the selected edit. Note that creation/deletions of xrefs cant be reversed.

For further information on reversing an edit please refer to the Reverse

Change History section of our online help.

Rewind

The Rewind operation essentially reverses all edits working backwards from the most recent back to (and including) the selected edit. Its end result is to restore the item to the state that it was in before the selected edit occurred.

For further information on rewinding edit histories please refer to the Rewind Change History section of our online help.

Results

Further Change History will be generated to show what changes were either reversed or rewound. The example below has seven change history entries. For simplicity each only modified one attribute of the item. Selecting the third entry and then either reverse or rewind will produce the two illustrated results.

Showing the different results for reversing or rewinding
Reverse or Rewind

We hope we have covered all the information that is needed to help you on your way to understanding reverse/rewind. Any more help can be found on our help page.

Article Updated 04/02/2019 –  Updated to say data will not be lost just changed to a state they were previously