WorkBench is Cradle’s primary systems engineering tool interface that allows users to customise exactly what he needs to view and manipulate in the database in the format he wishes to output it.
Did you know you can perform basic summary metric calculations without having a metric licence in Cradle?
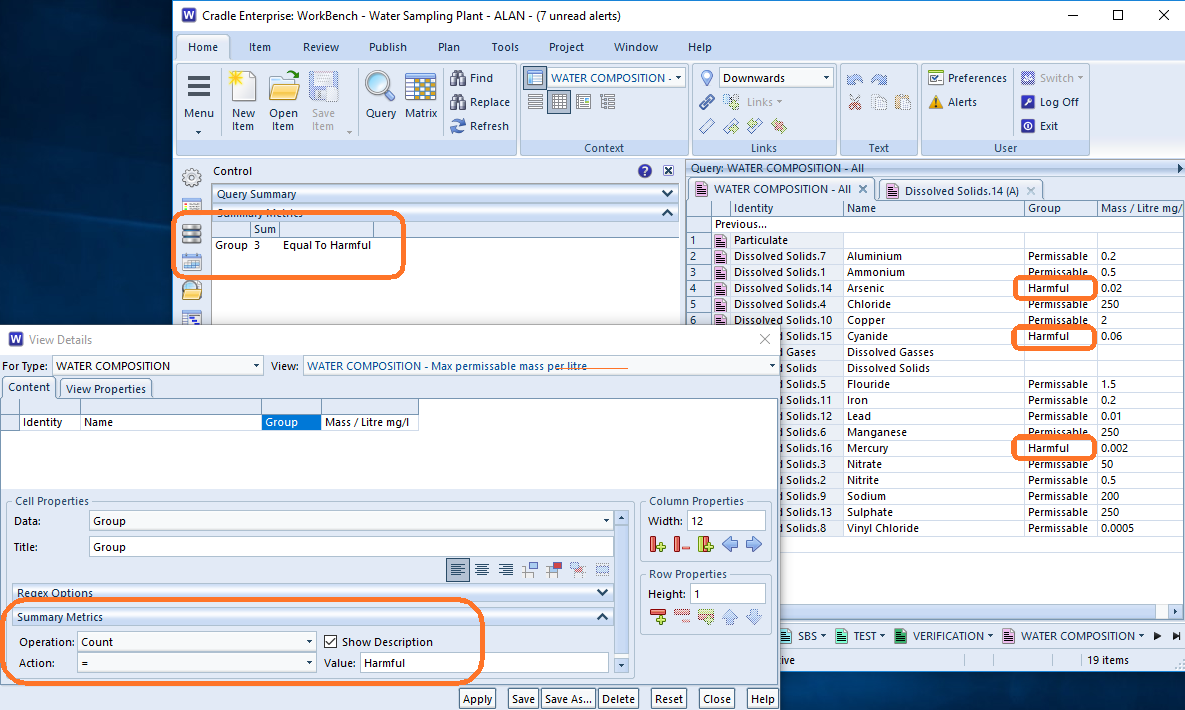
View Summary Metric
We all run queries to produce lists of data that match certain criteria.
In the example shown it would be possible to run the query to return only water constituents with the Group set to Harmful. Whilst this would produce useful results, it may be more important that other items are showing too, so they can be seen in context. By setting a View Summary MetricOperation of count and Action of = with a Valueof ‘Harmful’ it is possible to see a simple count of the constituents grouped as ‘Harmful’ in the sidebar.
Read our help for more information about simple Summary Metrics.
The Quick Access Bar (QAB) is intended to provide quick and easy access to all of the types of information in your Cradle database that are relevant to you. It provides easy access to the Automatic scope queries for all item types as a scrollable list of controls, each of which provide access to an automatic menu for an item type.
Controllability
But what about if you only want the bar to display a specific set of item types or you want them in a specific order?
You can customise how the QAB will look for you in User Preferences. Choose which items are to be shown and in which order you wish them to be displayed you even have the option to set whether you want the Quick Access Bar to be shown when WorkBench starts.
Customising your Quick Access Bar
For further information on customising your UI see this previous blog post.
Related Article:
If you need to set these values for everyone in the project, it can be achieved with the Cradle initialisation file.
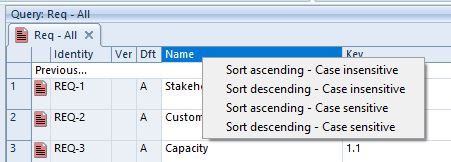
WorkBench can perform column sorting in Table and Documentview styles. This can easily be performed by clicking on a column heading.
Sort Options
Selecting a column heading will display four sort options. When one of these options is chosen the items will be sorted and then displayed based on that selection.
WorkBench Column Sorting
Sortascending – Case insensitive
The first sort option will sort the items from A to Z, based on the item’s value for the selected column. This is done regardless of whether the characters are upper-case or lower-case.
Sort Ascending – Case Insensitive
Sort descending – Case insensitive
For the second sort option the items are returned from Z to A, based on the item’s value for the selected column. Again, as this option is case insensitive the returned items can be upper-case or lower-case.
Sort Descending – Case Insensitive
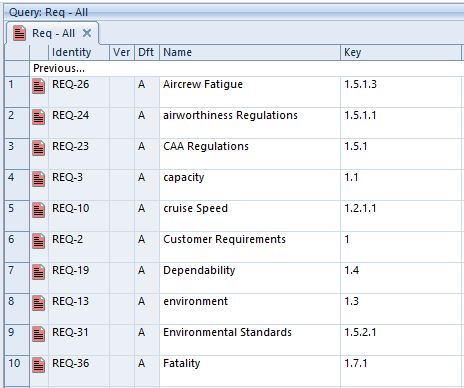
Sortascending – Case sensitive
The third sort option will sort the items from A to Z; but this time all upper-case items are returned first:
Sort Ascending – Case Sensitive
Once there are no more upper-case items the remaining items are then displayed a to z:
Sort Ascending – Case Sensitive
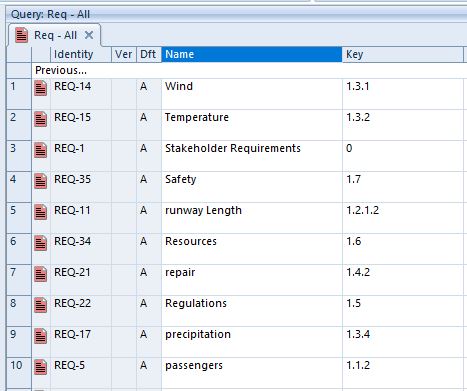
Sort descending – Case sensitive
The final sort option will sort the items from z to a; meaning all lower-case items are shown first:
Sort Descending – Case Sensitive
Once there are no more lower-case items the remaining items are displayed Z – A:
Sort Descending – Case Sensitive
Note:
This sorting only re-arranges the current data brought back in the current query. It does not retrieve new data from the database. In order to retrieve data from the database in a particular order, then one of the database key fields must be selected in the Sort by: field of the query. However, because the sorting occurs on the data in the table it does have the advantage of being able to order the table by frame content or other non key fields.
As a project progresses a requirement can grow from being atomic to containing multiple phrases and components. From an implementation or verification point of view this makes work increasingly difficult. It is necessary to split items like this into smaller parts. Making them into hierarchical items ensures clear and concise elements. However, it would be laborious to cut and paste the individual elements into new items and create the links back to the parent.
The Split utility is an operation available for requirements, system notes and specifications. It splits an item’s text frame into several parts and creates a new item in the database for each of these parts according to a user-selected regular expression as one of:
Newline
1) / 2} / 3.
1.2 / 2-3
a) / b}
i) / iv} / ix.
Item split dialog
Each of the new split items is a copy of the original item and they are cross referenced back to the original item with a specific link type. The frame content of the original item is unaffected by the split. If change history is enabled for the item type an entry is placed in the change history log. Note: The CREATE_ITEM privilege is required to use the split option. The Frame Setup dialog in Project Setup allows you to set the destination item type, destination frame and the link type to be used when linking the split items back to the original item.
The reason you would split an item instead of copying the item, is the split items text frames can be broken down into multiple items.
If you re-split an item using a different link type new items are created.
If you re-split an item using the same link type which would result in fewer items, all existing items are updated and any additional items are deleted.
Lastly if you re-split an item using the same link type which would result in more items, all existing items are updated and any new items are added.
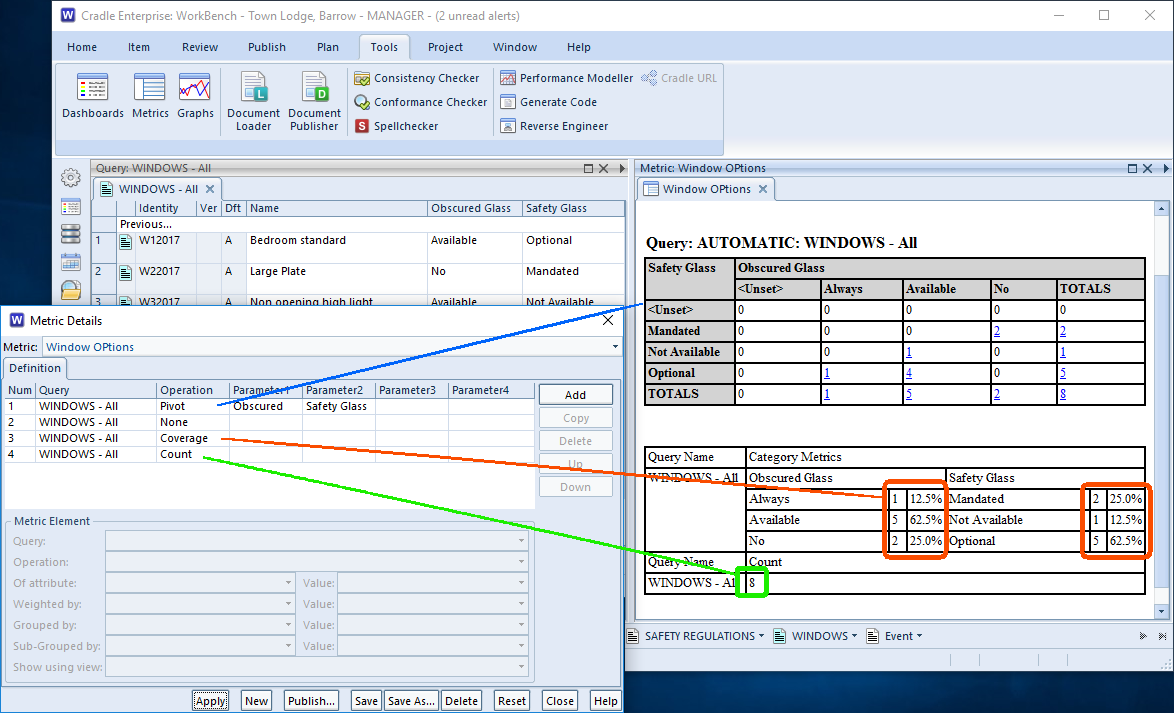
What percentage of our windows are mandated to use safety glass?
With a change in the overall cost for safety glass this may be one of the questions asked at the board level. You may now be tasked to provide some quick data analysis. Cradle provides a metrics module which can provide a range of data analysis options.
In this case, applying the coverage metric to the windows in the database, it can be seen that 25% of the windows in the range mandate safety glass. A further 62.5% have it as an option. Therefore, from a costing point of view, the firm must revisit the pricing of a quarter of their range. Additional work will be needed for those customer or location based offerings.
Simple Metrics – Illustrating quick data analysis
Why windows? We produce biological markers for flu viruses!
For illustration, hopefully this is a simple topic understandable by all. It is an example of quick data analysis. With such a diverse range of customers and industries, it would not be possible to pick a universal example. Metrics that find mean or highest values would not make sense for the above pick-list values, but would be really useful for analysing test results. Read on to discover the full range of metric options in Cradle’s data analysis.
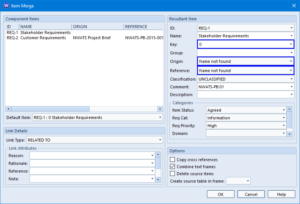
One or more requirements or system notes can be merged into either a new item or an existing item. Merging items combines their frames, concatenating frames that appear in two or more of the source items. Cross references are created between the requirements being merged and the merged result.
You can control the effect on the item’s key, origin, reference and category codes. The merged item can be cross referenced to everything that the sources were, as well as to the sources themselves. The source requirements can be deleted after the merge (if you have read-write access to them) if required.
When multiple items are merged, conflicts arise when their components differ. Fields in the Item Merge dialog with a blue border show conflicts between the selected items. The Options section in this dialog helps define how such conflicts can be resolved.
Item Merge dialog
Click here to see the steps on how to merge your requirements/system notes.
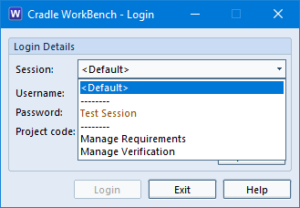
Would you like to save the state of your WorkBench environment so you can restore to this state again?
If you do, try using WorkBench sessions. You can use a session to save the state of your WorkBench environment so you can return to the same point each time you login by choosing the required session from the Login dialog.
What is a Session?
Sessions store information about your WorkBenchenvironment, such as:
Current project
Currently set navigation in the primary WorkBench window
Current window dimensions
Currently opened definitions (only if saved definitions)
Currently set navigation for each query pane
Saving a WorkBench session preserves the size and position of the main screen and which queries are active. Then next time you login to WorkBench you can choose the session to use.
How can I Save WorkBench Sessions?
To save a session select Save or Save As from the WorkBench Window tab. You can then enter a name for the session before confirming.
How can I Restore WorkBench Sessions?
To restore a session select Reload from the Window tab. Once you confirm the session is restored to how it was when you logged in initially.
How to Select a Session on Login
From the Login dialog there is a Session menu. From here you can choose the session you want to use when you login.
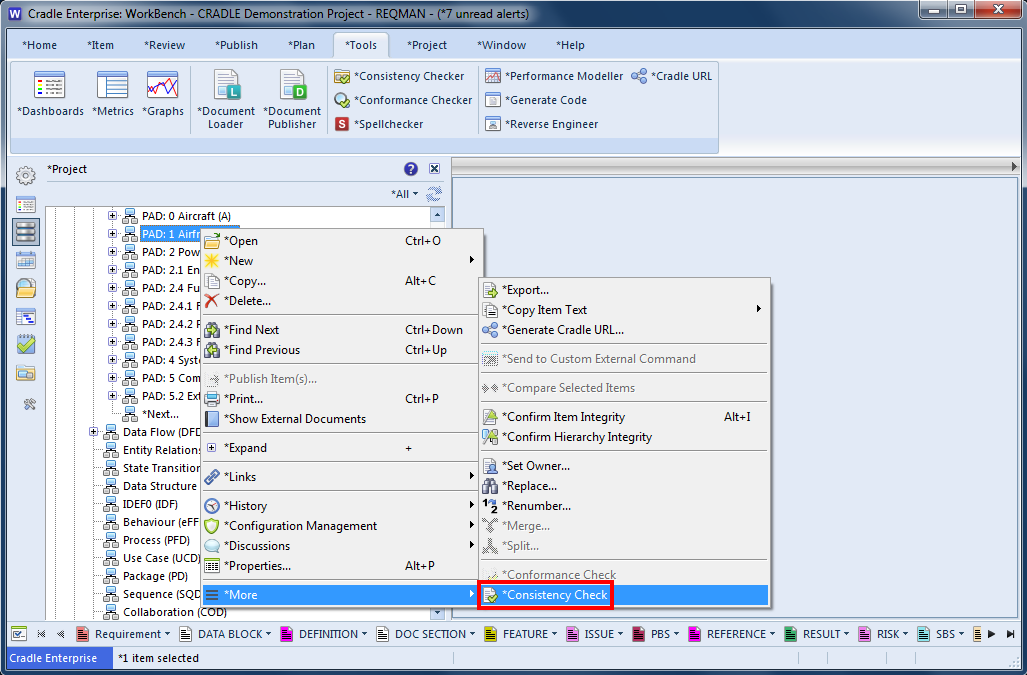
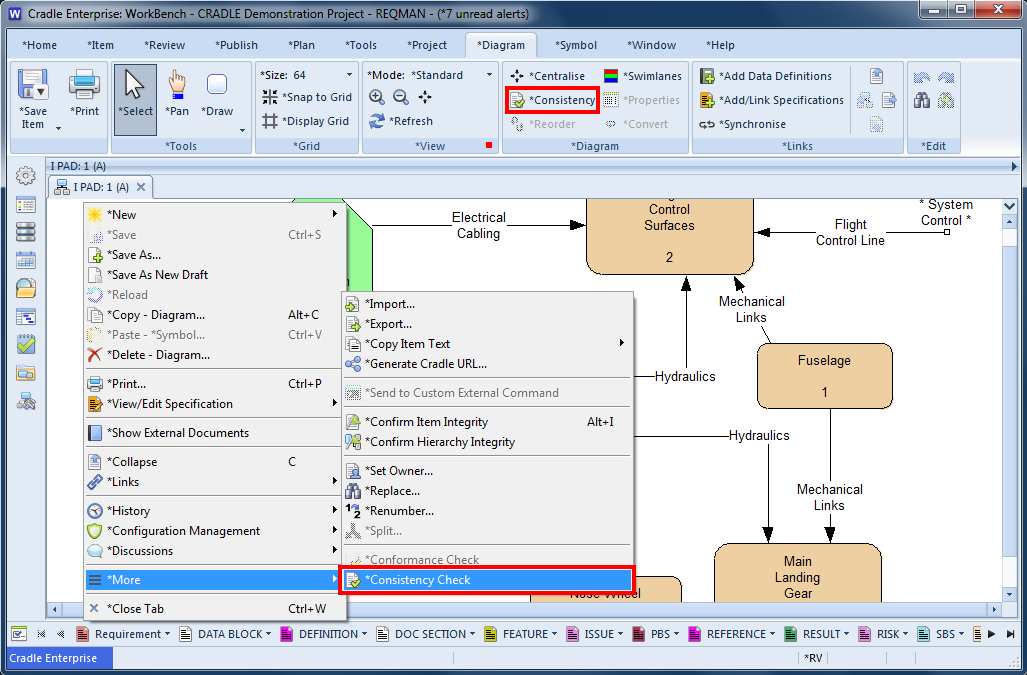
Want to run a Consistency Check on just a single diagram?
Consistency Check from the Project Sidebar
If the user doesn’t wish to open the diagram, to run a consistency check. They can just right-click on a diagram in the Project sidebar tree and select ‘More –> Consistency Check’ from the context menu.
Using the Consistency Checker for a single diagram
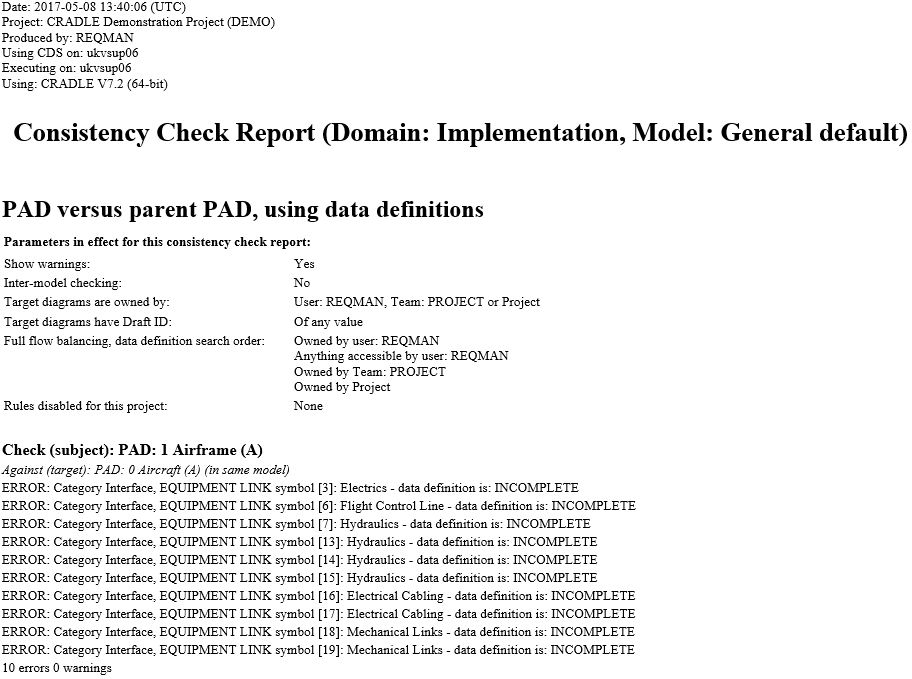
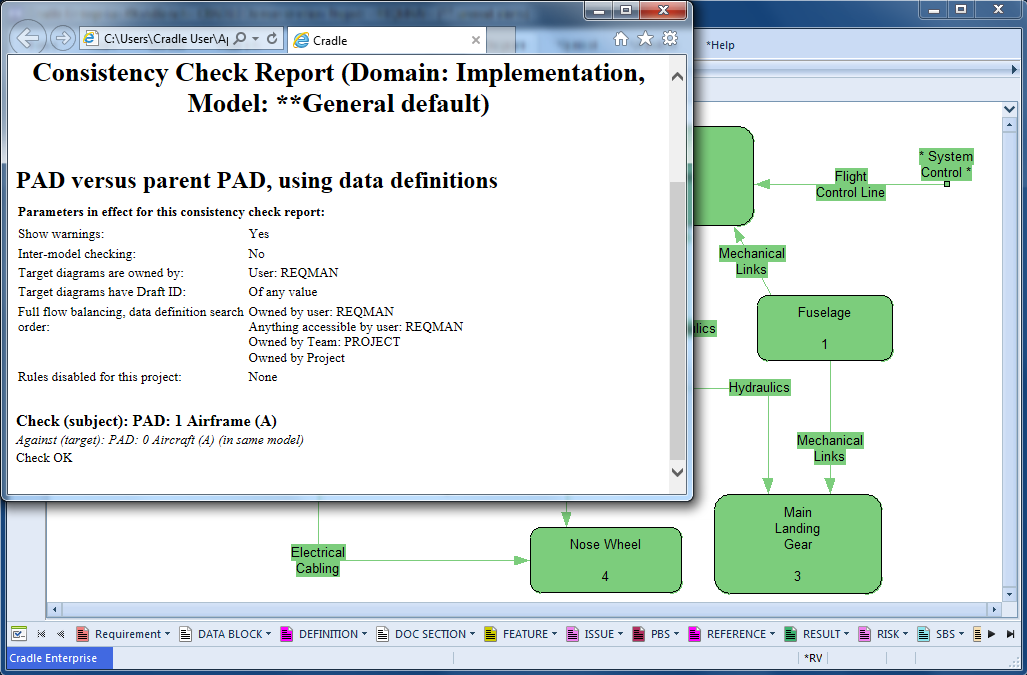
This will bring up a report on the errors and warnings within the diagram; it will not open the diagram:
PAD Consistency Check Report
Check Diagram within a Form
If the user is happy to open the diagram in a form, they can right-click on the diagram and select ‘More –> Consistency Check’ from the context menu. They can also select the Diagram tab and click on the Consistency button.
Single Diagram Consistency Checking from a diagram form
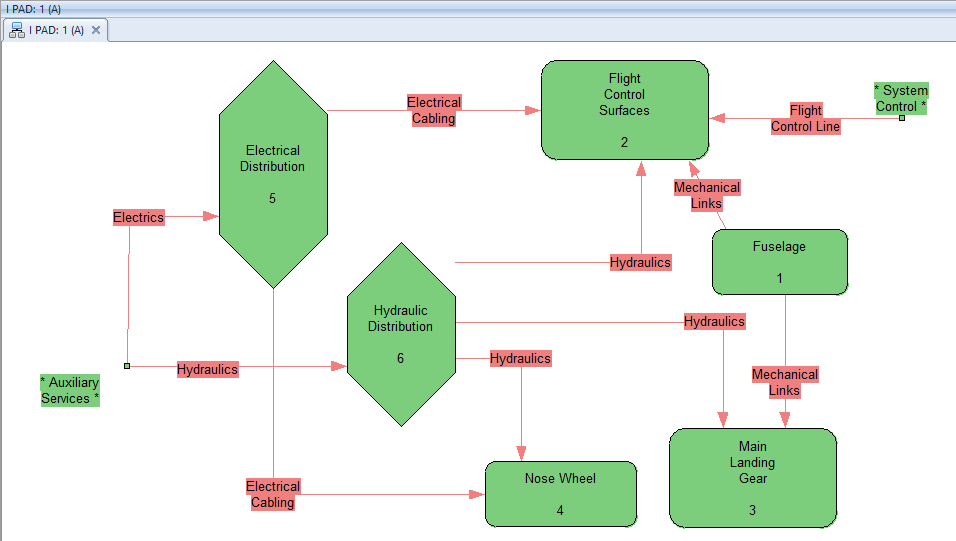
Once the check is done the diagram will show you with the colours red (item has an error) and green (item is fine) in the diagram. A report with the errors within the diagram will now open as well.
Physical Architecture diagram showing the errors
Once you have checked and corrected the errors found, you can then recheck the diagram if you so wish.
Complete Consistency Check of a single diagram in a form
Once the diagram is error free, it will show all symbols as green and the report will not show any errors.
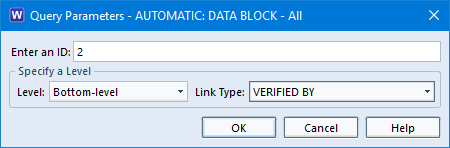
Parametric queries prompt you at runtime for values for certain parameters prior to the query being run. They are supported for Identity, Name, Key, Level and free-format categories (including picklists).
You are prompted for values when the query is run from the following places:
Query Details dialog
Definitions sidebar
Phase tree
As part of a report
When performing an export by query
A start page
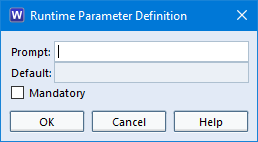
From the Query dialog press the arrow button next to the field you want to set the prompt for and select “Choose at Runtime“. This produces the “Runtime Parameter Definition” dialog where you can setup the parametric query prompt:
Prompt shown when running parametric queries
You can also specify more than one parametric in the query dialog. This can prove very useful in simplifying the interaction in not having to use the full query details window.
When you run a parametric query the prompt will be shown. An example is shown below:
Parametric Query Prompt
Parametric queries are supported in both WorkBench and Web Access.
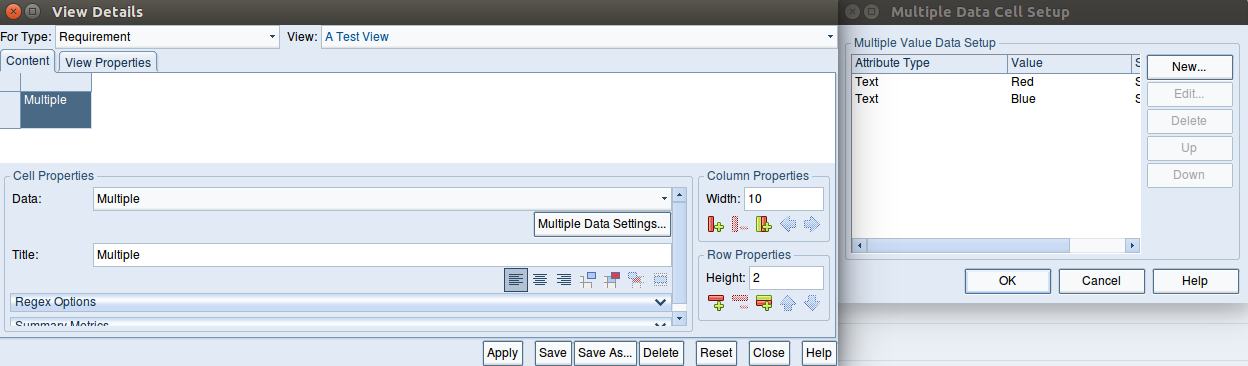
Multiple data cells are a useful way to combine a number of attributes in a single view cell. However, unlike other cells, the contents of Multiple Data cells can’t be copied in the same way. However, copying text from Multiple Data cells is still possible.
Usually, when in the Table or Document view styles, to copy the text contained in a cell you can simply click the cell to make it editable, select the text and use a keyboard shortcut (<ctrl> + C) to copy.
A Multiple Data Cell can use data from different sources. This means all cells of this type are uneditable from within a View. For this reason the method used to copy the contents of the cell is different from a standard Text Frame or Category, for example.
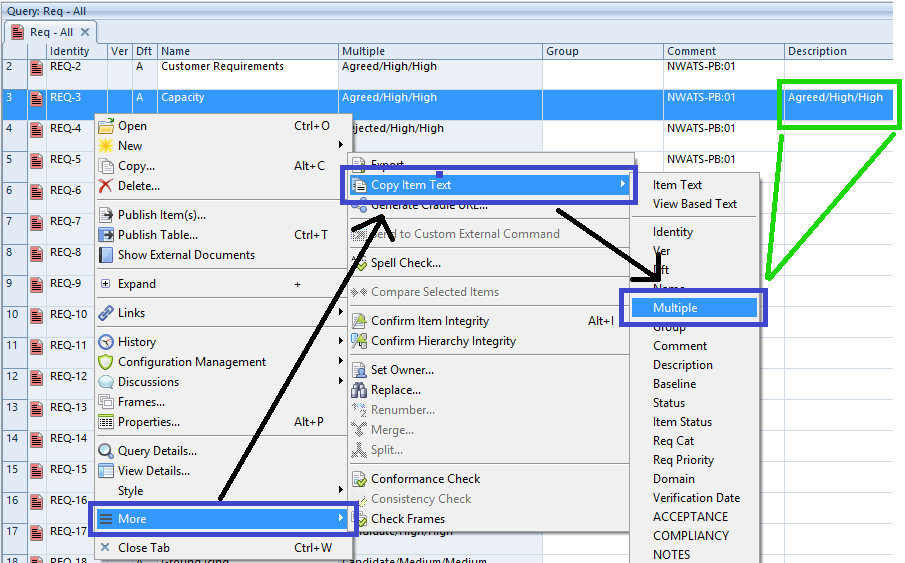
To copy the text contained within a multiple data cell, select the item which has the text you wish to copy and right-click to open the context menu. Once the context menu is open, select More -> Copy Item Text -> Multiple. The contents of the multiple data cell for the selected item will now be in your copy/paste buffer.
Copying text from a multiple data cell in WorkBench
Article Updated 04/02/2019 – Added an image showing the setup of a multiple data cell